Updated June 13, 2023
Introduction to CSS Float Right
Float property of CSS allows the texts and inline elements to wrap around it either on the left or right side of the element. This float property of CSS forces the layout elements to float inside the parent element, along with which other elements wrap around it. This property usually makes the element to float either left, right, none, or inherit. We use the float property in CSS to position an image or any layout element inside a container, allowing inline elements to wrap around it. This property does not intend to design the layout of elements; instead, it focuses on wrapping text around images.
How does CSS Float Right work?
In CSS, the float right property is usually used for specifying the elements that should float, and these elements float around it. To avoid this or to clarify this, we use clear property. Let us see the below syntax for this float right property.
Syntax:
Float: none | left | right | initial | inherit;- none: Where elements do not float.
- left: Elements float to the left side of the container.
- right: Elements float to the right side of the container.
- initial: This sets its value as a default value.
- inherit: It inherits the value from the parent element.
Examples to Implement CSS Float Right
Below is the use of float: right and float: left properties in one single program.
Examples #1
Code:
<!DOCTYPE html>
<html>
<head>
<title> Educba Training </title>
<style>
section {
border: 3px solid black;
width: 80%;
float: left;
}
div {
margin: 7px;
width: 80px;
height: 200px;
}
.left {
float: left;
background: red;
}
.right {
float: right;
background: blue;
}
</style>
</head>
<body>
<h1>The CSS float Property</h1>
<section>
<div class="left">1</div>
<div class="left">2</div>
<div class="right">3</div>
<p> EDUCBA is an online training provider which offers you training programs or courses across any field which you wish to learn and excel on. Here are few features about EDUCBA which will help you to build & enhance your skills: 1700+ courses across 10+ verticals. Professional Training to grow your career. </p>
</section>
</body>
</html>
Output:
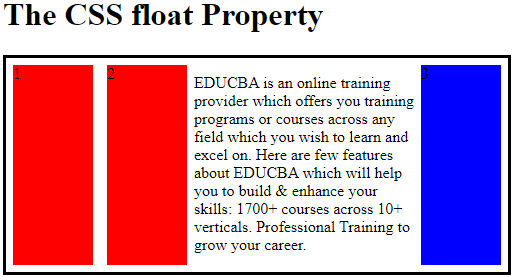
In the above program, we see that we are using both float properties such as float: right, which has the color “blue” and float: left has the color “red” and the text is at the center because there are float elements at both the sides of the element and hence the text is wrapped in it.
Examples #2
Float is a CSS positioning property used for wrapping the texts around images used to create entire web layouts. To clear this float, we have another property called as clear which also takes four different values such as both, left, right, and none. Right
Let us see an example of the float right property for CSS:
Syntax:
float: right;Code:
<!DOCTYPE html>
<html>
<head>
<title> Educba Training </title>
<style>
img {
float: right;
}
</style>
</head>
<body>
<h1>The CSS float Property</h1>
<p>In this example, the image will float to the right in the text, and the text in the paragraph will wrap around the image.</p>
<p><img src="pineapple.jpg" alt="Pineapple" style="width:150px;height:200px;margin-right:18px;">
The pineapple is a tropical plant with an edible fruit, also called a pineapple, and the most economically significant plant in the family Bromeliaceae. The pineapple is indigenous to South America, where it has been cultivated for many centuries. </p>
</body>
</html>
Output:

In the above program, we demonstrate the use of the float: right property. As shown in the screenshot, the text is wrapped around the image on the right side of the element layout.
Examples #3
This clear property is used to clear the floating texts as specified. When applied to any floating element, the bottom part of the margin edge, this property is moved below the margin edge of all relevant floats. This property has four values: right, left, none, and both. Now let us see how we can clear these floating elements using clear properties with examples and syntax.
Syntax:
clear: none | both | right | left;Let us know how to clear the right floating elements of the layout using this clear property.
Code:
<!DOCTYPE html>
<html>
<head>
<title> Educab Training </title>
<style>
.wrapper{
border:3px solid black;
padding:8px;
}
.right {
border: 5px solid black;
clear: right;
}
.black {
float: right;
margin: 0;
background-color: grey;
color: blue;
width:30%;
}
.red {
float: right;
margin: 0;
background-color: pink;
width:20%;
}
p {
width: 50%;
}
</style>
</head>
<body>
<h1>The float Property</h1>
<div class="wrapper">
<p class="black">EDUCBA is an online training provider, teaches you real world skill on everything from Investment Banking to Programming to Project Management to Design & many more.</p>
<p class="red">EDUCBA is a leading global provider of skill based online education. It offers amazing 1700+ courses across 10+ verticals prepared by top notch professionals from the industry which are job oriented skill based programs demanded by the industry. </p>
<p class="right">This paragraph clears right side.</p>
</div>
</body>
</html>
Output:
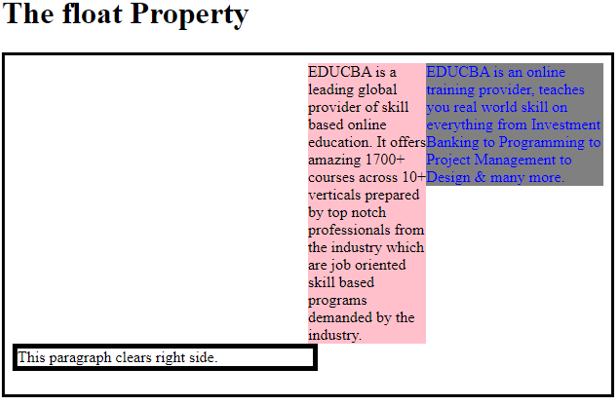
In the above program, we can see that we have cleared the text element to the right side of the element layout.
Examples #4
We use another concept called the clearfix hack when a floating element or image is taller than the container text and overflows outside its container. To avoid this, we can use the clearfix hack, demonstrated below.
Code:
<!DOCTYPE html>
<html>
<head>
<style>
div {
border: 4px solid black;
padding: 5px;
}
.img1
float: right;
}
.clearfix::after {
content: "";
clear: both;
display: table;
}
.img2 {
float: right;
}
</style>
</head>
<body>
<h1>The Clearfix Hack</h1>
<div>
<img class="img1" src="pineapple.jpg" alt="Pineapple" width="170" height="170">
The pineapple is a tropical plant with an edible fruit, also called a pineapple, and the most economically significant plant in the family Bromeliaceae.</div>
<p style="clear:right">Add the clearfix hack to the containing element, to fix this problem:</p>
<div class="clearfix">
<img class="img2" src="pineapple.jpg" alt="Pineapple" width="170" height="170">
The pineapple is a tropical plant with an edible fruit, also called a pineapple, and the most economically significant plant in the family Bromeliaceae.</div>
</body>
</html>
Output:
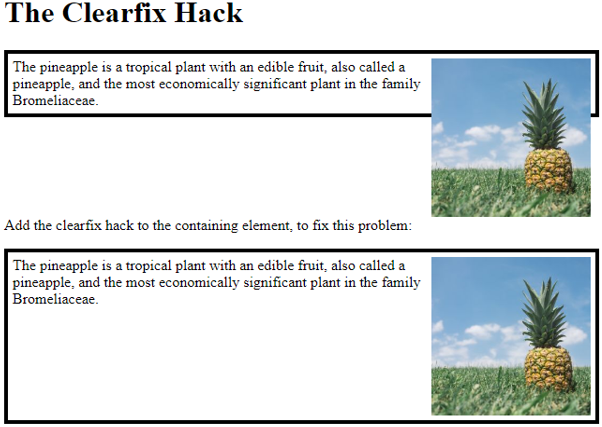
In the above program, we can see that the first image is taller than the text, so to make it fit inside the container, we use “clearfix hack” to clear both floating elements and display them as in the table.
Conclusion
This article concludes that we use the CSS float: right concept to wrap the text around the image on the right side. This float property has different values like left, right, none, initial, and inherit. But we have discussed on the float: right. We also use another property called “clear” to clear these floating elements. It has four different values: none, left, right, and both. Moreover, we utilize a concept called the clearfix hack when an image exceeds the height of the surrounding text, resulting in overflow issues when wrapping the text.
Recommended Articles
We hope that this EDUCBA information on “CSS Float Right” was beneficial to you. You can view EDUCBA’s recommended articles for more information.

