Updated April 10, 2023
Introduction to CentOS NFS
In the Linux environment, we are having multiple file system protocols. The NFS is one of the file system protocols. The NFS stands for the Network File System. It is a very popular protocol in the Linux / CentOS environment. It is having multiple feathers like distributed file system protocol, cross-platform, etc. In the NFS, we are exporting the local file system over the network. Hence, the client will able to share the directories or files over the network and able to interact with it. As per the CentOS version, the NFS version will also be changed. When we are installing or working with the NFS protocol, we need to make sure that we are using the compatible version as per the CentOS version, application, or job perspective.
Syntax of CentOS NFS
As such, there is no specific syntax available for the NFS. As per the requirement or the troubleshooting front, we can use the basic NFS commands. By default, the NFS is not configured in the CentOS environment. We need to configure it manually as per the compatible version of the NFS protocol. Generally, we are configuring or doing the NFS mount point entry in the “/etc/fstab” file.
The sampling method how to edit or configure the /etc/fstab file: vi /etc/fstab
vi /etc/fstab: As per the above method, we can use any text editor like vi, vim, nano to edit the file. Here, we are adding the NFS mount point information.
How CentOS NFS Works?
In the CentOS environment, the NFS file system protocol can also be used in the centralized file system also.
Below is the list of options that are supported by all NFS versions
1. nfsvers=n: It will help to print the NFS protocol version information used to contact the NFS server. If the server will not able to support the necessary version then the mount request will fail. If we haven’t provided the version information then it will consider the NFS version 4.1.
2. vers=n: We are using this option as an alternative to the nfsvers option. It will help for compatibility with other operating systems.
3. soft/hard: After an NFS request time out, this option will help to determine the recovery behavior of the NFS client. If neither option is specified as the hard option, the NFS requests are retried indefinitely. If we are providing the soft option then the NFS client fails an NFS request after retransaction can be sent. It will cause the NFS client to give an error for the calling application.
4. timeo=n: It is pointing to the time value. The time is in deciseconds. It means the tenths of a second. Before retries the NFS Client, the NFS client will wait for a response. If we using the NFS over TCP then the default time value is 600 deciseconds i.e. the 60 seconds. In the linear back-off, the retransmission of the NFS client timeout will increase by time up to the maximum of 600 seconds.
5. retrans=n: This option will help to define the number of retry times for the NFS client retries. If we haven’t provided the retrans option then the NFS client tries each request three times. If still there is no response then the NFS client generates a “server not responding” message after retrans retries.
6. rsize=n: It will help to define the maximum number of bytes in each network READ request that the NFS client can receive. The reading data from a file on an NFS server. The default data payload size of each NFS READ request depends on the smaller or equal size setting. The 1,048,576 bytes is the largest read payload supported by the Linux NFS client
7. acregmin=n: In the network file system protocol, the “acregmin=n” option will help to define the lower time value in the second format. If we will not configure or provide the option then it will network file system client instance will use the 3-second min.
8. acregmax=n: In the network file system protocol, the “acregmin=n” option will help to define the higher time value in the second format. If we will not configure or provide the option then it will network file system client instance will use the 60-second min.
9. acdirmin=n: In the network file system protocol, the “acregmin=n” option will help to define the maximum time value in the second format. If we will not configure or provide the option then it will network file system client instance will use the 30-second min.
10. acdirmax=n: In the network file system protocol, the “acregmin=n” option will help to define the higher time value in the second format. If we will not configure or provide the option then it will network file system client instance will use the 60-second min.
11. actimeo=n: In the action option, we are able to set multiple values like acdirmin, acregmax, acdirmax, acregmin, etc. From the client end, if we will configure the specific option then the network file system client will use the default values.
Examples to understand CentOS NFS
Below are mentioned the examples :
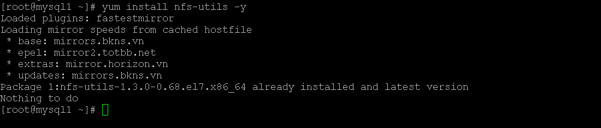
Example #1: Install NFS Packages
In the CentOS environment, we need to install the NFS packages.
Command:
yum install nfs-utils -yExplanation:
As per the above command, we are installing the NFS packages.
Output:
Example #2: Export the NFS Share Directory
In NFS, we need to export the directory. The same directory will use to share the data.
Command:
showmount -e 192.168.56.210Explanation:
As per the above command, we are getting the status of the export directory.
Output:

Example #3: Mount NFS Directory
In the CentOS environment, we need to mount the NFS directory.
Command:
mkdir /nfs_server_share_data
mount -t nfs 192.168.56.210:/nfssharedata /nfs_server_share_data
mount | grep -i NFS
Explanation:
As per the above command, we are mounting the NFS directory and getting the NFS mount status.
Output:


Conclusion
We have seen the uncut concept of the “CentOS NFS” with the proper example, explanation, and command with different outputs. With the help of NFS, we can access the files or directory over the network. There is no platform dependency.
Recommended Articles
This is a guide to CentOS NFS. Here we discuss Introduction, syntax and working along with different examples to understand CentOS NFS. You may also have a look at the following articles to learn more –
