Updated April 19, 2023
Introduction to CentOS add sudo user
In the CentOS environment, the root user is having all the privileges. Some of the system or security-related task, it will not complete unless and until it will not log in with the root user. If we need to provide the same root-level access to a different user then we need to provide the sudo access to the same user. Basically, sudo supports the plugin architecture; it will support the input or output logging and the security-related policies. Third parties like the application or communication can design such type of architecture. It will distribute the own security policy and input or output logging plugin to work smoothly with the front-end sudo user. In the Linux distribution, the sudoers is the default security policy. The same policy can be configured via /etc/sudoers file (It will also be configured via LDAP configuration also). To explore more into it, we need to explore the sudo support information. In this topic, we are going to learn about CentOS add sudo user.
Syntax of CentOS add sudo user
As such, there is no specific syntax available to add the user with sudo privileges. If we need any user with sudo access then there are different ways to achieve it. As per the requirement or application use case, we need to do the same.
Sample method how to edit the file for the sudo access: vi /etc/sudoers
- vi /etc/sudoers: As per the above method, we need to use an editor like vi, vim, nano to edit the file. We need to edit the “sudoers” file. As per the requirement or the access level, we need to add the user with the specific access condition.
How CentOS add sudo user Works?
In the CentOS operating system, the root user is having all the privileges. If any different user what’s the sudo privileges then we can also provide it. There are different methods to provide sudo access.
Below are the lists of options that can be considered while working with the sudo.
- -A, –askpass: From the user terminal, if the sudo requires a password then it will read. If the -A –askpass option is in used then the graphical program will execute to read the user’s password and output the password to the standard output. We can also set the SUDO_ASKPASS environment variable in the system. we can set the path for the askpass helper program
For example, we can set it to “/usr/X11R6/bin/ssh-askpass” (If the no askpass program is available then the sudo will exit with an error message)
- -b, –background: It will help to run the command in the background. Please note: it will not possible to use a shell job. To control the manipulate background processes which are started by sudo user. The number of interactive commands will fail to work properly in background mode.
- -C num, –close-from=num: It will help to close all the file descriptors which are greater than or equal to num before executing a command. It will not permit if the Values are less than three. By default, the sudo will close all open file descriptors other than standard input, standard output, and standard error when executing the command. By default, the security policy will restrict the user’s ability to use this option. The sudoers policy only permits to use of the command with the help of the -C option.
- -E, –preserve-env: This option will indicate the security policy that the user requirement to preserve their existing environment variables. The security policy may get the error message if the login or access user is not having permission to preserve the environment.
- –preserve-env=list: This option will indicate to the security policy that the user requirement to add the comma-separated list of environment variables to those preserved (it will from the user environment). The security policy may get the error message if the login or access user is not having permission to preserve the environment.
- -H, –set-home: It will help to set up the HOME environment variable for the security policy. In the target user’s password database entry, it will also set the home directory specified.
- -h, –help: It will print the short help information to the standard output. It will automatically exit.
- -g group, –group=group: It will help to run the command with the primary group. In the target user’s password database entry, it will set to group instead of the primary group.
Examples to understand CentOS add sudo user
Here are the following examples mention below
1. CentOS add sudo user: Grant the Sudo Access to Normal User
In the CentOS environment, we are able to provide sudo access to the normal user. As we have discussed earlier, there are different methods to do that. Here, we are using the group modification method.
Command :
usermod -aG wheel user1
Explanation :
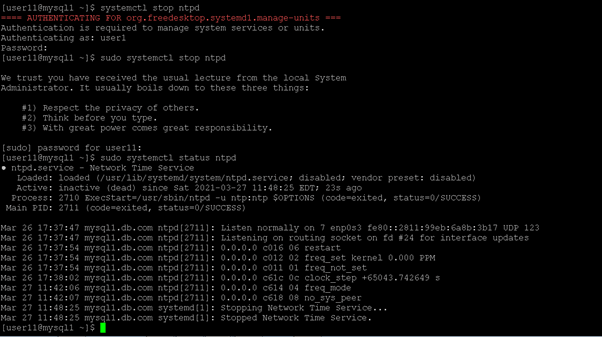
As per the above command, we are modifying the group for the “user1” user. In screenshot 1 (a), we are not able to run the “systemctl” command because we need sudo access. Once, we have added the user to the wheel group. The user1 will get the sudo access and the ability to run the command (please refer to screenshot 1 (b)).
Output :

Screenshot 1 (a)

Screenshot 1 (b)
2. CentOS add sudo user: Allow sudo access to the normal user
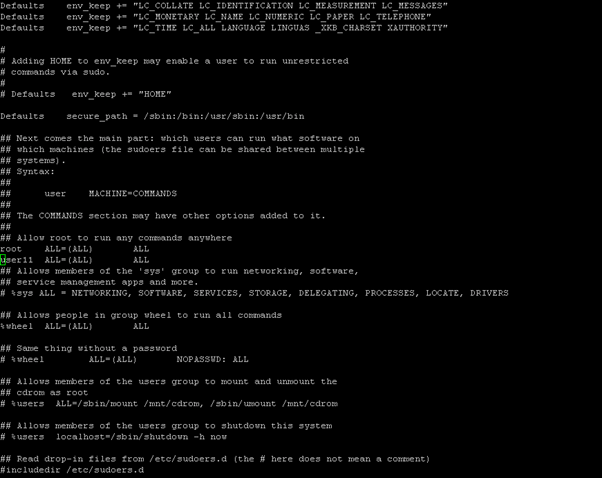
In the CentOS environment, we can provide sudo access to normal user via editing the “sudoers” file
Command:
vi /etc/sudoers
Explanation :
As per the above command, we are doing changes in the “sudoers” file. We need to add the user name to which we need to provide the sudo access. Here, we are providing sudo access to the “user11” user.
Output :
Screenshot 2 (a)
Screenshot 2 (b)
Conclusion
We have seen the uncut concept of the “CentOS add sudo user” with the proper example, explanation, and command with different outputs. By default, there are multiple ways to provide sudo access to the normal user. As per the requirement or need, we need to choose any method which is applicable.
Recommended Articles
This is a guide to CentOS add sudo user. Here we discuss the uncut concept of CentOS add sudo user along with the example and command. You may also have a look at the following articles to learn more –
