Updated June 21, 2023
Introduction to Autodesk Uninstall Tool
During the installation of Autodesk, many additional components are required by personnel as additional plugins for their work. Post-work completion, it was a hassle to remove these additional products using the standard add/remove programs through the control panel. Thus, to leverage user experience and ease down the user’s steps, Autodesk came up with a unique yet interesting idea of having an uninstallation tool that provides the choice to uninstall all the components for the complete Autodesk suite. This Autodesk uninstalls tool is crucial if the installation fails for any reason and the user wants a clean installation.
The uninstallation tool removes relevant details from the registry and reduces the chances of after-installation issues that may occur because of the partial installation’s failure. Since the uninstallation tool allows the uninstallation of multiple software simultaneously, it is more efficient than the standard uninstallation steps using the default control panel of the system. The next section will describe the steps to remove programs from the uninstallation tool, followed by some tips and tricks.
Steps to Remove the Program Using Autodesk Uninstall Tool
The uninstallation process would be slightly different depending upon the type of operating used to install Autodesk products but generally controlled by the Control panel. Installing the Uninstall tool will help to remove all products at once –
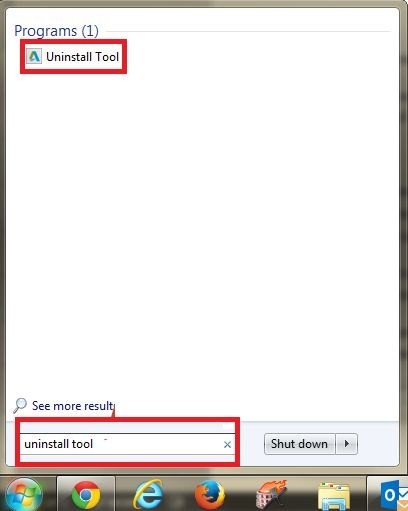
Step 1: Open Start Menu and Search “Uninstall Tool”
If the tool is unavailable, the uninstallation tool can be downloaded from – Link: https://viewer.autodesk.com/.
Step 2 – Click and Open Uninstall tool
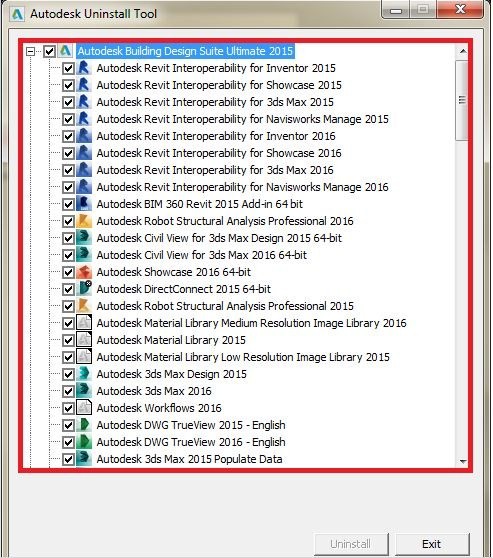
It will display all the components of the suite installed during the installation of Autodesk. The choice of uninstallation lies with the user, and you may deselect any components in case you don’t want to uninstall them.
Step 3 – Click Uninstall to remove software that is no more needed
This will remove all the selected components from the user’s system.
Tips and Tricks for Using Autodesk Uninstall Tool
We can use various tips and tricks to use the Autodesk Uninstall tool efficiently.
Tip 1 – If installation fails by a system crash or any other means, use Autodesk uninstall tool or clean install before a new installation. Clean machines are generally positive as they remove unnecessary residuals from the system.
Tip 2 – Clean installation refers to the execution of three steps without any troubles –
- The installation runs without error
- The product starts and licenses properly
- Product runs
Tip 3 – What stops the installation
- Competing programs/access: Usually antivirus, malware, permissions, BIM 360.
- Prerequisites: Unavailability of Microsoft Visual C++ redistributables, Microsoft .net framework.
- Installation files and folders: Autodesk’s previous versions shared the folder destination, the presence of 3rd party plugins, object enablers, user profiles, and folders.
- Registry keys: Residual registry keys.
Tip 4 – Before reinstallation of software, always reboot the system.
Tip 5 – Always disable the antivirus before installation; the steps are as follows –
- Open the Task Manager and On the Processes tab.
- Select the processes for the antivirus programs.
- Then click “End Process.”
Tip 6 – Always remove an older Autodesk release using Autodesk’s dedicated uninstallation tool before installing a new release.
Tip 7 – Before reinstallation, delete all the files of the Windows temp folder. Make sure you do not delete the temp folder by itself.
Tip 8 – Always maintain a backup for existing files and configurations.
Tip 9 – During uninstallation using the Autodesk uninstall tool, the green tick will show the products removed, and the blinking arrow will indicate the current program being removed.
Tip 10 – Autodesk uninstall tool does not remove the third-party add-ins example CTC BIM Project suite, and these need to be removed through the Windows control panel.
Conclusion
To conclude, Autodesk has created Uninstall tool that can be installed separately to remove components from the user’s machine. It is more efficient and time-saving than the default uninstallation process through the control panel. It can uninstall or allow us to uninstall multiple software simultaneously from the Autodesk suite, which is hassle-free.
The entire process takes approximately 10 minutes to remove unnecessary components and can even remove that software that is not removed after uninstalling them from the Windows operating system’s control panel. The earlier default process through the control panel was time-taking and left certain residues in the registry, increasing the chances of issues in software run post-installation.
Recommended Articles
This has been a guide to Autodesk Uninstall Tool. Here we have discussed how to uninstall software or component through the Autodesk uninstall tool. You may also look at the following articles to learn more –
