Updated March 16, 2023
What is AngularJS?
AngularJS is one of the most popular JavaScript-based web frameworks used in front end development. In addition, it is used in the development of Single Page Applications (SPAs). AngularJS is an open-source framework that is mainly maintained by Google and by a community of individuals involved in resolving problems faced in single page application development. In this topic, we are going to learn about AngularJS Directives.
AngularJS is nothing but it extends the existing HTML; It is added in HTML page with <script> tag. AngularJS makes the HTML site more responsive to user actions by adding additional attributes easily. The latest stable version of AngularJS is 1.6.x as of now.
Directives of AngularJS
AngularJS is an efficient framework that supports Model-View-Controller (MVC) based architecture. In addition, it provides core features such as two-way data binding, Controller, Services, Directives, Templates, Router, Filters, Dependency Injection, etc. These all are the main features that work collaboratively to make AngularJS efficient.
The directive is one of the very useful features in AngularJS. It extends the existing HTML and easily develops web pages with new behaviour using core JavaScript. Furthermore, it allows us to write our own custom tags and map them into existing HTML. This functionality gives more freedom and allows developers great flexibility in creating and using custom elements in web applications accordingly. Also, they can design their own directives too. This article will mainly focus on AngularJS Directives and try to gain knowledge of this core feature.
Directives are nothing but markers on DOM elements in HTML such as attribute name, element name, CSS class or comment. The compiler of AngularJS then attaches the specified behaviour to that element. Each directive has a name and starts with ‘ng-’. Each directive can decide where it can be used in DOM elements. There are some existing directives that are already available in AngularJS, and similarly, we can define them on our own.
We will have a look at three main in-built directives, which divide the AngularJS framework into three major parts.
1. ng-app: This directive tells the compiler that this is the AngularJS application. The directive where it is defined in DOM becomes the root element of the application.
Code:
<!DOCTYPE html>
<html>
<script src="https://ajax.googleapis.com/ajax/libs/angularjs/1.6.9/angular.min.js"> </script>
<body>
<div ng-app = "">
<! -- main code -->
</div>
</body>
</html>
AngularJS is available as JavaScript file and is added into HTML using <script> tag. The ng-app at <div> element tells AngularJS that div is the root element and owner of the AngularJS application. AngularJS application starts from that element, and whatever is AngularJS code is written inside of it.
2. ng-model: This directive binds the value from the web page, mostly from the input field, to the application variable. Basically, this directive allows sending data from input to AngularJS application which can be used somewhere else.
Code:
<body>
<div ng-app = "">
<p> Enter: <input type="text" ng-model = "input"> </p>
</div>
</body>
Output:
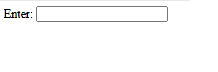
The ng-model directive binds the input value to the application variable named “input”. We will then see how we can display the same value on the web page in the next example.
3. ng-bind: This directive binds the value from the AngularJS application to the web page. i.e. It allows forwarding data from the application to HTML tags.
Code:
<body>
<div ng-app = "">
<p> Enter: <input type="text" ng-model = "input"> </p>
<p ng-bind = "input"> </p>
</div>
</body>
Output:
The data we captured using the “ng-model” directive in the application variable “input” is bound to tag element <p> using “ng-bind”. We can run this application now and see how dynamically AngularJS updates the entered value on the page.
Along with these, there are some other directives available in AngularJS, which are important.
4. ng-repeat: This directive repeats an HTML element and is used on an array of objects. This directive is very useful in scenarios like displaying table elements on a web page.
5. ng-init: This directive is used to initialize the values for the AngularJS application before it loads a web page.
Creating New Directives
We can create our own custom directives along with the existing available AngularJS directives. It is very easy to create new directives by using only JavaScript. New directives are created by using the “. directive” function. E.g.
<body ng-app = "appName">
<custom-Directive> </custom-Directive>
<script>
var app = angular.module("appName", []);
app.directive("customDirective", function() {
return {
template : "<h1> Welcome to AngularJS Directives..! </h1>"
};
});
</script>
</body>
Angular.module is an AngularJS function that creates a module. We have created a custom directive named custom directive for which function is written. Whenever we use this directive on our web page, this function will get executed. In this case, it is a returning template that contains HTML code.
While naming directive, we need to use the camel case naming convention, and while invoking it, we need to use “-” separated naming convention.
There are 4 ways by which we can invoke directives
1. Element name
As used in the last example:
<custom-Directive> </custom-Directive>2. Attribute
<div custom-Directive> </div>3. Class
<div class="custom-Directive"> </div>To invoke directive by using the class name, we must add restrict property with the value ‘C’ while defining it.
app.directive("customDirective", function() {
return {
restrict : "C",
template : "<h1> Welcome to AngularJS Directives..! </h1>"
};
});
4. Comment
<! -- directive: custom-Directive -->To invoke a directive by using a comment, we must add restrict property with the value ‘M’ while defining it.
app.directive("customDirective", function() {
return {
restrict : "M",
replace: true,
template : " <h1> Welcome to AngularJS Directives..! </h1> "
};
});
The replace property: true is mandatory, and it will replace the original comment with a directive; otherwise, the comment would be invisible.
Conclusion
So, it is a very powerful feature available in AngularJS. The directive allows us to introduce new syntax, are like markers, and attach special behaviour to them. There are available directives in AngularJS, which are very useful; we can also define our own custom directives and use them. Custom directives allow developers great flexibility and freedom. Directives add new functionality into existing HTML with innovative style and features.
Recommended Articles
We hope that this EDUCBA information on “AngularJS Directives” was beneficial to you. You can view EDUCBA’s recommended articles for more information.
