Updated June 28, 2023
Introduction to AngularJS Validation
AngularJS offers client-side form validation. We use AngularJS as a frontend framework that is very scalable and easy to code and developed our single-page angular web application. The AngularJS validation also provides us with more exciting features like form validation, which only validates the user input to the client side without sending it to the backend server for validation. Also, it reduces our backend code and complexity for code maintenance. In angular, we have form validation, and we can also create custom validation as well.
States of AngularJS Validation
AngularJS provides us with form validation to check user input data. This serves as a client-side validation before submitting the data to the server. AngularJS keeps track of all the input fields we provide users to enter their data; it can be anything like selecting from the drop-down, input field, text area, etc. If we modify the user field, it keeps notifying the user about the current validation status; it also keeps track of files that are modified, have been touched, or not.
So in angular js, we have divided the states into two parts. They are specific to form and fields.
1. Input Filed State
As we input different fields into the form, they possess varying states, outlined below. Each of these fields has a Boolean value of either true or false:
- $dirty: This state shows whether the file is modified or not.
- $untouched: This state shows whether the current form filed is touched.
- $valid: This file holds significance as it showcases that the input data we have provided complies with the requested input.
- $touched: It is used to show the field is touched.
- $invalid: This file shows that the input we have provided is invalid according to the input we have asked to enter.
- $pristine: This indicates that we have not done anything on the filed yet means has not been modified by the user.
2. Form State
The form state is as follows now all the states will apply for whole form fields, not for specific one or two:
- $valid: Apply to the entire form that shows fields are valid.
- $dirty: Used to show whether more than one field is modified or not.
- $submitted: This state shows that the form is submitted.
- $pristine: Apply to the whole form to show more than one file has not been modified yet.
- $invalid: This indicates that the form fields are invalid corresponding to the input asked to enter.
Similarly, all these form states also have Boolean values, true or false. We can use these states to show some messages to the user, error messages, or success messages.
Following is an example to show validation:
Code:
<!DOCTYPE html>
<html>
<script src="https://ajax.googleapis.com/ajax/libs/angularjs/1.6.9/angular.min.js"></script>
<body ng-app="">
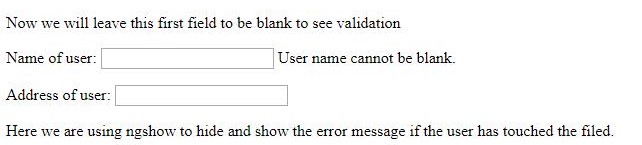
<p>Now we will leave this first field to be blank to see validation</p>
<form name="myForm">
<p>Name of user:
<input name="myName1" ng-model="myName1" required>
<span ng-show="myForm.myName1.$touched && myForm.myName1.$invalid">User name cannot be blank.</span>
</p>
<p>Address of user:
<input name="myAddress1" ng-model="myAddress1" required>
</p>
</form>
<p>Here we are using ngshow to hide and show the error message if the user has touched the filed.
</p>
</body>
</html>Output:
Examples of AngularJS Validation
Fields can easily ensure validity by applying built-in validation options such as email and required in Angular.
Example #1
Email Validation.
If we have user input that contains the user’s email, we need to verify the input data so we can directly make this field a type of email. It is a feature of HTML5. Below is one example to show how to use this.
Code:
<!DOCTYPE html>
<html>
<script src="https://ajax.googleapis.com/ajax/libs/angularjs/1.6.9/angular.min.js"></script>
<body ng-app="">
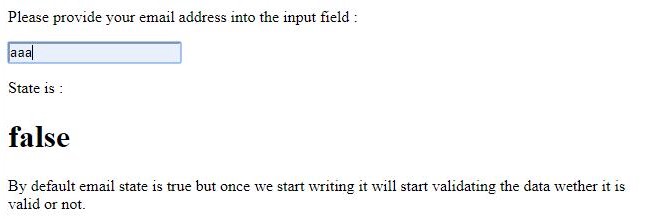
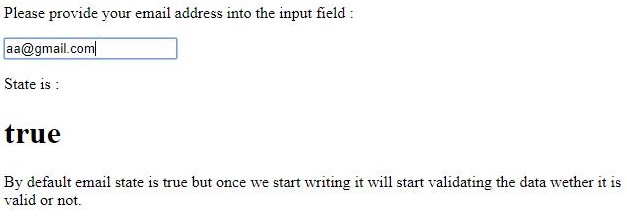
<p>Please provide your email address into the input field :</p>
<form name="myForm1">
<input type="email" name="myInput" ng-model="myInput">
</form>
<p>State is :</p>
<h1>{{myForm1.myInput.$valid}}</h1>
<p>By default email state is true but once we start writing it will start validating the data whether it is valid or not.</p>
</body>
</html>Output:
When we provide the correct email format, it will show the below output:
Example #2
Required Validation.
This is also an HTML5 feature that makes the filed as required. Below is a simple example to show how to use this.
Code:
<!DOCTYPE html>
<html>
<script src="https://ajax.googleapis.com/ajax/libs/angularjs/1.6.9/angular.min.js"></script>
<body ng-app="">
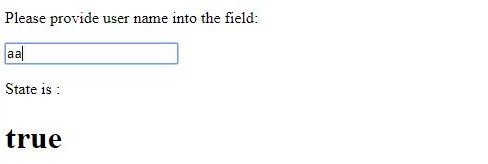
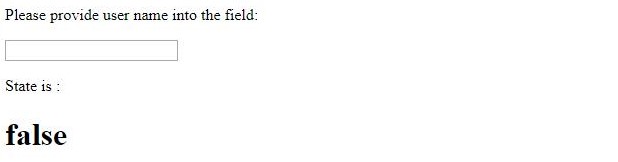
<p>Please provide user name into the field:</p>
<form name="myForm1">
<input name="myInput1" ng-model="myInput1" required>
</form>
<p>State is :</p>
<h1>{{myForm1.myInput1.$valid}}</h1>
</body>
</html>Output:
When the input field remains empty, it will show the below output:
We can also have custom validation, which means we can build our own validation according to the requirement. But that is not easy; we must make many things that make the code tricky to understand. We need to add a new directive to our application as follows.
Example #3
Custom Validation.
Code:
<!DOCTYPE html>
<html>
<script src="https://ajax.googleapis.com/ajax/libs/angularjs/1.6.9/angular.min.js"></script>
<body ng-app="myApp">
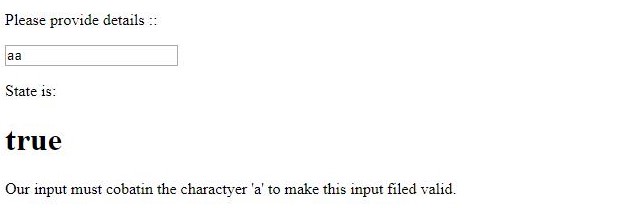
<p>Please provide details ::</p>
<form name="myForm">
<input name="myInput" ng-model="myInput" required my-directive1>
</form>
<p>State is:</p>
<h1>{{myForm.myInput.$valid}}</h1>
<script>
var app = angular.module('myApp', []);
app.directive('myDirective1', function() {
return {
require: 'ngModel',
link: function(scope, element, attr, mCtrl) {
function myValidation1(value) {
if (value.indexOf("a") > -1) {
mCtrl.$setValidity('charE', true);
} else {
mCtrl.$setValidity('charE', false);
}
return value;
}
mCtrl.$parsers.push(myValidation1);
}
};
});
</script>
<p>Our input must contain the character 'a' to make this input filed valid.</p>
</body>
</html>Output:
Here we are adding a new directive named mydirective1. The directive should follow the camel case naming convention. When calling the directive, it should be separated by a hyphen (‘-‘). Furthermore, an object is being returned to ngModel. Now we will make one function that takes argument according to requirement, and here mCTRL1 is the ngModelCotroller. Now test the input by providing some value wrong and right it will return true or false based on the value passed.
Conclusion
So AngularJS validation provides client-side validation before submitting it to the back end. So it reduces some backend calls to improve performance. Also, we can create custom validations by creating a directive in AngularJS, linking them with the controller, and providing logic in functions.
Recommended Articles
This is a guide to AngularJS Validation. Here we discuss the introduction and states of AngularJS validation, examples, and code implementation. You may also look at the following articles to learn more –
