Updated March 27, 2023
Introduction to PowerShell Scripts
In this article, we will learn about Useful PowerShell Scripts. For any user or administrator, there are certain tasks that need to be performed daily. There are also tasks that are simpler to do and can be done without human intervention. To save time for the users, the tasks can be automated with the help of PowerShell scripts. The tasks can be anything from downloading a file from a location, fetching the details of a computer, deleting files that are older than a certain day, rebooting a system at an hour. Once the script is ready, it can be run manually or even can be run using a task scheduler.
For example: To free up space in a drive, we can write a PowerShell script to delete files that are older than 90 days and schedule a task that will run daily at a time so that an adequate amount of space on the driver is maintained.
Examples of Useful PowerShell Scripts
Below we explain examples of how PowerShell Scripts are used:
Script to Fetch Information Related to System
The following script is used to fetch important and basic information related to systems such as the model of the system, the available disk space, the BIOS information, processors configuration, memory details, Operating System details, the list of users and owners of the system, current user session and the status of the various running processes and various hotfixes that are installed.
Example #1
Code:
Write-Host "Welcome to the script of fetching computer Information"

Write-host "The BIOS Details are as follows"

Get-CimInstance -ClassName Win32_BIOS
Output:
Example #2
Code:
Write-Host "The systems processor is"

Get-CimInstance -ClassName Win32_ComputerSystem | Select-Object -Property SystemType
Output:
Example #3
Code:
Write-Host "The computer Manufacture and physical memory details are as follows"

Get-CimInstance -ClassName Win32_ComputerSystem
Output:
Example #4
Code:
Write-Host "The installed hotfixes are"

Get-CimInstance -ClassName Win32_QuickFixEngineering
Output:
Example #5
Code:
Write-Host "The OS details are below"

Get-CimInstance -ClassName Win32_OperatingSystem | Select-Object -Property Build*,OSType,ServicePack*
Output:
Example #6
Code:
Write-Host "The following are the users and the owners"

Get-CimInstance -ClassName Win32_OperatingSystem | Select-Object -Property *user*
Output:
Example #7
Code:
Write-Host "The disk space details are as follows"

Get-CimInstance -ClassName Win32_LogicalDisk -Filter "DriveType=3" |Measure-Object -Property FreeSpace,Size -Sum |Select-Object -Property Property,Sum
Output:
Example #8
Code:
Write-Host "Current user logged in to the system"

Get-CimInstance -ClassName Win32_ComputerSystem -Property UserName
Output:
Example #9
Code:
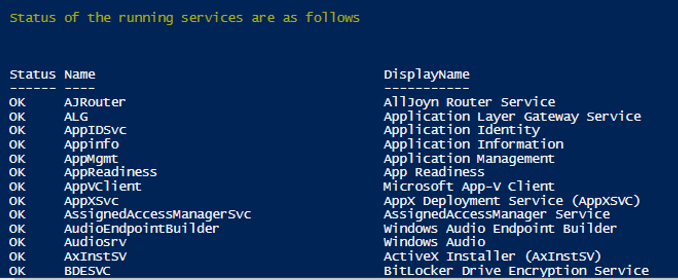
Write-Host "Status of the running services are as follows"

Get-CimInstance -ClassName Win32_Service | Format-Table -Property Status,Name,DisplayName -AutoSize -Wrap
Output:
Examples to Implement in PowerShell Scripts
The examples to be implemented in PowerShell Scripts are explained below:
Example #1: Adding Users to AD
The following script will add each user present in a CSV to the AD. The CSV will have all the user-related properties that need the script to create a user in AD. In case of an error, the script will log the error details in a text file. After successful creation, a message will appear in the console saying that the user has been created in Active Directory. The first line is used to import the csv document and loop through each record. The subsequent lines are used to assign the records values to the user’s attributes in the AD. The last line is used to add the user to an Active Directory group. The code is enclosed in a try-catch block to catch any exception if any error occurs it is printed on the console using the catch statement.
Code:
try

{

Import-Csv “C:\test\test.csv” | ForEach-Object {

$Name = $_.Name + “test.com”

New-ADUser `

-DisplayName $_.”Dname” `

-Name $_.”Name” `

-GivenName $_.”GName” `

-Surname $_.”Sname” `

-SamAccountName $_.”Name” `

-UserPrincipalName $UPName `

-Office $_.”off” `

-EmailAddress $_.”EAddress” `

-Description $_.”Desc” `

-AccountPassword (ConvertTo-SecureString “vig@123” -AsPlainText -force) `

-ChangePasswordAtLogon $true `

-Enabled $true `

Add-ADGroupMember “OrgUsers” $_.”Name”;

Write-Host "User created and added in the AD group"

}

}

catch

{

$msge=$_.Exception.Message

Write-Host "Exception is" $msge

}
Sample Input of the CSV file:
| Name | Dname | GName | Sname | UPName | off | EAddress | Desc |
| test1 | test1 | test1 | test1 | test1 | test | [email protected] | test1 |
| test2 | test2 | test2 | test2 | test2 | test2 | [email protected] | test2 |
| test3 | test3 | test3 | test3 | test3 | test3 | [email protected] | test3 |
| test4 | test4 | test4 | test4 | test4 | test4 | [email protected] | test4 |
| test5 | test5 | test5 | test5 | test5 | test5 | [email protected] | test5 |
Example #2: Delete Files Older than 30 Days from A Path
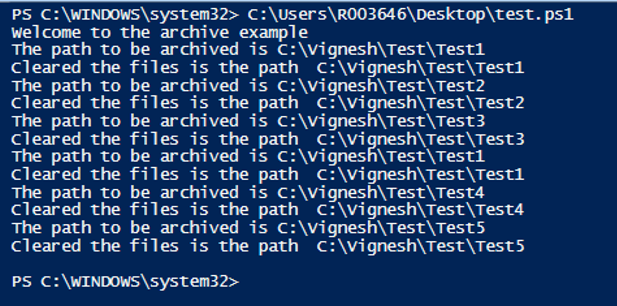
The following script is used to delete files that are created 30 days or more from the current date. The path to be checked for files are mentioned in a csv. First, the csv file is imported. Then, for each path, the files that are older than 30 days are checked and deleted.
Code:
Write-Host "Welcome to the archive example"

$csv = Import-Csv "C:\Vignesh\test.csv"

foreach($row in $csv)

{

$Path=$row.Path

write-host "The path to be archived is" $row.Path

$DaysTOBeArchived = "-30"

$CurrentDate = Get-Date

$DatetoBeDeleted = $CurrentDate.AddDays($DaysTOBeArchived)

Get-ChildItem $Path -Recurse  | Where-Object { $_.CreationTime  -lt $DatetoBeDeleted } | Remove-Item

Write-Host "Cleared the files is the path "$row.path

}
Sample Input:
Path
C:\Vignesh\Test\Test1

C:\Vignesh\Test\Test2

C:\Vignesh\Test\Test3

C:\Vignesh\Test\Test1

C:\Vignesh\Test\Test4

C:\Vignesh\Test\Test5
Output:
Example #3: Send an Email if The Disk Space Is Less than 5%
The following example will send an automated mail when the disk space is less than 5%.
Code:
$cname="Mycomputer"

ForEach ($c in $cname)

{

$disk=Get-WmiObject win32_logicaldisk -ComputerName $c -Filter "Drivetype=3" -ErrorAction SilentlyContinue | Where-Object {($_.freespace/$_.size) -le '0.05'}

If ($disk)

{

$EmailToAdd = "[email protected]"

$EmailFromAdd = "[email protected]"

$userdet = 'testuser'

$passworddet = "testpwd"

$Subjectdet = "Disk space alert"

$Bodydet = "low space in the system"

$SMTPServerdet = "testswer"

$SMTPMessagedet = New-Object System.Net.Mail.MailMessage($EmailFromAdd,$EmailToAdd,$Subjectdet,$Bodydet)

$SMTPClientdet = New-Object Net.Mail.SmtpClient($SMTPServerdet, 587)

$ SMTPClientdet.EnableSsl = $true

$ SMTPClientdet.Credentials = New-Object System.Net.NetworkCredential($userdet, $passworddet)

$ SMTPClientdet.Send($SMTPMessagedet)

}

}
Running a Script via Task Scheduler
The above script can be run daily without user intervention by creating a task. That task will run the script at a specified time daily. The advantage with this approach is that there can’t be the risk of missing the running of the script and it saves the users time. Following are the steps to run a ps script via task scheduler
- Open task scheduler and create a task
- In the trigger tab, set when this task needs to be run and the frequency of the job like whether it should be run daily or hourly and the time at which it needs to be run
- In the action tab, specify the file location
- Finally, click on OK.
Conclusion
Thus, the article covered various useful scripts that can be used to automate the tasks performed. The advantage of the scripts is that they reduce human effort and the need for monitoring. It also showed how a script can be run using a task scheduler. Scripts can also be used to send emails or alerts to the user whenever an issue occurs. To get expertise with scripts, it is advisable to write sample programs and practice them.
Recommended Articles
This is a guide to Useful PowerShell Scripts. Here we discuss various useful scripts, examples to implement with appropriate codes and outputs and using a task scheduler. You can also go through our other related articles to learn more –


