Updated April 10, 2023
Introduction to Tkinter input box
The Tkinter input box is also known as the Entry widget box is the kind of element the user will give the input through Entry boxes. These boxes are one of the basic widgets used to get user inputs. It may be any of the formats like text strings and numbers and it allows the single-line text to the applications even though if the input is number it will display it in the single line else the string type inputs will be longer formats means the contents available to display in the screen using the scrolled option.
Syntax
The Tkinter most powerful GUI based widget it has mostly used in the basic UI elements in the application, as well as some type of application, needs advanced library methods in the python programming language. It has n number of methods it has been used across globally it includes the images, animations, videos, and even some scientific applications are created using these type of UI widgets.
Hence Entry() is one of the basic default methods it can be used to directly enter the user inputs on the application depends upon the specific requirement. The widget and these functions will be called wherever it needs on the other project areas. It has its own syntax and default parameters.
from tkinter import * //import all the library of the tkinter module
import tkinter as tk
variable name=Tk()
tk.Label(variable name, text="").grid()
variable name.mainloop()
How to create an input box in Tkinter?
The Tkinter package has a set of built-in functions that have been used for covering the UI parts in both desktop and web applications. It has more interactive and advanced library scripts it can be calculated for the time, space functionalities in the real-time world, and even though some AI-based application scenarios this will be covered across the widget methods. Basically, we want to decorate the UI has textbox, labels, buttons, views, scroll box, etc. mostly button will be the UI area to navigate the web pages. Once we clicked the button it performs the application logic and it works in the backend areas.
Even though some research areas they created the scientific application using the python programming language they have used these Tkinter modules for creating the UI. As we mentioned earlier the user input will be any of the formats like string, numbers, etc. If we use string formats datas depends upon the user needs the input data will be longer format and these formats will be handled through via the scroll box UI panel widget. And these widgets will be availed through the backend whenever the user entered the input to the ui screen.
These input formats can’t be seen entirely on the screen. Using the arrow keys it can be moved to the invisible area of the application. With the help of arrow keys, the user input will be scrolled automatically on the application so the hiding areas are visible on the user screen. And also if we want to enter more number of characters it crosses more than one line so the multi-line text will be covered using the text widget. If we use an entry widget in the application it limits the user inputs i.e. it uses only the single fonts on the widget applications.
We use default methods for both the scenarios also we can put some input datas is the usages of the Entry fields. The grid rows and columns is used for the complexity of the text boxes sizes and the boxes will be more grid and it looks more pretty on the screen.
Constructor
The Tkinter Entry() constructor has a default set of arguments that will be passed into throughout the programming. We can use mainly two constructs the text boxes in grid sizes with the help of Rows and Columns that can set the values and these arguments should be passed along the runtime.
Entry()//without arguments
Entry(method or option values)//with arguments
The constructor is generally used to create the instance and it will be called through the entire scripts wherever it needs on the logic.
Methods
We already discussed in the previous paragraphs regarding the Entry() method and its behavior and the attributes. The Entry function will get the method using the Tk packages and these packages will be more user-friendly and it’s a default package. When used these package managers it will cover always used for some default options like fill, side, expand, etc. These options will have used to controls and give more presentations in the application.
Examples of Tkinter input box
Here are the following examples mention below
Example #1
Code:
from tkinter import *
import tkinter as tk
from tkinter import ttk
first = Tk()
first.geometry("132x110")
textboxes = tk.Canvas(first, width = 430, height = 330, relief = 'raised')
textboxes.pack()
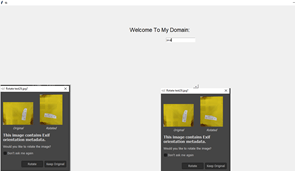
lbel = tk.Label(first, text='Welcome To My Domain:')
lbel.config(font=('helvetica', 17))
textboxes.create_window(213, 104, window=lbel)
e = tk.Entry (first)
textboxes.create_window(303, 146, window=e)
frm = Frame(first)
frm.pack()
frm1 = Frame(first)
frm1.pack(side = RIGHT)
frm2 = Frame(first)
frm2.pack(side = LEFT)
imge = PhotoImage(file = r"C:\Users\Kripya-PC\Downloads\MicrosoftTeams-image (11).png")
Button(first, text = 'Have a Nice Day !', image = imge).pack(side = LEFT)
labels=Label(first, image=imge, width=320, height=350)
labels.pack(side=BOTTOM)
btn1=Button(first, text=" +" )
btn1.pack(side=TOP)
btn2=Button(first, text=" - ")
btn2.pack(side=RIGHT)
first.mainloop()Output:
Example #2
Code:
from tkinter import *
import tkinter as tk
from tkinter import ttk
first = Tk()
first.geometry("132x110")
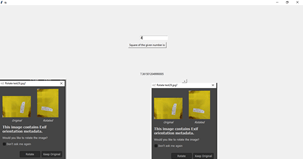
textboxes = tk.Canvas(first, width = 430, height = 330)
textboxes.pack()
e = tk.Entry (first)
textboxes.create_window(230, 147, window=e)
def demo ():
i = e.get()
lbel = tk.Label(first, text= float(i)**1.44)
textboxes.create_window(220, 310, window=lbel)
btn = tk.Button(text='Square of the given number is:', command=demo)
textboxes.create_window(200, 180, window=btn)
imge = PhotoImage(file = r"C:\Users\Kripya-PC\Downloads\MicrosoftTeams-image (11).png")
Button(first, text = 'Have a Nice Day !', image = imge).pack(side = LEFT)
labels=Label(first, image=imge, width=320, height=350)
labels.pack(side=BOTTOM)
btn1=Button(first, text=" +" )
btn1.pack(side=TOP)
btn2=Button(first, text=" - ")
btn2.pack(side=RIGHT)
first.mainloop()Output:
Example #3
Code:
import tkinter as tk
first = tk.Tk()
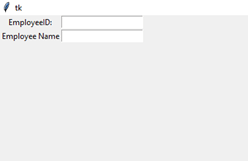
tk.Label(first, text="EmployeeID:").grid(row=0)
tk.Label(first, text="Employee Name").grid(row=1)
e = tk.Entry(first)
en = tk.Entry(first)
e.grid(row=0, column=1)
en.grid(row=1, column=1)
first.mainloop()Output:
Conclusion
The Entry method has a default pattern class and it will be used for entering all types of user input data formats to the application UI Widget. And these datas will be validated based upon the validation script that will be written in the code. The libraries will include all the supported classes and methods which has been already defined in the python library.
Recommended Articles
We hope that this EDUCBA information on “Tkinter input box” was beneficial to you. You can view EDUCBA’s recommended articles for more information.
