Updated July 7, 2023

Definition of Swift forms
By the use of Swift forms, we can create forms that are interactive, easy to make by adding only a few lines in the code. In order to create forms in Swift, we have to use one external library, which is written in Swift only; this library provides great support to create forms in Swift. Before using it, we have to add this to our project. By the use of forms, we can create our own cells and use already-defined cells as well. In the coming section, we will see how to include this in our application to make the best use of it and see everything in detail.
Syntax:
As we already discussed, we have to use ‘SwiftForms’ library in order to create forms in Swift; this is an external library that we need to import before using it. Let’s see its syntax and how to define and create a form for better understanding. See below;
var variable_name = FormDescriptor()In the above line of syntax, as you can see, we are using FormDescriptor() to create the instance here. This class would be available in the SwiftForms library; once you add it, then only we can access the classes and everything available inside it. We just have to give the variable_name after this; it can be used to access the various element available inside it to design our form in Swift. Let’s see one practice syntax to understand it better. See below;
e.g. :
var myform = FormDescriptor()
myform.title = "Any title you want"
This is a sample syntax to use one of the attributes available in the FormDescriptor instance. In the coming section, we will see how to create a full form for users to enter data in detail that will be helpful for beginners to understand and start using it in real-life applications of Swift.
How do forms work in Swift?
As of now, we already know that forms are used to design a create interactive pages for users in Swift. Where we can ask the user to enter data that can be processed for further use, we can design login pages, registration pages, list show pages, and data rendering pages with the use of SwiftForms library. This is not ab inbuild feature available in Swift. Rather, we have to include one external library for it. That library is named ‘SwiftForms.’ This is also written in Swift language only, also it is very easy to use and optimizes the code because by using very few lines of code, we can design a good form.
Steps to follow:
1) Minimum requirement to setup this is ios 8.0 or above version
2) After this, we have to install ‘cocoapods’. This is a dependency manager; by the use of it; we can easily handle it. This provides support for swift frameworks. We are mentioning one simple command below which will help you to install the ‘cocoapods’ on your system; see below;
cmd:
gem install cocoapodsIt will take a few minutes to install t.
3) Once ‘cocoapods’ is installed on your machine, we have to make some configurations in our project in order to use SwiftForms in our application. If we do not do this configuration, we will not be able to use SwiftForms in our application. Got to your podfile and did the configuration, which is mentioned below ;
pod 'SwiftForms'4) After this, we have to install pod in our application; in order to install it, we have to run the following command see below;
pod install5) open you Cartfile and try to add the below lines mentioned,
"ortuman/SwiftForms" :: rom ofical github documentationTry to update it after the additional changes run the below command;
Carthage updateDo not skip any of the steps mentioned; otherwise, it will not work. We have to have an IOS setup or environment on our machine in order to run the application.
In this, we can define sections, rows, and other cells as per the requirement. Let’s discuss each of them in detail. See below;
1) section: This will create a section in your form. Inside this, we can create our field, cells, or anything we want But in order to use this, we have to use ‘FormSectionDescriptor’. This will be available once we have derived ‘FormViewController’ in our class. By the use of ‘FormSectionDescriptor,’ we can create its instance and use it to have a section on forms. Let’s see its syntax for a better understanding. See below;
e.g. :
var variable_name = FormSectionDescriptor()As you can see, we are creating an instance of a section here using ‘FormSectionDescriptor’. After this, inside this section, we can define our fields, rows, etc.
2) Row: By using SwiftForms library, we can use ‘rows’ to properly define the structure of our form in SwiftForms. To create a row, we also have one class available from FormViewController that we have to use name das ‘FormRowDescriptor’. This class helps us to create rows in SwiftForms, which is very easy to use and define. Let’s see its syntax for a better understanding. See below;
e.g. :
var variable_name = FormRowDescriptor(tag: "", rowType: , title: "")As you can see, while creating its instance, it takes three parameters as the input param here. Let’s discuss each of them in detail. See below;
- tag: This is used to assign a tag to the row. This can be anything of our choice.
- row type: This defines the type of the row and what it will be.
- title: This is used to define a title for the row which makes it easy for a user to understand the row’s purpose.
3) To append row in Section: Once we have created the row Ans section instance successfully we have to append the row into the section, then only it will be visible inside the section; otherwise, it will not be visible on the form. To append them, we have one method named ‘append()’ that can be called on the section instance. Let’s see one sample syntax for a better understanding. See below;
e.g. :
section_instance.rows.append(your_row_instance)In the above line of code, as you can see, we are using a section instance to append the row in the section; we just have to pass the row instance inside it.
In the same way, we can create as many sections and rows as we want to display on the form using the SwiftForms library. For this, we have one method named ‘section’ available on the form instance. Let’s see its syntax for better understanding and its usage see below;
e.g. :
your_form_instance.sections = [your section1, your section2, your section3 , and so on]In this way, we can add a section to the form and display it. If you are using the SwiftForms library, then you have to follow the above-mentioned steps in order to run it.
Example
In this example, we are trying to use the Swiftforms library FormViewController to create forms in Swift. But make sure you have the proper environment setup on your machine; otherwise, it will not work on your machine. Also, add the dependency to make it work.
Code:
class DemoControllerForms: FormViewController {
var myformdemo = FormDescriptor()
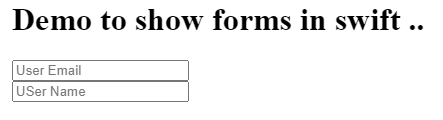
myformdemo.title = "Demo to show forms in swift .."
var section1 = FormSectionDescriptor()
var row1 = FormRowDescriptor(tag: "email", rowType: .Email, title: "Uer Email")
section1.rows.append(row1)
var section2 = FormSectionDescriptor()
var row2 = FormRowDescriptor(tag: "name", rowType: .Name, title: "User Name")
section2.rows.append(row2)
myformdemo.sections = [section1, section2]
self.myformdemo = myformdemo
}Output:
Conclusion
Swift forms can easily be created by using the SwiftForms library. If you want to run your project, then you should have a proper environment setup on your machine; also, the dependency for SwiftForms also added properly; otherwise, it will not run and compile.
Recommended Articles
This is a guide to Swift forms. Here we discuss the Definition, syntax, and working of forms in Swift, along with examples and code implementation. You can also go through our other suggested articles to learn more –
