Updated August 25, 2023

Introduction to Stamp Effect in Photoshop
Game designers or gothic movie productions or even various thematic parties and several other areas are where this stamping effect, although small but is used tremendously. New businesses and various ad flyers also try to create a stamp effect in their ads to give it that “It is Legit Effect”. Believe it or not, this is only created by the use of Shape tools and Layer Masks. I have decided to show you how to create an old fashioned stamp like in the Victorian times as it’s more fun to learn about.
Creating an Old Stamp Effect in Photoshop
Below is the step to create an old fashioned Victorian stamp in photoshop:
Step 1: Go to File and New. Open a new document in which the rubber stamp will be created.

Step 2: Once the new file is created, go to File and Place.

Step 3: Select the grunge paper texture image on which the stamp will be placed. Hit the Place button. Adjust the image according to your liking by dragging with the mouse, and then once you are satisfied with the shape, hit Enter.


Step 4: Normally, we can change the color with the Paint Bucket Tool and Colour Picker tool and then reduce the opacity; let me show you another fun way. Goto Layer > New Adjustment Layer > Gradient Map.

Step 5: After hitting Ok, you will see that a black and white (default shade) of the gradient is placed on our image. We can change the shade by simply clicking on the color of the gradient and then making changes using the Gradient Editor, as shown below.


Step 6: Select the Ellipse tool. Now in order to have a perfectly round circle, drag the mouse while holding the Shift key on the keyboard once your outer circle is created, the name that layer Circle 1.


Step 7: To create the border of the Circle 1 layer, select the Circle 1 layer and set Fill to 0 %. Then double click the layer and set Stroke to 6 Px.


It will look like this.

Step 8: Let’s have 2 borders to the stamp to. So we will need a copy of the Circle 1 layer. Hence, Double click on Circle 1 layer and perform Duplicate Layer and name the second layer Circle 2.

Step 9: Select the Circle 2 layer. Pick the Move tool. While pressing the Shift button, resize Circle 2 so that it will resize while maintaining the aspect ratio. Once the border has been resized, select both Circle 1 and Circle 2 Layers and click on Align Vertical Centres button as shown below.

Step 10: Alternatively, you could choose to change the stroke of the Circle 2 layer to 4 PX too to give it an authentic look. Select Circle1 and Circle 2 layers together and perform Duplicate layers. Name the layers Circle 3 and Circle 4, respectively.

Step 11: Select the Circle 3 and Circle 4 layers. Pick the Move tool. While pressing the Shift button to resize Circle 3 and Circle 4 together, it will resize while maintaining the aspect ratio.

Step 12: Once the border has been resized, select all the layers together and click on the Align Horizontal Centres button as shown below. It will look like this.

Step 13: To give it a more stamp border effect, we can make use of the Custom Shapes tool. Goto Edit>Preset Manager. Select Custom Shapes > Load. Load the.CSH file into Photoshop. Hit Done.


Step 14: Now select the Custom Shape Tool. Make sure you have selected the Defined Proportions Option. This option will ensure that the border remains aligned to our shapes perfectly. Select the shape of your choice and draw it as shown below.


Step 15: To add Text in between the stamp borders is optional. One way to do it is to Select Horizontal Type Tool. Write any text of your liking. Now select Create Warped Text option in the properties bar. Select type Arc and Bend to 100%. Adjust the text accordingly on the arc of the Circle 3 layer and hit Enter.


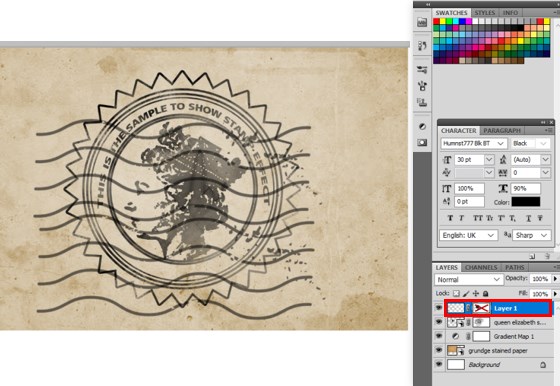
Step 16: To add the portrait image, go to File > Place. Add the portrait image as shown below. Make sure that this layer is on the top of all layers.

Step 17: Now, keep pressing the Ctrl key on the keyboard and select the Vector Mask thumbnail of the Circle 4 layer so that the selection for layer mask cutting is done.

Step 18: Add a mask using Add Layer mask to the Circle 4 Layer. Then drag this mask to the portrait layer to get a perfectly cut image.

Step 19: Add effects to the image. Goto Filter > Sketch > Stamp and set Light/Drak Balance to 5 and Smoothness to 1.


Step 20: Go to Blending Options by right-clicking the Portrait Layer. In the last, you will find This Layer Option. Move the White color slider to value 180.

Step 21: To add a wearing out effect, Select all the layers together. Right-click and select Convert to Smart Object. This will merge all into 1 layer.


Step 22: Select our portrait and do Add Layer Mask. Now select the Brush Tool. Select any distorted brush of your choice and set the size to 100 px, Opacity to 22 % and Flow to 20% and start adding patches on the stamp. The effect will look like this. Make sure the foreground color is black.

Step 23: Let’s add some stamp lines. The procedure is similar. Create a new layer. Keep the background color black. Select the brush tool and select the Stamp lines to brush I have already downloaded. Set the size to 800 px. Opacity to 70 % and Flow to 100 %.

Step 24: To make these wore out, too, Add a Layer Mask to the brush layer. Keep the foreground colour black and select a Distorted brush from Brush Tool, and patch it up.
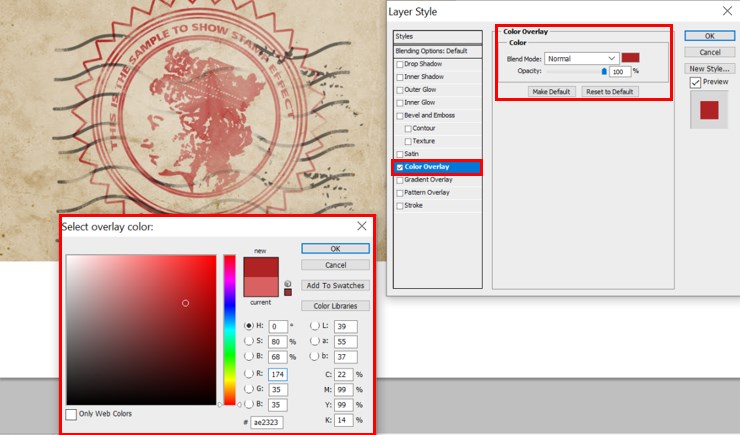
Step 25: To make it look old to select the portrait layer. Right-click, and in the Blending Options goto Colour Overlay. Set the desired color with color picker as shown and Hit Ok.
Step 26: You can even change the shape a bit with the Move tool. Finally, it will look like this.

Conclusion
This is a rather interesting topic to be indulged into. Here we saw how a stamping effect that literally means creating stamps in Photoshop could be created. There are various types of stamps that can be customized. You can add Rubber stamps, date stamps, company stamps, school stamps, etc.
Recommended Articles
This is a guide to Stamp Effect in Photoshop. Here we discuss to create an old fashioned Victorian stamp in photoshop in a step by step manner. You can also go through our other related articles to learn more –
