
Introduction to Typography in Photoshop
Examples to Create Typography in Photoshop
Below are the examples to create Typography in Photoshop:
Example 1 – Floral Font Typography
This is a popular effect. Floral effect typography is used in a lot of festive, wedding type designs and flyers. This gives a very subtle yet powerful thematic message and directly gives the viewer a sense of the purpose of that particular font. This effect in itself can be done in a number of ways. I will show how to do it in a quick, easy and colorful manner.
Step 1: Try to download a beautiful picture of roses online. Open a new document by File then New. Now go to File > Place and place our image of roses as shown below.


Step 2: Go to the Horizontal Type tool. Type the text you wish to edit. Hit enter. You can select any font of your choice. I have selected Font: Magneto and font-size: 320.

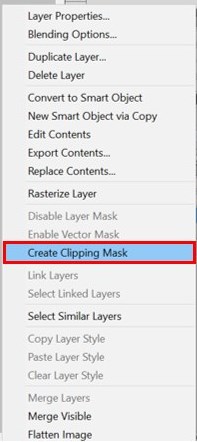
Step 3: This is an important step. Make sure the roses image layer is on top of the Text layer. Now right-click on the image layer and select Create Clipping Mask option. You will see that the text has obtained the effect of the rose. We can further do a lot of editing using Blending Options but only if it is required.


Example 2 – Popular Stranger Things Font Typography
This is a popular effect, and I am sure many of you all would love to know how we create such a typographical effect. Let’s see!
Step 1: Go to File click on New. Since the font is in black background, fill the background layer with black using the Paint Bucket Tool.


Step 2: Select the Horizontal Type tool and type Stranger Things. Now what’s left is to give effects using Blending options.

Step 3: Let the font be in Caps and Bold. Select the Font Style and size as shown in the image.

Step 4: While keeping the text layer selected, start making changes in the placement of the text with the help of the Character panel, as shown below. First, change the Tracking value to -100.

Step 5: To stretch the text vertically, set the value of the vertical scale to, let’s say, 115%. You can set it as per your liking too.

Step 6: Now, the first and the last letter in the actual font is a bit bigger. To set it like that, select the first letter of the word and change its font size to, let’s say, 400.

Step 7: Now, we also know that these big letters are aligned together in one line. This can be easily done using the Baseline Shift option right below the Vertical Scale option in the Character Panel. Select the letters and change the Baseline Shift value to, let’s say, -50 pt or any that you are comfortable with.

Step 8: Now, I chose to adjust the Kerning or Spacing between the letters for some extra effects. This I did by changing the value of Kerning or character spacing option right below the Font size option. Change the value to 50. Here I would like to note that I had to change the font size again as I was satisfied with a new value while styling my text.

Step 9: After the desired spacing and letter adjustment is achieved, let’s start styling the text. Select the Fill value of the Stranger things layer to 0%.

Step 10: Double click on the layer. In the Layer styles option, select Bevel and Emboss. I had to do a lot of hit and trial values to achieve the desired output. These are the effects I altered; kindly set the following values.
- Style: Stroke Emboss
- Depth: 220
- Size: 3
- Uncheck the Use Global Lightbox
- Angle: 156
- Altitude: 37
- Gloss Contour: Cone – Inverted
- Check the Anti-aliased box
- Highlight Mode – Opacity: 35%
- Shadow Mode – Opacity: 50%

Step 11: Hit the Contour option under Bevel and Emboss and set the following values.
- Contour: Cove – Deep
- Check the Anti-aliased box.

Step 12: Select the Stroke option, and set the following values and change the color value using the color editor as shown below.
- Size: 3
- Position: Inside

Step 13: Select the Inner Glow option and set the following values.
- Opacity: 50%
- Noise: 5%
- Color: #ea0f0f
- Size: 17

Step 14: Select the Outer Glow option and set the following values.
- Opacity: 50%
- Noise: 5%
- Color: #ea2314
- Size: 12
- Range: 60%

Step 15: Once we are satisfied with our styling and editing, select the text layer. Right-click the text layer and select Copy Layer Style. This will be helpful in directly styling the small rectangle shapes later.
Step 16: Select the Rounded Rectangle Tool and create 3 rounded rectangle shapes as shown.

Step 17: Now select each layer and right-click on each layer one by one, and select the option Paste Layer style. This will automatically stylize the shapes according to our text layer. Adjust the layers if necessary; we have our stranger things inspired typography ready.


Conclusion
The following examples were chosen to be able to show the designer that typographical effects don’t have to be complicated or difficult to create. What is more important to understand is the purpose for which they have to be created and how will typography affect our design. Rest all is just creativity!
Recommended Articles
This is a guide to Typography in Photoshop. Here we discuss two different examples and the art and technique of arranging type, including type design. You can also go through our other related articles to learn more –
