Updated March 29, 2023
SQLAlchemy Transaction
SQLAlchemy transaction is one of the most efficient and popular ways using which one can make the use of the transactional module in the applications created by using python where one can communicate with the relational database from the python application using the sqlalchemy transactions.
In this article, we will learn about the Introduction sqlalchemy transaction, Using sqlalchemy transaction, sqlalchemy transaction connection, and the Conclusion about the same.
Introduction sqlalchemy transaction
SQLalchemy is the package library that can be easily installed by using PyPi using the below steps –
We will need to follow certain steps to make the use of SQLAlchemy on our system –
- Step 1 – Installation using pip which is a python package manager. You can fire the below command on the command prompt for installation –
Pip install sqlalchemyThe execution of the above command gives the following output –
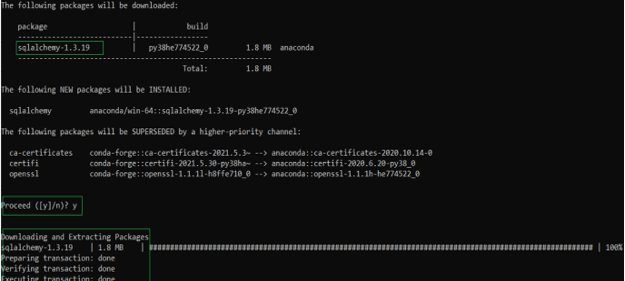
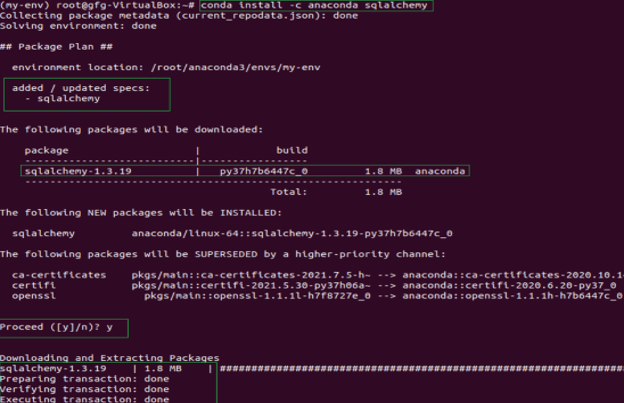
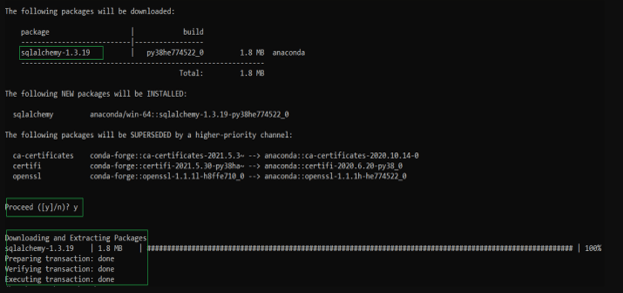
- Step 2 – Further, there is also an alternative way using which SQLAlchemy can be installed using the conda terminal –
conda install -c anaconda sqlalchemyWhich results in the following output –
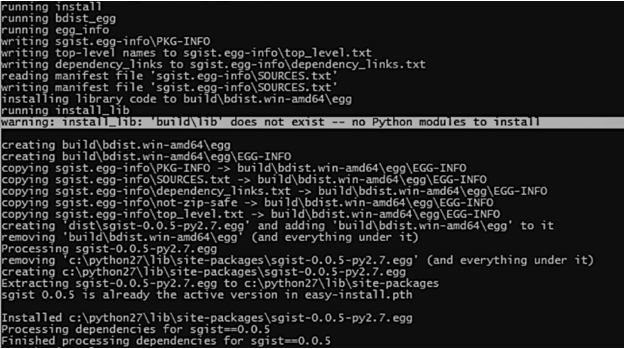
- Step 3 – One of the other way using which we can download is by using the python setup.py file –
Python setup.py install
This results in the following output –
- Step 4 – The final step is to verify the installation of sqlalchemy which can be done by executing the command –
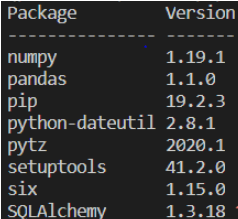
Pip installThis results in the following output where we can go for checking the version of SQL Alchemy.
After this, we will have to choose a data manager once the database which you will be using is installed. This is because data managers help in communicating between the transaction package and SQLAlchemy and sending the proper commands to the SQL while any transactions occur in the life cycle of the event. There is a package on PyPi named zope.sqlalchemy which depends on the zope interface that can further help in communication. For its installation, we can simply fire the below command –
Pip install zope.sqlalchemyThat gives the following output –
Which makes the setup of sqlalchemy transaction complete and enables us to make the use of python apps which will contain the transaction modules in them and further allowing to send and receive the data to the relational database present as the backend in SQLalchemy.
Using sqlalchemy transaction
Before you go for the further details of getting to know how we can make the use of sqlalchemy transactions, you should go through this official link to get the basics clear. After all the prerequisites are set up, we will need to follow the below-mentioned steps for using the sqlalchemy transaction –
Step 1 – Creation of the database engine –
This can be done by importing the package and then making the use of create_engine method as shown below –
>>> from sqlalchemy import create_engine
>>> engine = create_engine('sqlite:///:memory:')
Which looks as shown below in editor –
![]()
This step will enable us to establish the connection with the database, in this case, sqlite. For each of the databases, there is a different connection string that you can use to get connected to the database.
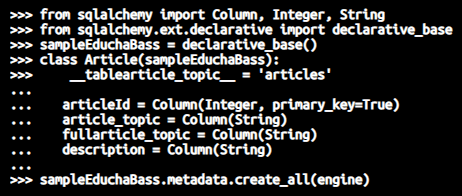
Step 2 – Define class
In these steps, we will provide the definition of the class which will be in turn mapped to the relational database’s table. Here, the declarative syntax of SQLAlchemy proves to be helpful –
>>> from sqlalchemy import Column, Integer, String
>>> from sqlalchemy.ext.declarative import declarative_base
>>> sampleEduchaBass = declarative_base()
>>> class Article(sampleEduchaBass):
>>>     __tablearticle_topic__ = 'articles'
...
...    articleId = Column(Integer, primary_key=True)
...    article_topic = Column(String)
...    fullarticle_topic = Column(String)
...    description = Column(String)
...
>>> sampleEduchaBass.metadata.create_all(engine)
Which in the editor is as shown below –
Step 3 – Creation of session and integration with data manager – This will enable us to perform all the transaction machinery. We will need to pass the extension of the session which we create the session of SQLAlchemy which is done by using the below code –
>>> from sqlalchemy.orm import sessionObjmaker
>>> from zope.sqlalchemy import ZopeTransactionExtension
>>> sampleSessionMakerobj = sessionObjmaker(bind=engine, extension=ZopeTransactionExtension())
>>> sessionObj = sampleSessionMakerobj()
Which in the editor looks as shown below –

Step 4 – Insert the data into the created tables and commit the same. This can be done by creating and statement and then executing it to run the query in the respectively connected database –
>>> import transaction
>>> sessionObj.add(Article(articleId=1, article_topic='SQLAlchemy', fullarticle_topic='SQLAlchemy Transactions', description='Details about working'))
>>> transaction.commit()
Which looks as shown below on editor –
![]()
Step 5 – In case if required then we can abort that is rollback the transaction. For understanding the same. Let us consider the same above example where rollback of the transaction on abort can be done as shown below –
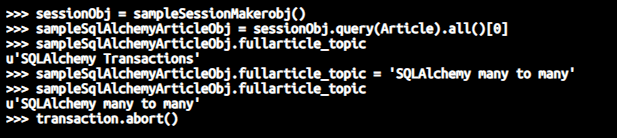
>>> sessionObj = sampleSessionMakerobj()
>>> sampleSqlAlchemyArticleObj = sessionObj.query(Article).all()[0]
>>> sampleSqlAlchemyArticleObj.fullarticle_topic
u'SQLAlchemy Transactions'
>>> sampleSqlAlchemyArticleObj.fullarticle_topic = 'SQLAlchemy many to many'
>>> sampleSqlAlchemyArticleObj.fullarticle_topic
u'SQLAlchemy many to many'
>>> transaction.abort()
Which looks as shown below on the editor –
Step 6 – Verification – For verifying the details of the old record whether the rollback is finished successfully or not, we can execute the following code –
>>> sessionObj = sampleSessionMakerobj()
>>> sampleSqlAlchemyArticleObj = sessionObj.query(Article).all()[0]
>>> sampleSqlAlchemyArticleObj.fullarticle_topic
This gives the following output persisting the value of the old record as it is which concludes that the transaction was rollbacked properly –
![]()
SQLalchemy transaction connection
We make the use of transaction connection because of two main reasons which include atomic writes which in turn means that either the whole thing will get committed properly or the whole thing will be rollbacked having no change on any present data due to actions of that particular transaction which was unsuccessful.
The other reason for using transactions is to make sure that one connection does not have any kind of effect on the operations made by transactions of other connections which means effective management of concurrent connections. This happens by locking the data set for a particular current transaction unless it is completed with its work.
There are three possible states for the relationship connection and transaction –
Active state – As each and every query statement runs inside the transaction; the active state simply means that the current connection is in the transaction. In other words, the database is making the use of the connection to perform some task or query execution.
Idle in transaction state – This state refers to the started connection that is waiting for some task to be finished up. The most common example of this case happening is when the transaction wants to manipulate the loaded data before it goes for writing the things or probably getting more data that is to be loaded.
Idle – This refers to the state where the current connection of transaction is waiting which can, in turn, be disconnected from the database when needed as it will result in no effect or data loss from the database.
The tools required for understanding the working of the database performance include pg_stat_activity.
Conclusion
SQLAlchemy transaction is required for establishing the connection between the python applications and the relational database which allows communication between the two. While performing any action inside the transaction, we can make sure that the atomicity of the task is maintained.
Recommended Articles
This is a guide to SQLAlchemy Transaction. Here we discuss the Introduction, Using sqlalchemy transaction, examples with code implementation. You may also have a look at the following articles to learn more –
