Updated April 17, 2023
What is Spring Boot Docker?
We can create spring boot image on docker. There are different ways to implement it i.e. we can take the predefine spring-boot docker image from the docker hub. Similarly, we can build our own spring boot image. As per the requirements or the development effort we need to choose which approach we need to select. The pivotal is the company that is managing the spring boot framework. The spring boot has come under the micro-framework group. It is open source. It will help to develop the auto-configure production sordid spring boot application. It will reduce the time for deploying the application or project. Hence the developer will build the application without losing his/her time. It will provide the application reliability. It will provide fault tolerance. The monitoring and managing of the application are very simple in the docker. In the docker environment, we are running the docker images in terms of the container.
Creating Docker Images with Spring Boot
Before directly jumping to create the docker images, we need to first understand what spring boot is and what the docker is. With the help of the spring boot application, we can easily create a stand-alone application. We can also create the production base spring boot application also. Here, there is no need to do any prerequisites while running the spring boot application. It is simply just run the spring boot application. We add different applications like jetty; easily deploy the war files, tomcat, etc. We can easily add the third party libraries while developing the spring applications. It will provide the different product development features like the external configuration, health check status, metrics support, etc. In the spring boot application development, there is no requirement for code generation. There is no requirement for the XML configuration also. In the docker environment, we are able to build the docker images. Once the docker images are ready, we need to deploy the same docker images and it will run as the docker container.
Examples to understand spring boot docker
Example #1: Create spring boot image
There are different ways to create the image. As per the requirement or the application need, we need to decide which type of image we need to select in the working docker environment. In this example, we are getting the predefine spring boot image from the docker hub.
Command:
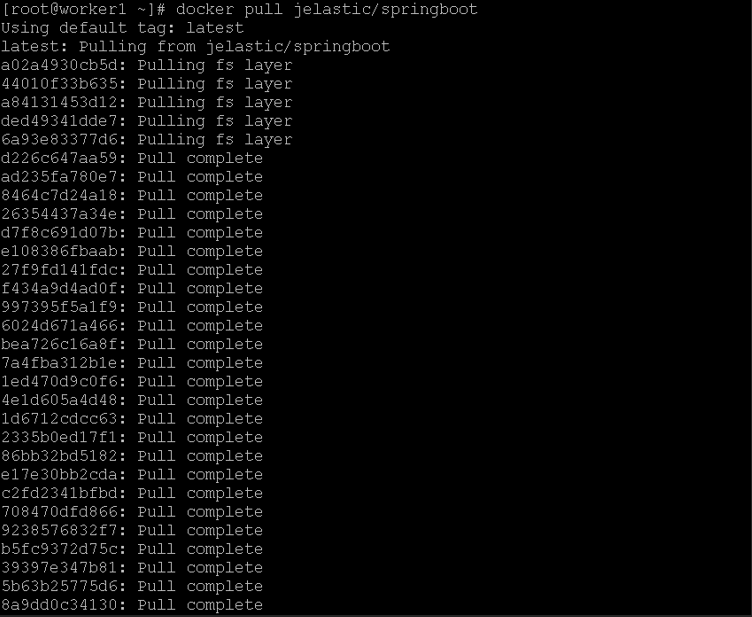
docker pull jelastic/springbootNote: Here, we are using the public spring boot directory.
Explanation:
As per the above command, we are pulling the jelastic/springboot docker hub image into the docker environment.
Output:
Example #2: Run the docker container
Once the image spring boot image is ready, we are ready to run the image on the Docker engine. Please note, if it is predefined or the docker hub image then we can run the image directly (if it will suffice the application need). If it will not suffice the application need then we need to run our own application level code.
Command:
docker run -p 80:80 -dt jelastic/springbootExplanation:
As per the above command, we are running the “jelastic/springboot” docker image. We are using the port forwarding port as 80.
Output:


Example #3: Build our own spring boot image
As per the requirement, we can define our own spring boot image in the docker. As per the need, we can define our own code or define the application requirement.
Command:
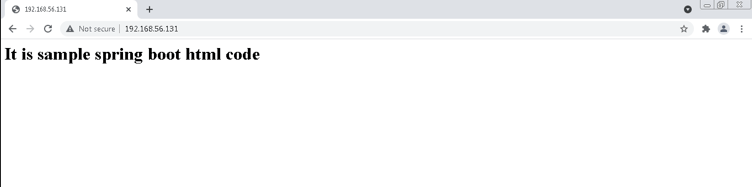
echo "<html><body><h1>It is sample spring boot html code</h1></body></html>" > /usr/local/apache2/htdocs/index.htmlExplanation:
We can use the echo command, to write the file. We are writing the content in the “/usr/local/apache2/htdocs/index.html” file.
Output:

Example #4: Spring boot docker : Commit the docker container
Once the application is ready and deploy with the necessary application build and library. We need to commit the docker image. Once the image is ready then we can deploy our own docker image on the Docker engine.
Command:
docker commit 1e893301b0a4Explanation:
As per the above command, we are able to commit the docker image i.e. the “1e893301b0a4”.
Output:


Example #5: Define the image tag
Once the docker image is ready, first we need to commit the docker image. It will help to save the insight content of the docker image. Once it will complete. We need to define the tag to the docker image. It will further help to push the docker image to the docker hub also.
Command:
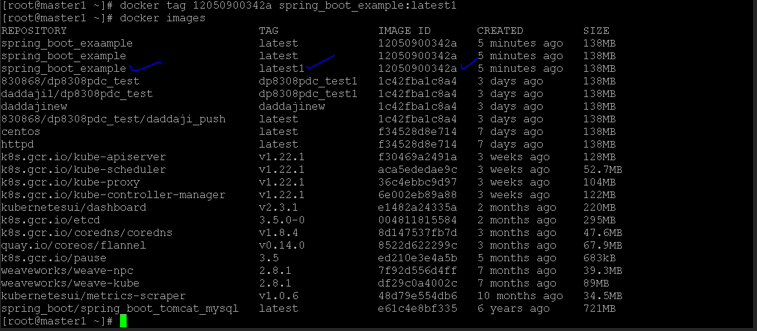
docker tag 12050900342a spring_boot_example:latest1Explanation:
As per the above command, we are adding the “latest1” tag. We are adding the tag to the “12050900342a spring_boot_example” image. It will help to push the image on the docker hub also.
Output:
Example #6: Run the own docker spring boot image
Once the docker image is ready with the commit change as well as the docker tag definition. We can run the docker images on the Docker engine. While running the docker images, we need to define the different parameters also like the port detail, backend or background image run, etc. While defining the docker option into the docker command. It will depend on the application requirements only.
Command:
docker run -p 80:80 spring_boot_exampleExplanation:
As per the above command, we are providing the forward port detail. We are using the inbound port as well as the outbound port as 80 and 80. In the below screenshot 1 (b), we are able to access the spring boot code on the browser level.
Output:

Conclusion
We have seen the uncut concept of the “spring boot docker” with the proper example, explanation and command with different outputs. In the docker environment, we are able to create our own custom images. We can use it locally as well as we can push it to the docker hub as well. We per the requirement or the application need, we can use the necessary docker hub command option while running the docker images.
Recommended Articles
This is a guide to Spring Boot Docker. Here we discuss What is Spring Boot Docker? Creating Docker Images with Spring Boot the with examples for better understanding. You may also have a look at the following articles to learn more –
