EDUCBA

EDUCBA

MENUMENU
  • Free Tutorials
  • Free Courses
  • Certification Courses
  • 280+ Courses All in One Bundle
  • Login
Home Design Design Tutorials Photoshop Tutorial Sponge Tool in Photoshop
Secondary Sidebar
Photoshop Tutorial
  • Basics and Advanced
    • What is Photoshop?
    • Install Adobe Photoshop
    • Introduction to Photoshop
    • Career in Photoshop
    • Uses of Photoshop
    • Adobe Photoshop Commands
    • Is Photoshop Free?
    • Website Layout in Photoshop
    • Adobe Photoshop
    • Top Features in Adobe Photoshop
    • Adobe Photoshop Elements tools
    • Free UI Kits For Photoshop Download
    • Layers Panel in Photoshop
    • Photoshop Moon Brushes
    • Ripple Effect Photoshop
    • Action in Photoshop
    • Photoshop Color Match
    • Photoshop color picker
    • Photoshop split toning
    • Photoshop GIF
    • Photoshop Extend Background
    • Photoshop template flyer
    • Photoshop content aware fill
    • Photoshop Overlays
    • Photoshop vignette
    • Photoshop Textures
    • Photoshop liquify
    • Photoshop automate
    • Photoshop presets
    • Layer effects in Photoshop
    • Photoshop hologram effect
    • Vintage Effect Photoshop
    • Vaporwave Photoshop
    • Photoshop Polaroid
    • Pixel Effect Photoshop
    • Photoshop Creative
    • MP4 to GIF Photoshop
    • Templates in Photoshop
    • Night Effect in Photoshop
    • Photoshop Sun Effect
    • Photoshop Gold Gradient
    • Perspective Correction in Photoshop
    • VHS Effect Photoshop
    • Halftone in Photoshop
    • Puppet Warp in Photoshop
    • Photoshop Cheat Sheet
    • Resize Object in Photoshop
    • Distortion Effect Photoshop
    • Clone Stamp Tool in Photoshop
    • Fisheye Effect in Photoshop
    • Vanishing Point in Photoshop
    • Fix Perspective in Photoshop
    • Warp Image Photoshop
    • Transform Tool Photoshop
    • Photoshop Straighten Image
    • Glitch Effect in Photoshop
    • Photoshop Cinemagraph
    • Stamp Effect in Photoshop
    • Typography in Photoshop
    • Photoshop Distort Effect
    • How to Print in Photoshop?
    • Morphing in Photoshop
    • Glow Effects in Photoshop
    • Tree Brush Photoshop
    • 3D Text Effect in Photoshop
    • Shiny Effect Photoshop
    • Photoshop Font Effects
    • Metallic Effect Photoshop
    • Ice Effect in Photoshop
    • Dispersion Effect in Photoshop
    • Healing Brush Tool in Photoshop
    • Crop Tool in Photoshop
    • Artboard in Photoshop
    • Fire Effect in Photoshop
    • Photoshop Versions
    • Portrait Effect in Photoshop
    • Quick Selection Tool in Photoshop
    • How to Highlight Text in Photoshop?
    • How to Change Text Color in Photoshop?
    • Change Color in Photoshop
    • Filters in Photoshop
    • Change Hair Color in Photoshop
    • How to Change Shirt Color in Photoshop?
    • Watercolor Brushes in Photoshop
    • How to Blend Images in Photoshop?
    • Plastic Effect in Photoshop
    • Ruler Tool in Photoshop
    • How to Fill Color in Photoshop?
    • How to Delete Background in Photoshop?
    • Plugins in Photoshop
    • Photoshop Mixer Brush Tool
    • Color Replacement Tool in Photoshop
    • Eraser Tool in Photoshop
    • Motion Effect in Photoshop
    • How to Make Logo in Photoshop?
    • Lasso Tool in Photoshop
    • Reflection Effect in Photoshop
    • Metal Text Effect in Photoshop
    • Gold Text Effect in Photoshop
    • Smart Objects in Photoshop
    • Text Effects in Photoshop
    • Layers in Photoshop
    • 3D Text in Photoshop
    • Selection Tool in Photoshop
    • Patch Tool in Photoshop
    • Eyedropper Tool in Photoshop
    • Rectangle Tool in Photoshop
    • Background Eraser Tool in Photoshop
    • Rain Effect in Photoshop
    • Oil Paint Filter in Photoshop
    • Clipping Mask in Photoshop
    • Burn Tool in Photoshop
    • Paint Bucket Tool in Photoshop
    • Snow Effect in Photoshop
    • Mirror Effect in Photoshop
    • Adobe Photoshop Alternatives
    • Transparent Text in Photoshop
    • Sharpen Tool in Photoshop
    • Custom Shape Tool in Photoshop
    • Adobe Photoshop Tools
    • Red Eye Tool in Photoshop
    • Adobe Photoshop Shortcut Keys
    • Pencil Tool in Photoshop
    • Blur Tool in Photoshop
    • Smudge tool in Photoshop
    • Sponge Tool in Photoshop
    • Magic Wand Tool in Photoshop
    • Move Tool in Photoshop
    • Line Tool in Photoshop
    • Photoshop Interview Questions

Related Courses

Photoshop Training Course

Adobe Premiere Pro Training Course

Design Training Course

Sponge Tool in Photoshop

Sponge-Tool-in-Photoshop

Introduction to Sponge Tool in Photoshop

A sponge tool is a powerful tool in Adobe Photoshop used for controlling the image saturation to give depth or lighting appearance, and professional photographers mostly employ this feature, VFX artists, designers and creators for their work as they use sponge tool on areas of the image to make it light with saturation mode on or to they can make the image area darken while using the sponge tool with a de-saturate mode based on how the user wants the image to be appearing in terms of color, enhance the lighting, adding blur and so on which also saves time and used for designing anything from visiting cards, greeting cards to texture design.

How to use the Sponge Tool?

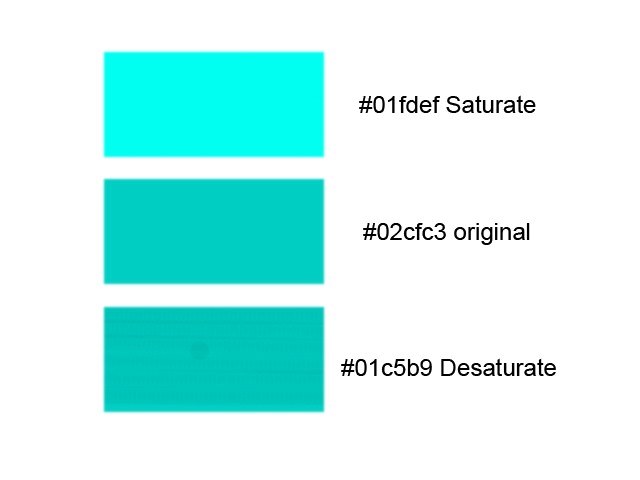
  • Once Photoshop and select sponge tool from tools menu enables all brushes from the menu bar and is ready to use brushes shape, orientation, thickness, and color can be configured there. We can configure the mode of the brush where to saturate or de-saturate the colors on the image taken below are the example for each to know the difference.
  • We can see if we use saturate mode, the existing color on the image becomes lighter, and if we use de-saturate mode, the color becomes darker; it also depends on the number of reputations of sponge done on the image. The sponge must be moved only to the required portion of the image; to maintain this, many users select the portion using different selection tools. Then they move the sponge tool on the selected portion is the best practice that avoids spreading the colour or doesn’t cause pixelation. Good quality edits can be performed using this trick on client images.
  • If we don’t want to modify the original layer, we can create the mask and work on it using the sponge tool. There are few more properties, such as Flow which helps in maintaining the opacity of color deposition on the image, set the Value and use sponge accordingly; Airbrush must always be active; it spreads the color equality around the portion of the sponge moved if airbrush is off solid color dumping can happen which can affect the quality of the image after editing Vibrancy must also be active while working which avoids the pixilation spreading between different modes like saturation and de-saturation when they change were close to each other. Overall sponge tool has its best users from Photography, Animation, VFX making, Graphic designers and many more.

Steps to configure the sponge

  • The sponge tool is used to add different saturation levels to an image using a mask or on the existing image based on needs. The below is the step-by-step tools which help in configuring the sponge tool before using each attribution. The importance of working is one example of using different saturation on sponge tool, respectively. The number of reputations of sponge on the same area the depth of color keeps on changing darker if de-saturates mode or lighter id saturated mode.
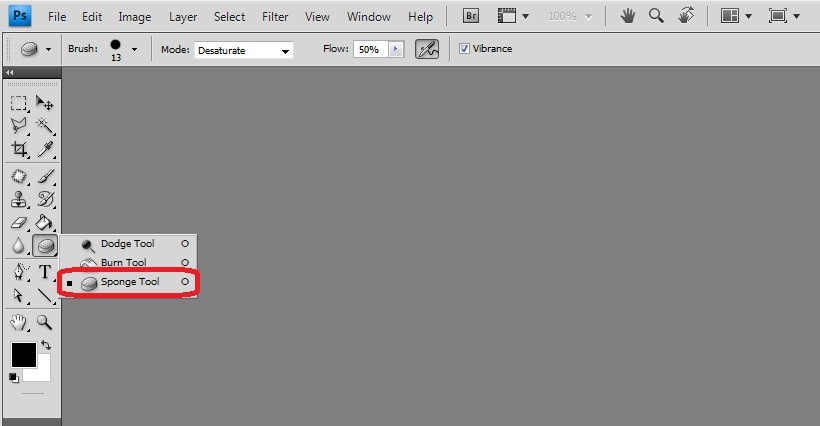
Sponge tool 2

Step #1

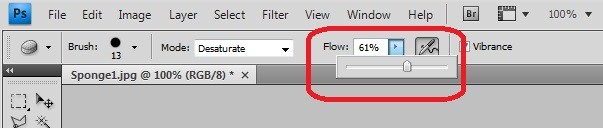
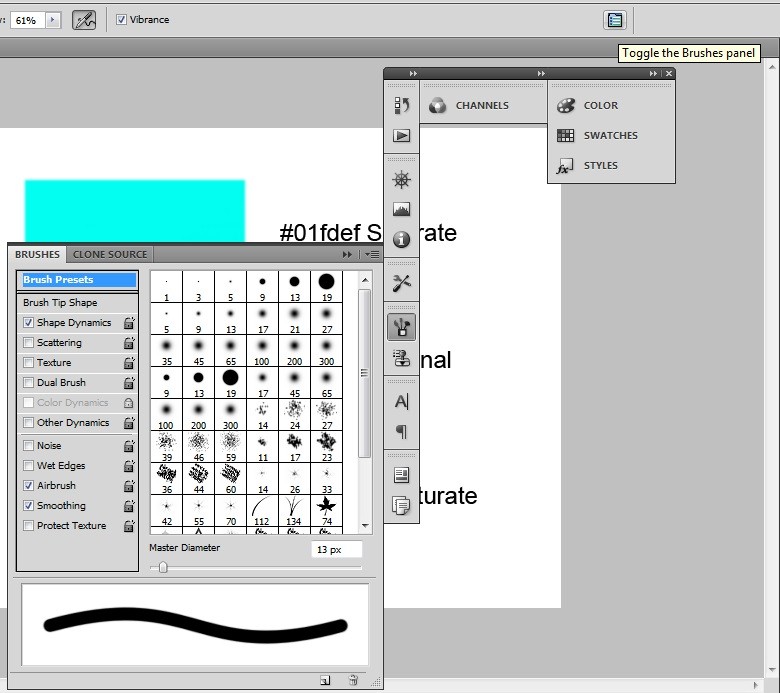
First, open photoshop load the image; we will increase or decrease the saturation and select the sponge tool, which is located in the tools menu hotkey to access them is “O”. Once after doing this, we can see all properties such as brush, mode, flow, airbrush, and vibrancy below the menu bar.
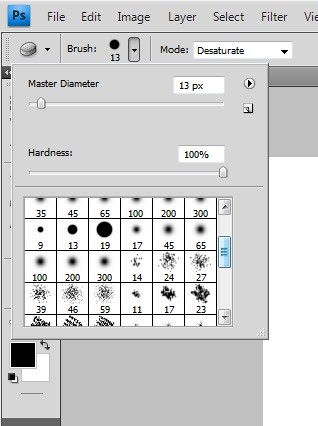
Sponge tool 3

Start Your Free Design Course

3D animation, modelling, simulation, game development & others

Step #2

All the brushes get enabled; we can use the most suitable brush for our needs of the edit, with even adjustable properties as dimension and hardness.

Sponge tool 4

Step #3

The mode has a drop-down list with Saturate and Desaturate options, which helps increase and decrease the saturation levels on the image using a mask or directly on the image up to the selected portion.

Sponge tool 5

Step #4

Flow is the adjustment value similar to the opacity of brush color to be dumped on to the layer.

All in One Design Bundle(280+ Courses, 100+ projects)
AutoCADHoudiniAdobe Premiere ProPhotoshop
SolidworksVFX Visual EffectsCorelDrawUnreal Engine
Price
View Courses
280+ Online Courses | 100+ projects | 2000+ Hours | Verifiable Certificates | Lifetime Access
4.6 (65,057 ratings)

 Sponge tool 6

Step #5

The airbrush option must always be active, which helps in maintaining color spreading equally without overlapping all around unwanted areas. Improves the quality of edits made.

ST 7

Step #6

Vibrancy maintains the difference between saturation and De-saturation pixels of the image. The difference between mode will be shown clearly by enriching image quality needs.

ST 8

Step #7

The brushes panel is also available for more needs; if required, we can make color adjustments and other internal properties for image enhancements and make sponge edits look natural.

ST 9

Conclusion

  • Sponge tools help in adding effects on the image for saturation, de-saturation, enlightening, blurring and many more within the picture and using different mask layers to save edits. Practice on multiple patterns and images, which makes to understand the real visual feel of depth which is given to an image using the tool. Photographers, 2D and 3D vector-based and Photoshop graphics, can use this option to get visual richness to the images in their projects.
  • Beginners and experience can compare their tricks using the sponge tool, which saves time and process of many other options for the same needs. Visiting cards, greeting cards, texturing artists, and many other professional technical solutions using sponge tools in Photoshop.

Recommended Articles

This has been a guide to Sponge Tool in Photoshop. Here we discussed how to use the Sponge Tool in Photoshop and steps to configure the sponge. You can also go through our other suggested articles to learn more –

  1. Career In Designing
  2. 3D Software Design
  3. Uses Of Photoshop
  4. Adobe Photoshop Commands
Popular Course in this category
Photoshop Training (10 Courses, 12+ Projects)
  10 Online Courses |  12 Hands-on Projects |  80+ Hours |  Verifiable Certificate of Completion
4.9
Price

View Course

Related Courses

Adobe Premiere Pro Tutorial (4 Courses, 7+ Projects)4.9
All in One Design Bundle (280+ Courses, 100+ projects)4.8
0 Shares
Share
Tweet
Share
Primary Sidebar
Footer
About Us
  • Blog
  • Who is EDUCBA?
  • Sign Up
  • Live Classes
  • Corporate Training
  • Certificate from Top Institutions
  • Contact Us
  • Verifiable Certificate
  • Reviews
  • Terms and Conditions
  • Privacy Policy
  •  
Apps
  • iPhone & iPad
  • Android
Resources
  • Free Courses
  • Photoshop Tutorial
  • 3ds Max Tutorial
  • All Tutorials
Certification Courses
  • All Courses
  • Design Course - All in One Bundle
  • Photoshop Course
  • Maya Course
  • Unreal Engine Course
  • Unity Course
  • DaVinci Resolve Course
  • Pro Tools Course

ISO 10004:2018 & ISO 9001:2015 Certified

© 2022 - EDUCBA. ALL RIGHTS RESERVED. THE CERTIFICATION NAMES ARE THE TRADEMARKS OF THEIR RESPECTIVE OWNERS.

EDUCBA
Free Design Course

Banner Creation, Object Selection, Sky Replacement, Advance Filters & others

*Please provide your correct email id. Login details for this Free course will be emailed to you

By signing up, you agree to our Terms of Use and Privacy Policy.

EDUCBA Login

Forgot Password?

By signing up, you agree to our Terms of Use and Privacy Policy.

EDUCBA
Free Design Course

3D animation, modelling, simulation, game development & others

*Please provide your correct email id. Login details for this Free course will be emailed to you

By signing up, you agree to our Terms of Use and Privacy Policy.

EDUCBA

*Please provide your correct email id. Login details for this Free course will be emailed to you

By signing up, you agree to our Terms of Use and Privacy Policy.

Let’s Get Started

By signing up, you agree to our Terms of Use and Privacy Policy.

This website or its third-party tools use cookies, which are necessary to its functioning and required to achieve the purposes illustrated in the cookie policy. By closing this banner, scrolling this page, clicking a link or continuing to browse otherwise, you agree to our Privacy Policy

Loading . . .
Quiz
Question:

Answer:

Quiz Result
Total QuestionsCorrect AnswersWrong AnswersPercentage

Explore 1000+ varieties of Mock tests View more