Updated August 24, 2023
Adobe Photoshop Commands
If you are thinking of editing graphics or giving a new touch to your photographs, Photoshop is the best option for you. The software was developed by Adobe in 1988, and ever since, it is regarded as the best tool when it comes to editing raster graphics, reimaging, etc. Understanding Adobe Photoshop Commands is no big rocket science. What you need to understand while working on Photoshop is your level of creativity. There are several uses for Adobe Photoshop, including creating gif animations. But the most important and efficient use is editing raster graphics and images. If you have been working on the software, you might be aware that there are many different ways to do the same things. Below are some of the most useful dan handy Adobe Photoshop commands that can make it easier for you to understand and use the software.
Basic Adobe Photoshop Commands
Let us understand the basic Commands:
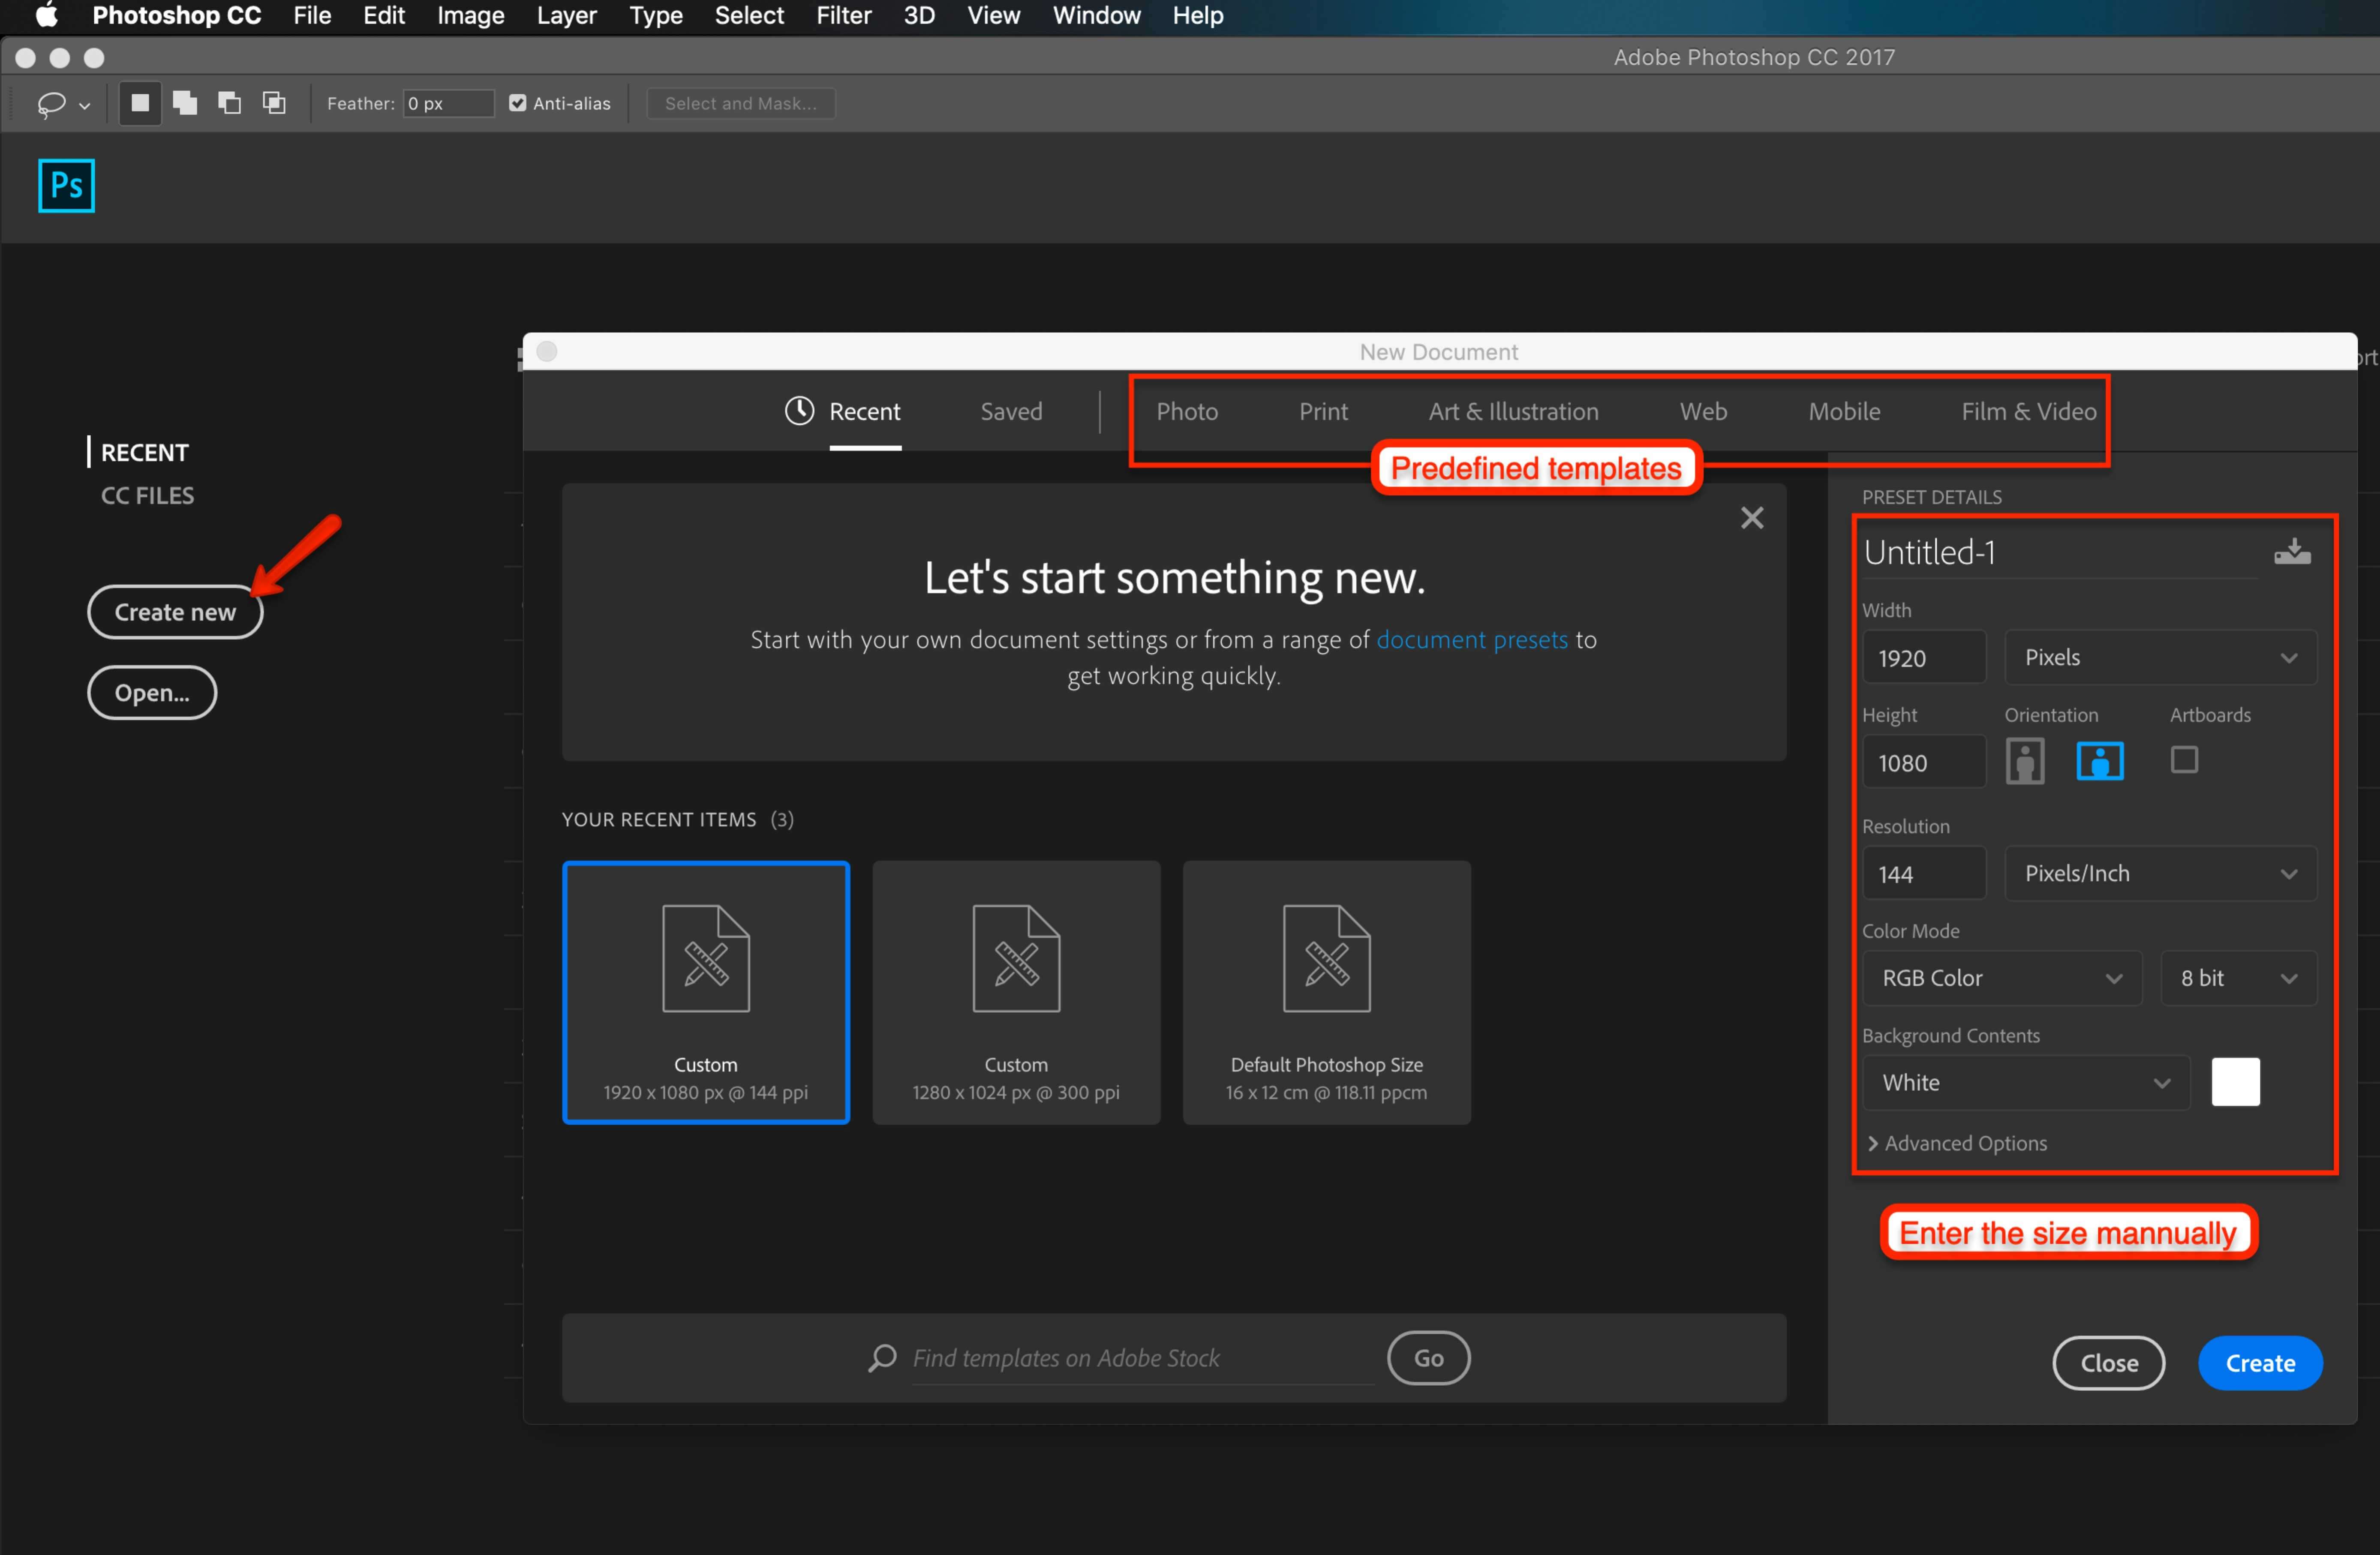
- New file: The interface may differ from version to version, but the basic commands are the same. So when you start Photoshop, a window pops up, giving you different options. You can choose from the option to create a new or open one. Open will open an already saved Photoshop file. Creating new will help you start with a new document. You can also use ctrl + n for Windows and command + n for Mac to open a new file.
- Choosing Dimensions: when you click Create, a new window will pop up asking you to choose the file’s dimensions. You can either choose from the already set templates provided by Photoshop. Or you can enter the dimensions manually if you want anything for a specific size.
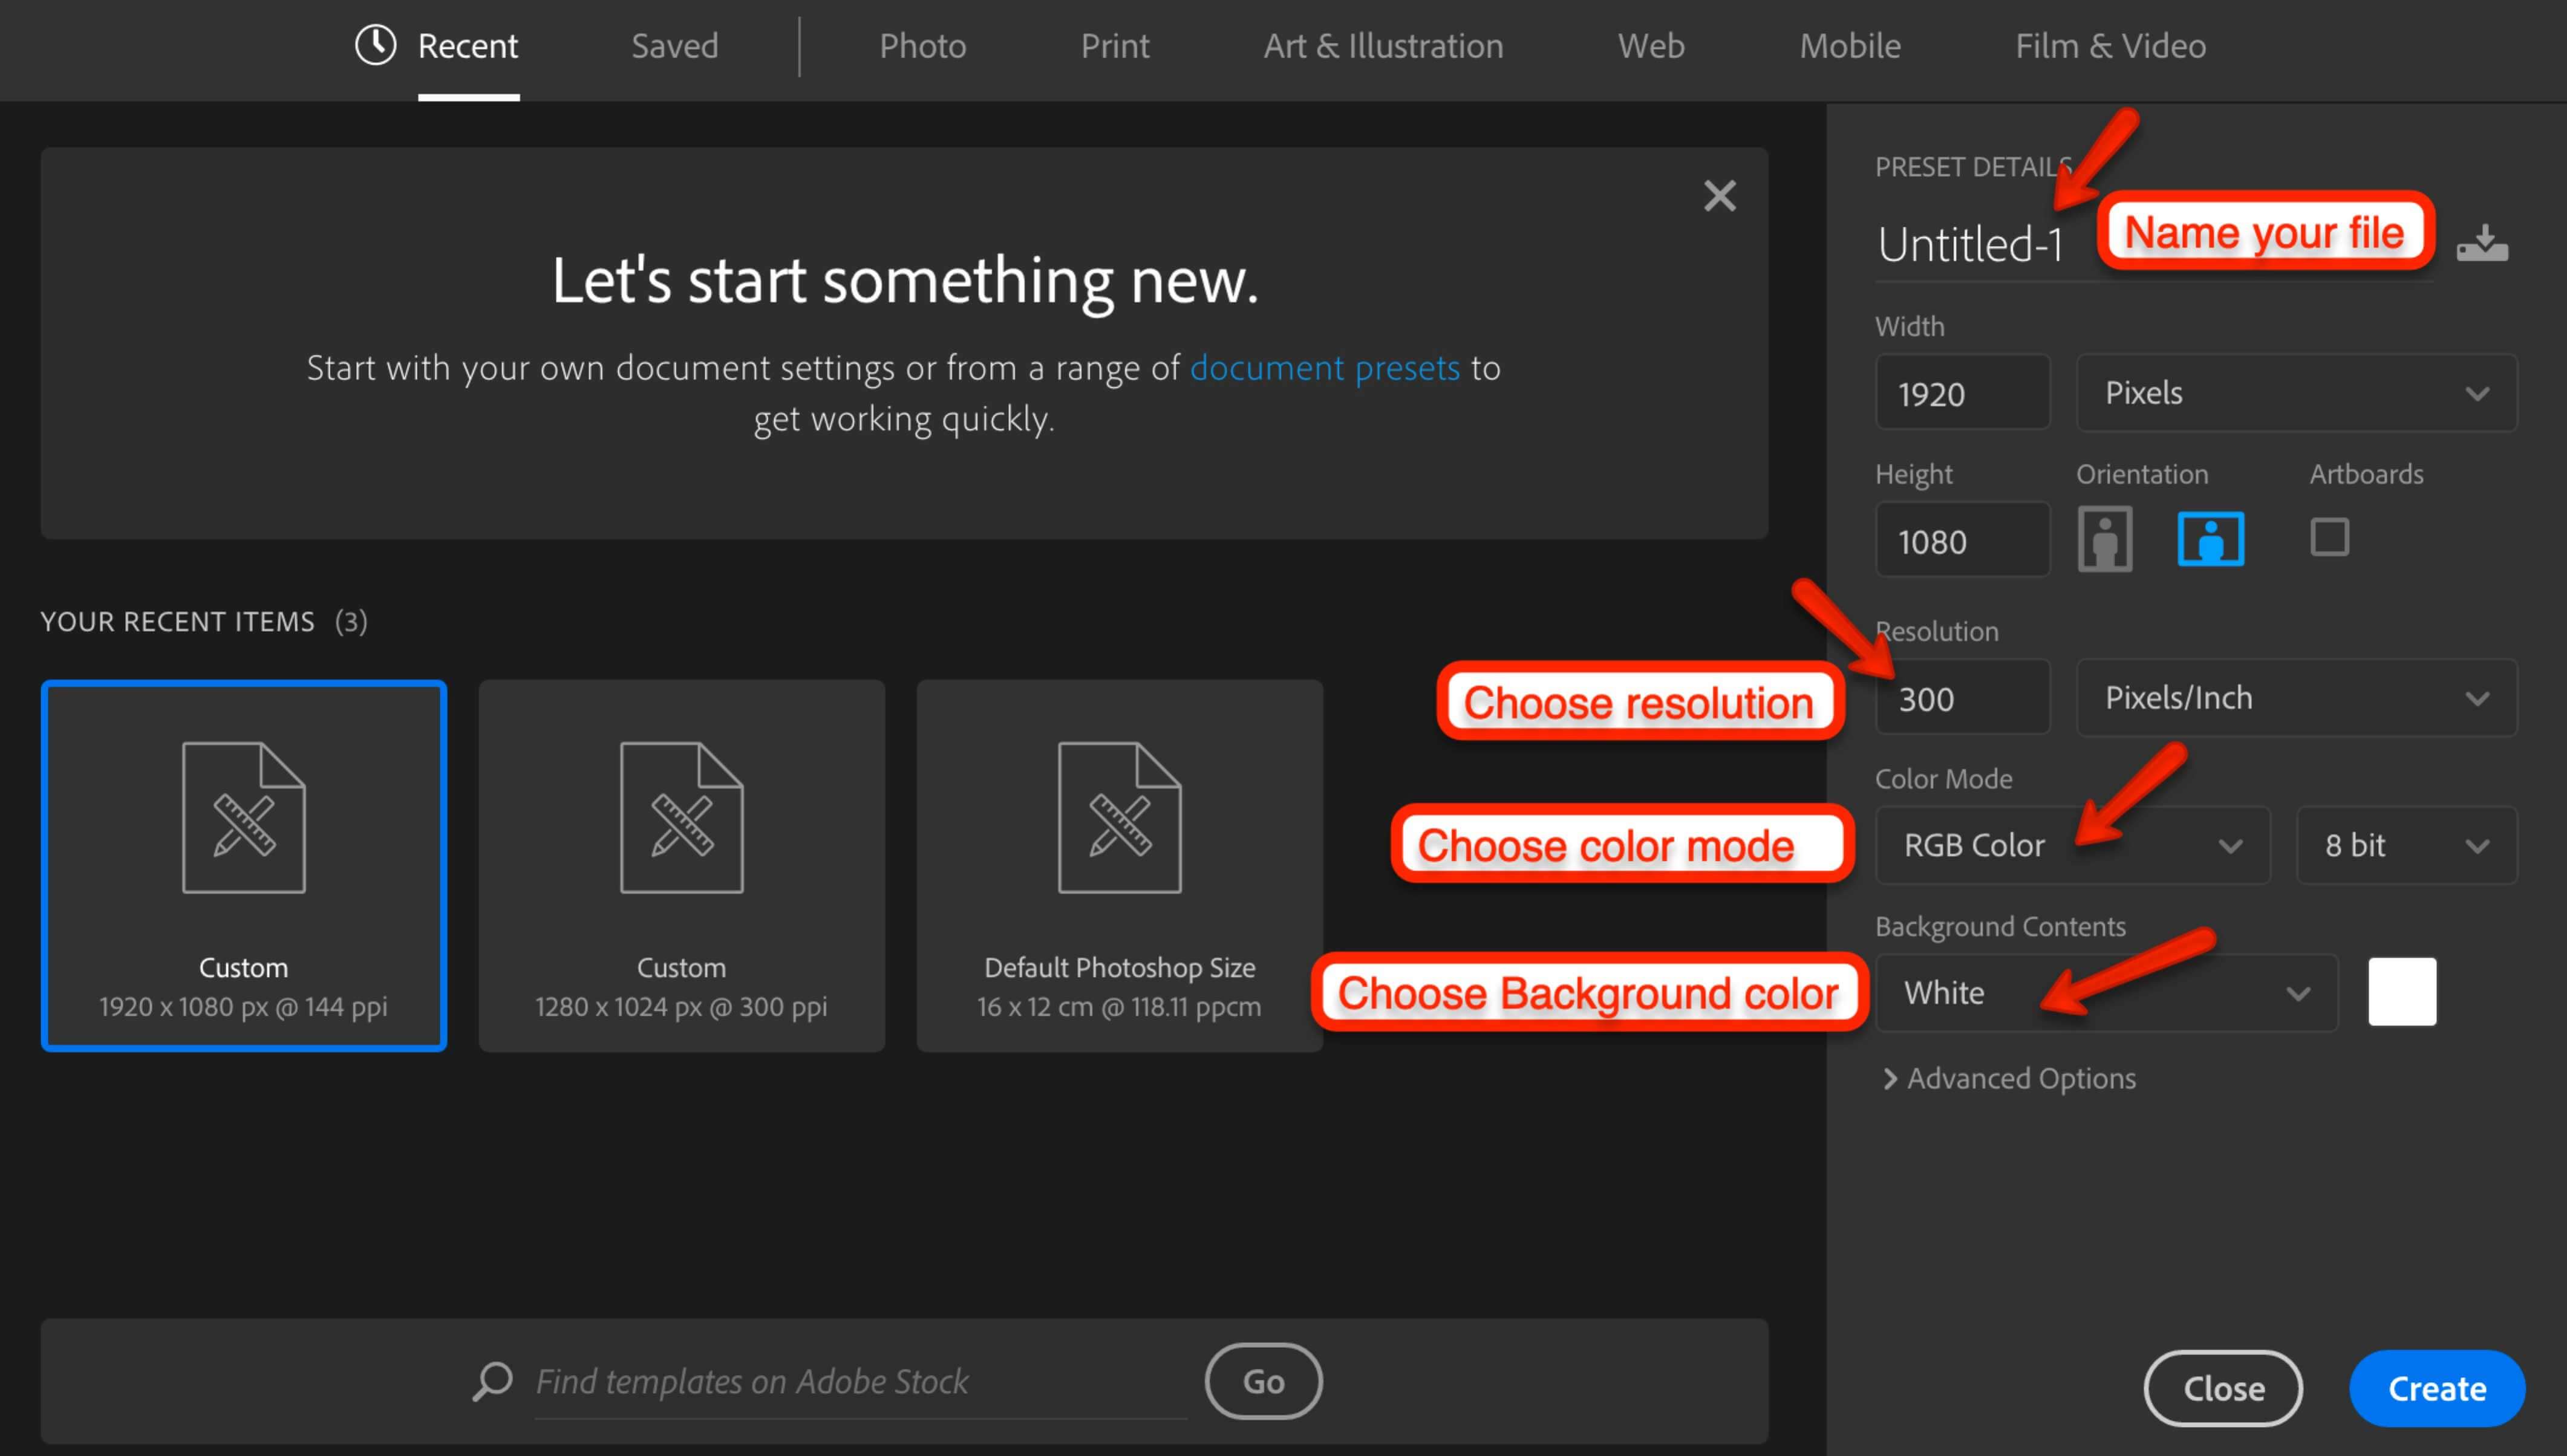
- Defining Other Dimensions: After setting the height and width of the new document, you need to decide on the resolution, color mode, and background options. You can also name your file at the preset details. You can also choose to see the dimension on a different measuring scale-like pixels, inches, centimeters, points, etc. The Photoshop file is usually kept at a pixel scale. However, it may depend on you what you want. The resolution also depends upon the type of work you are doing. Generally, for the best resolution, keep it at 300 dpi. The color mode is chosen between RGB and CMYK. If the document is used on the web, you should choose RGB. And if it is to be printed, then you should select CMYK. The background could be according to your preference.
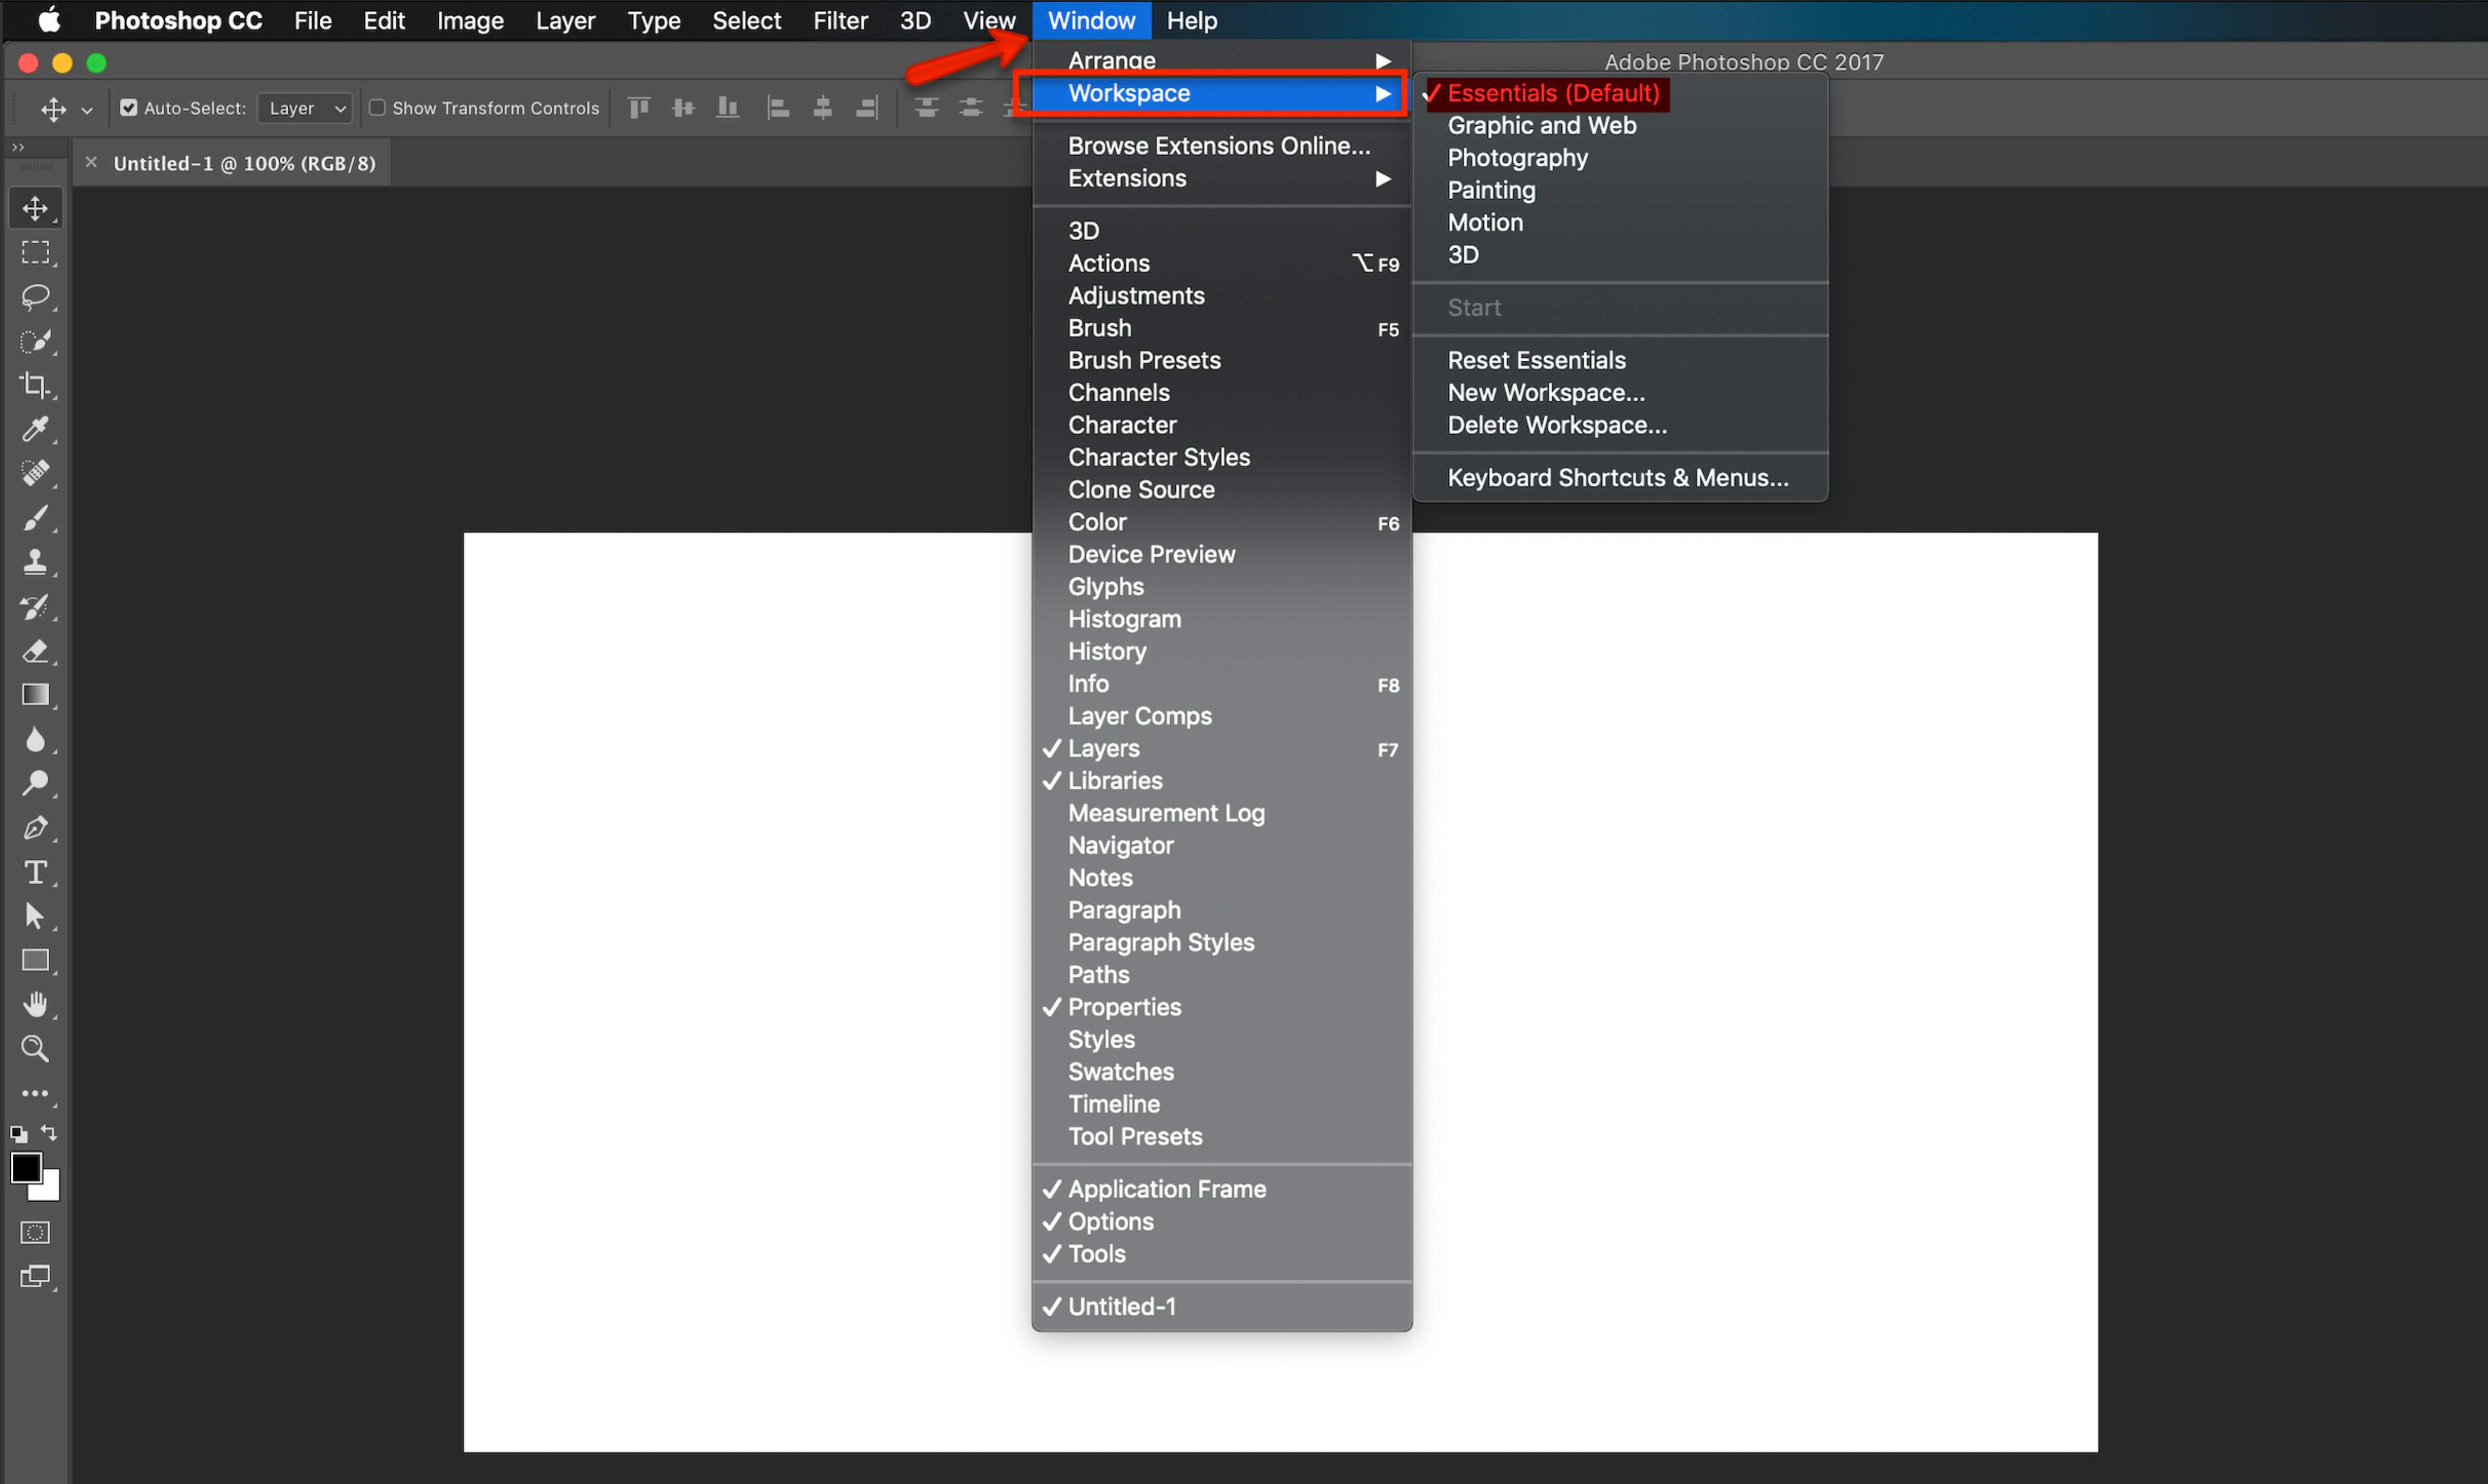
- Interface: You can set the interface according to you. You can select the tools and bars that you want to see. Usually, the interface is kept to Essential (Default). You can change the interface as and when you like from the Windows – workspace option.
- The Document Window: The large area in the middle of the interface where your file is open is known as the document window. You can toggle between the full-screen view and normal view simply by pressing the ‘F’ key on your keyboard.
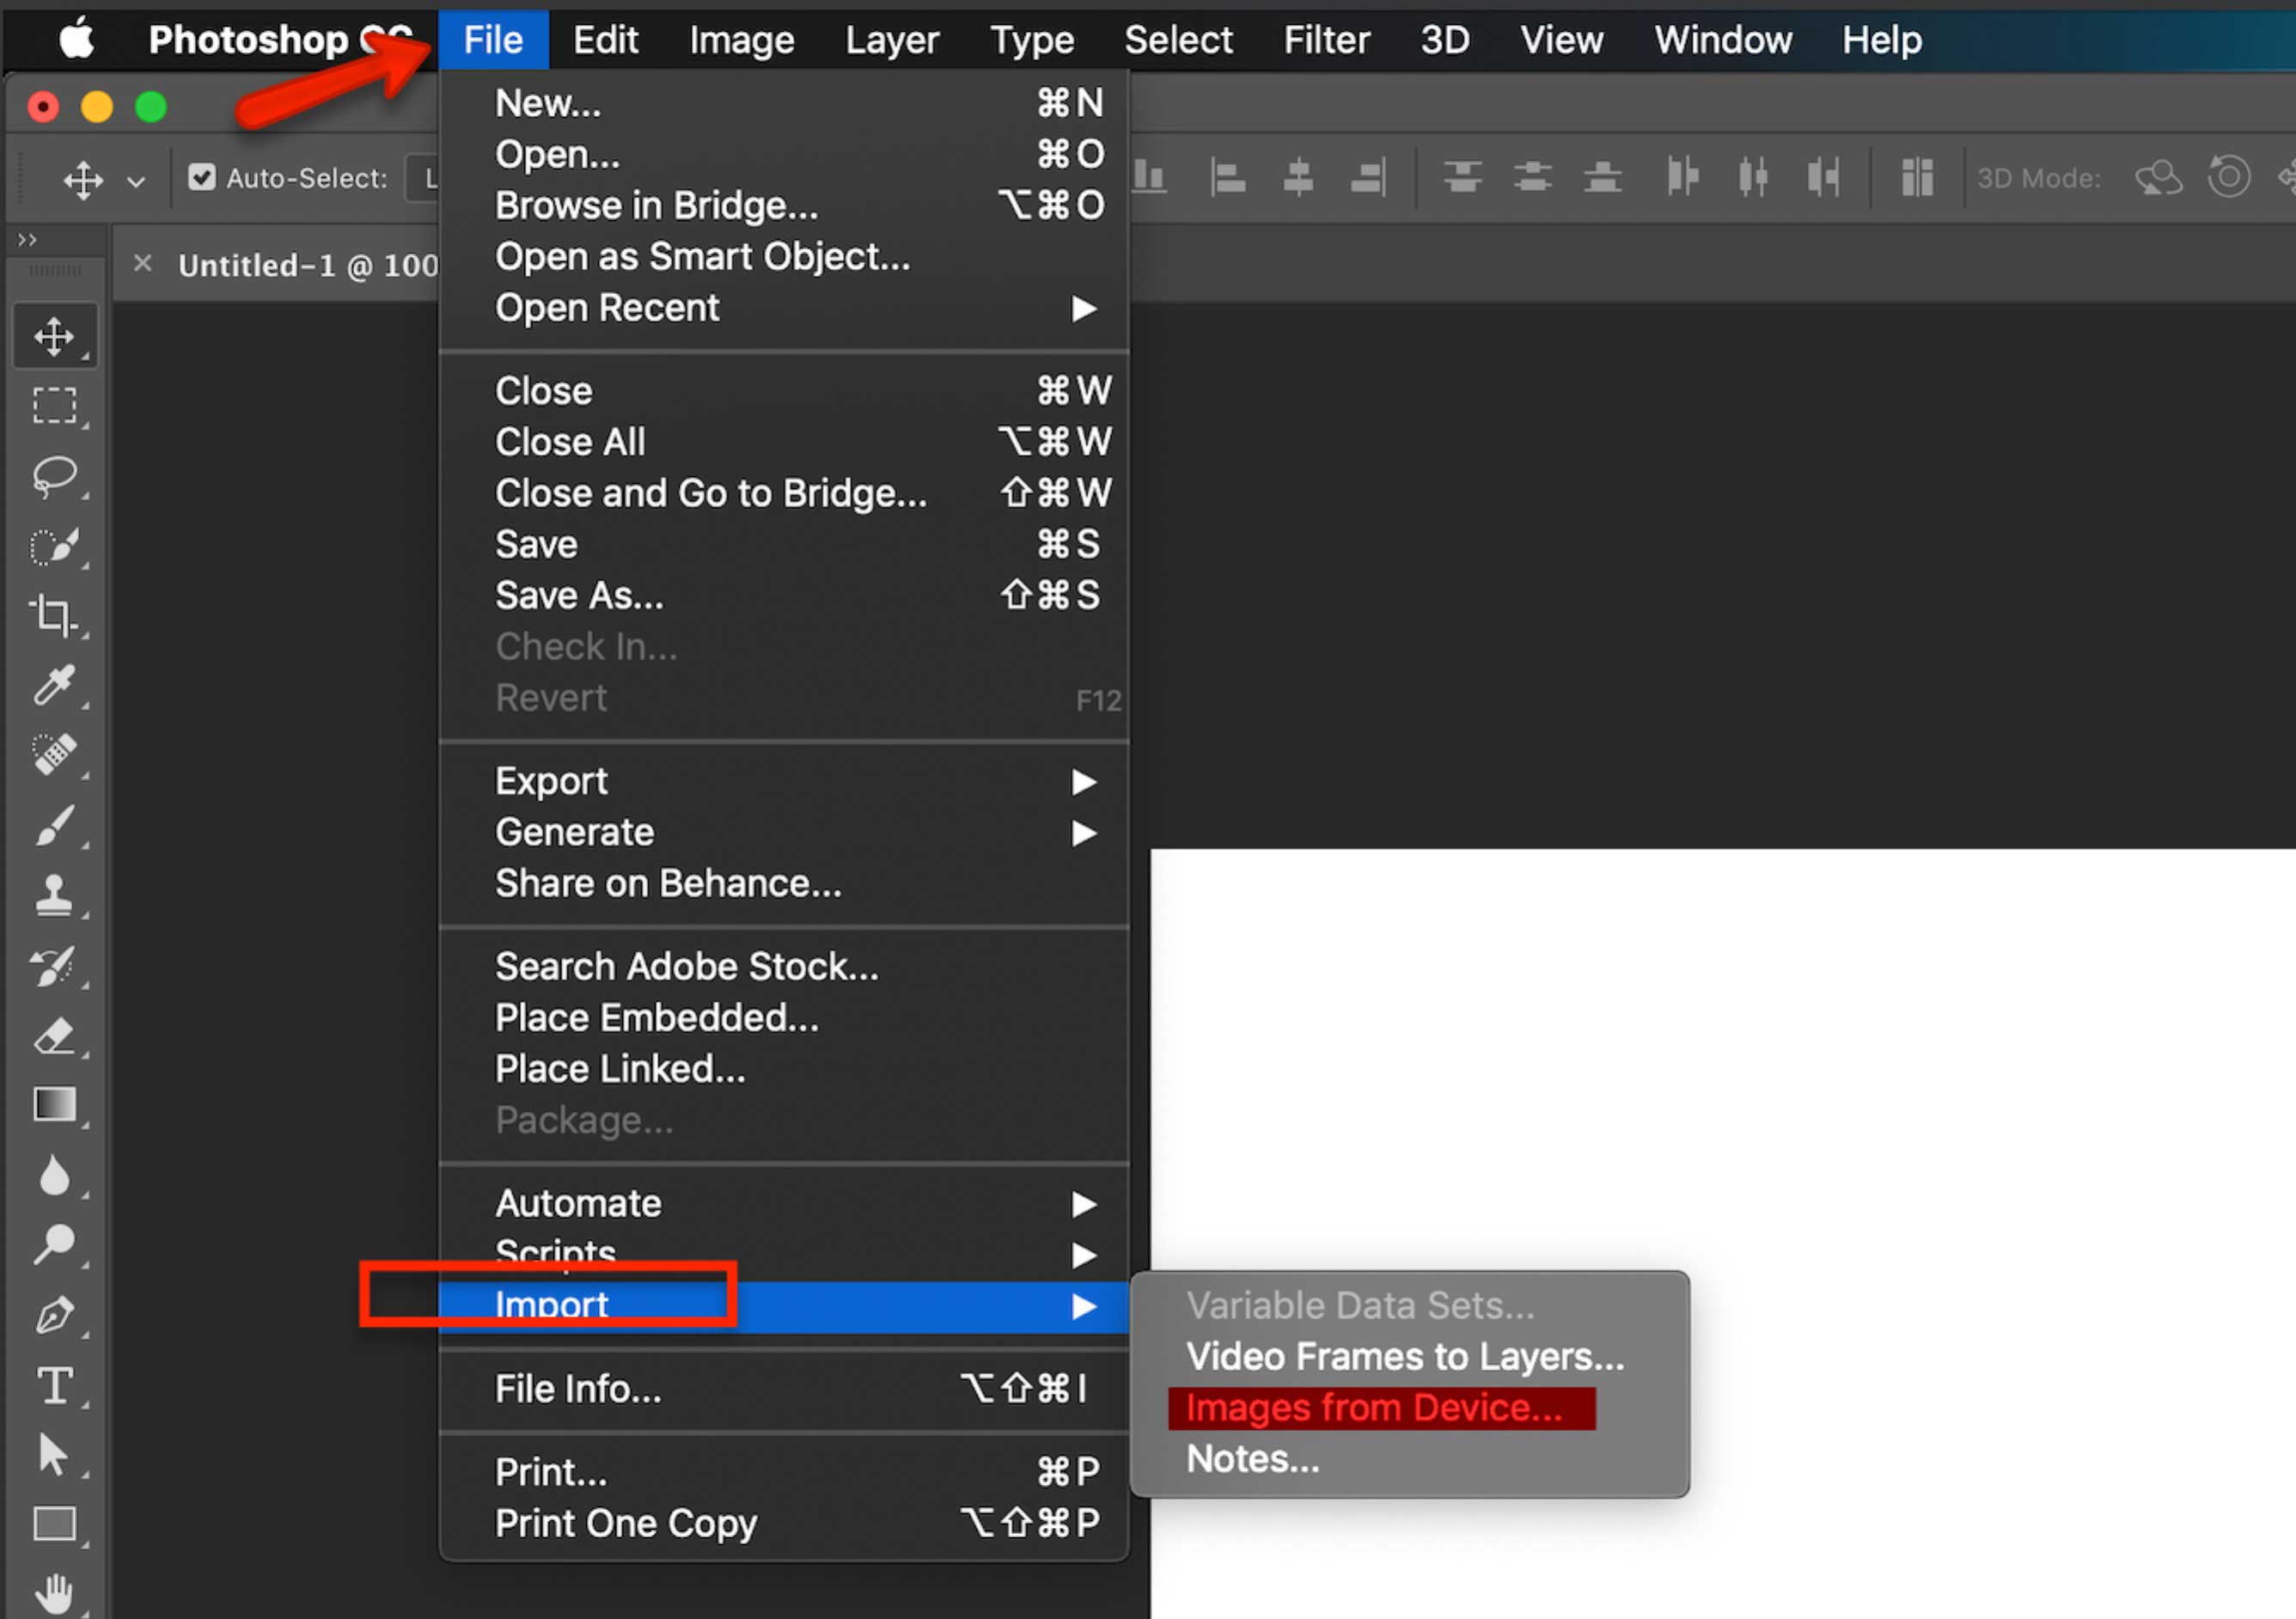
- Placing image: You can either directly drag and drop the image or import the image by going to file – import – images from the device.
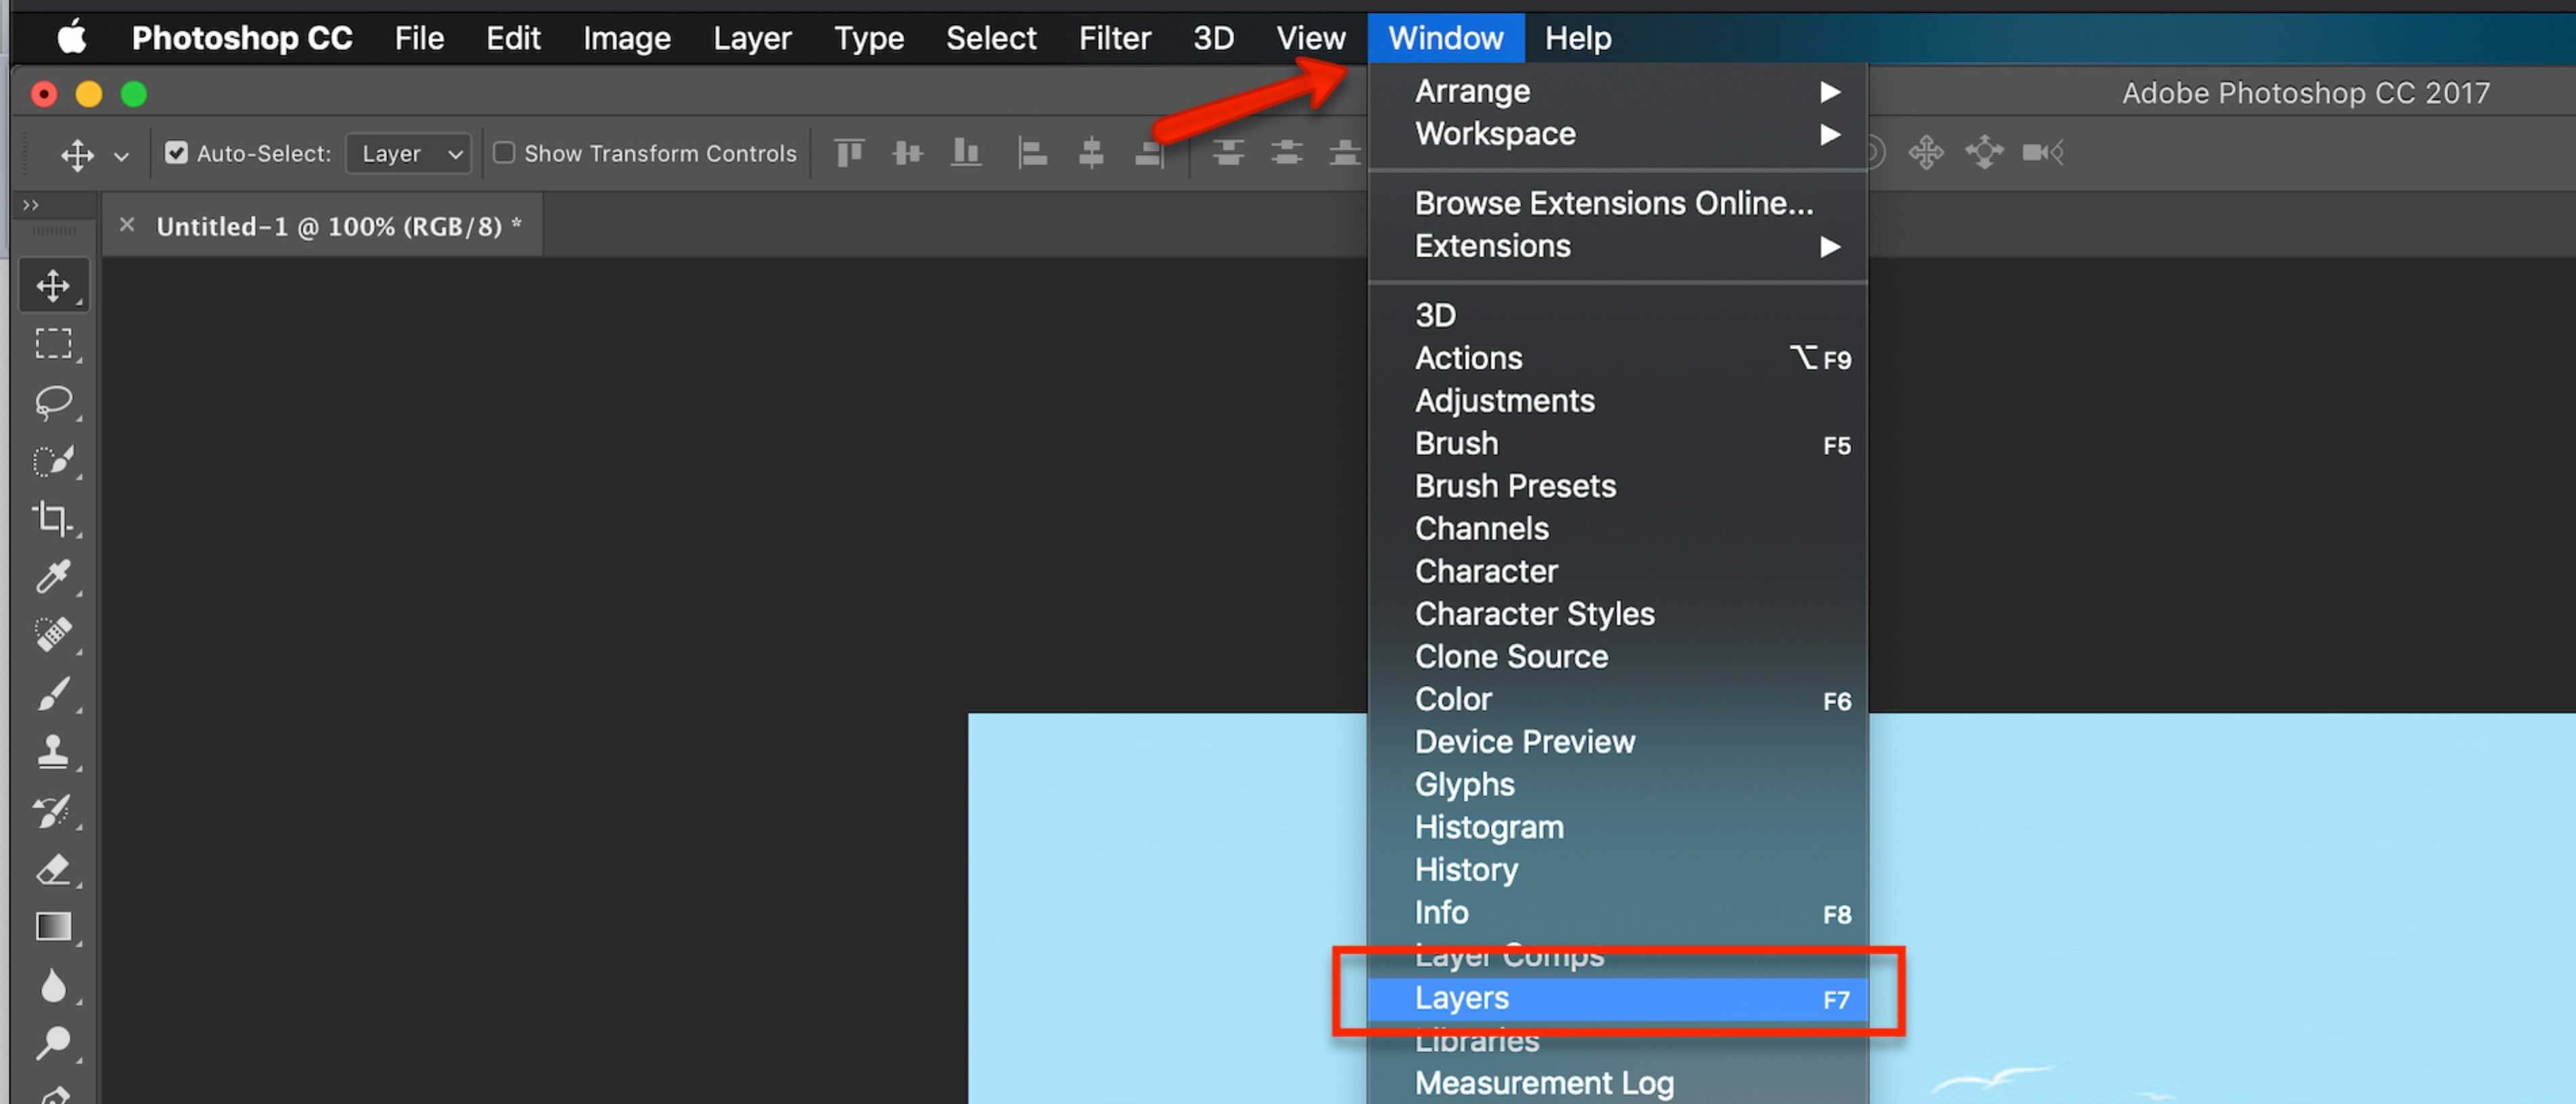
- Layers: While working in Photoshop, layers are one of the most needed tools. You can either open it from Windows – Layers. Or directly press f7 to open it.
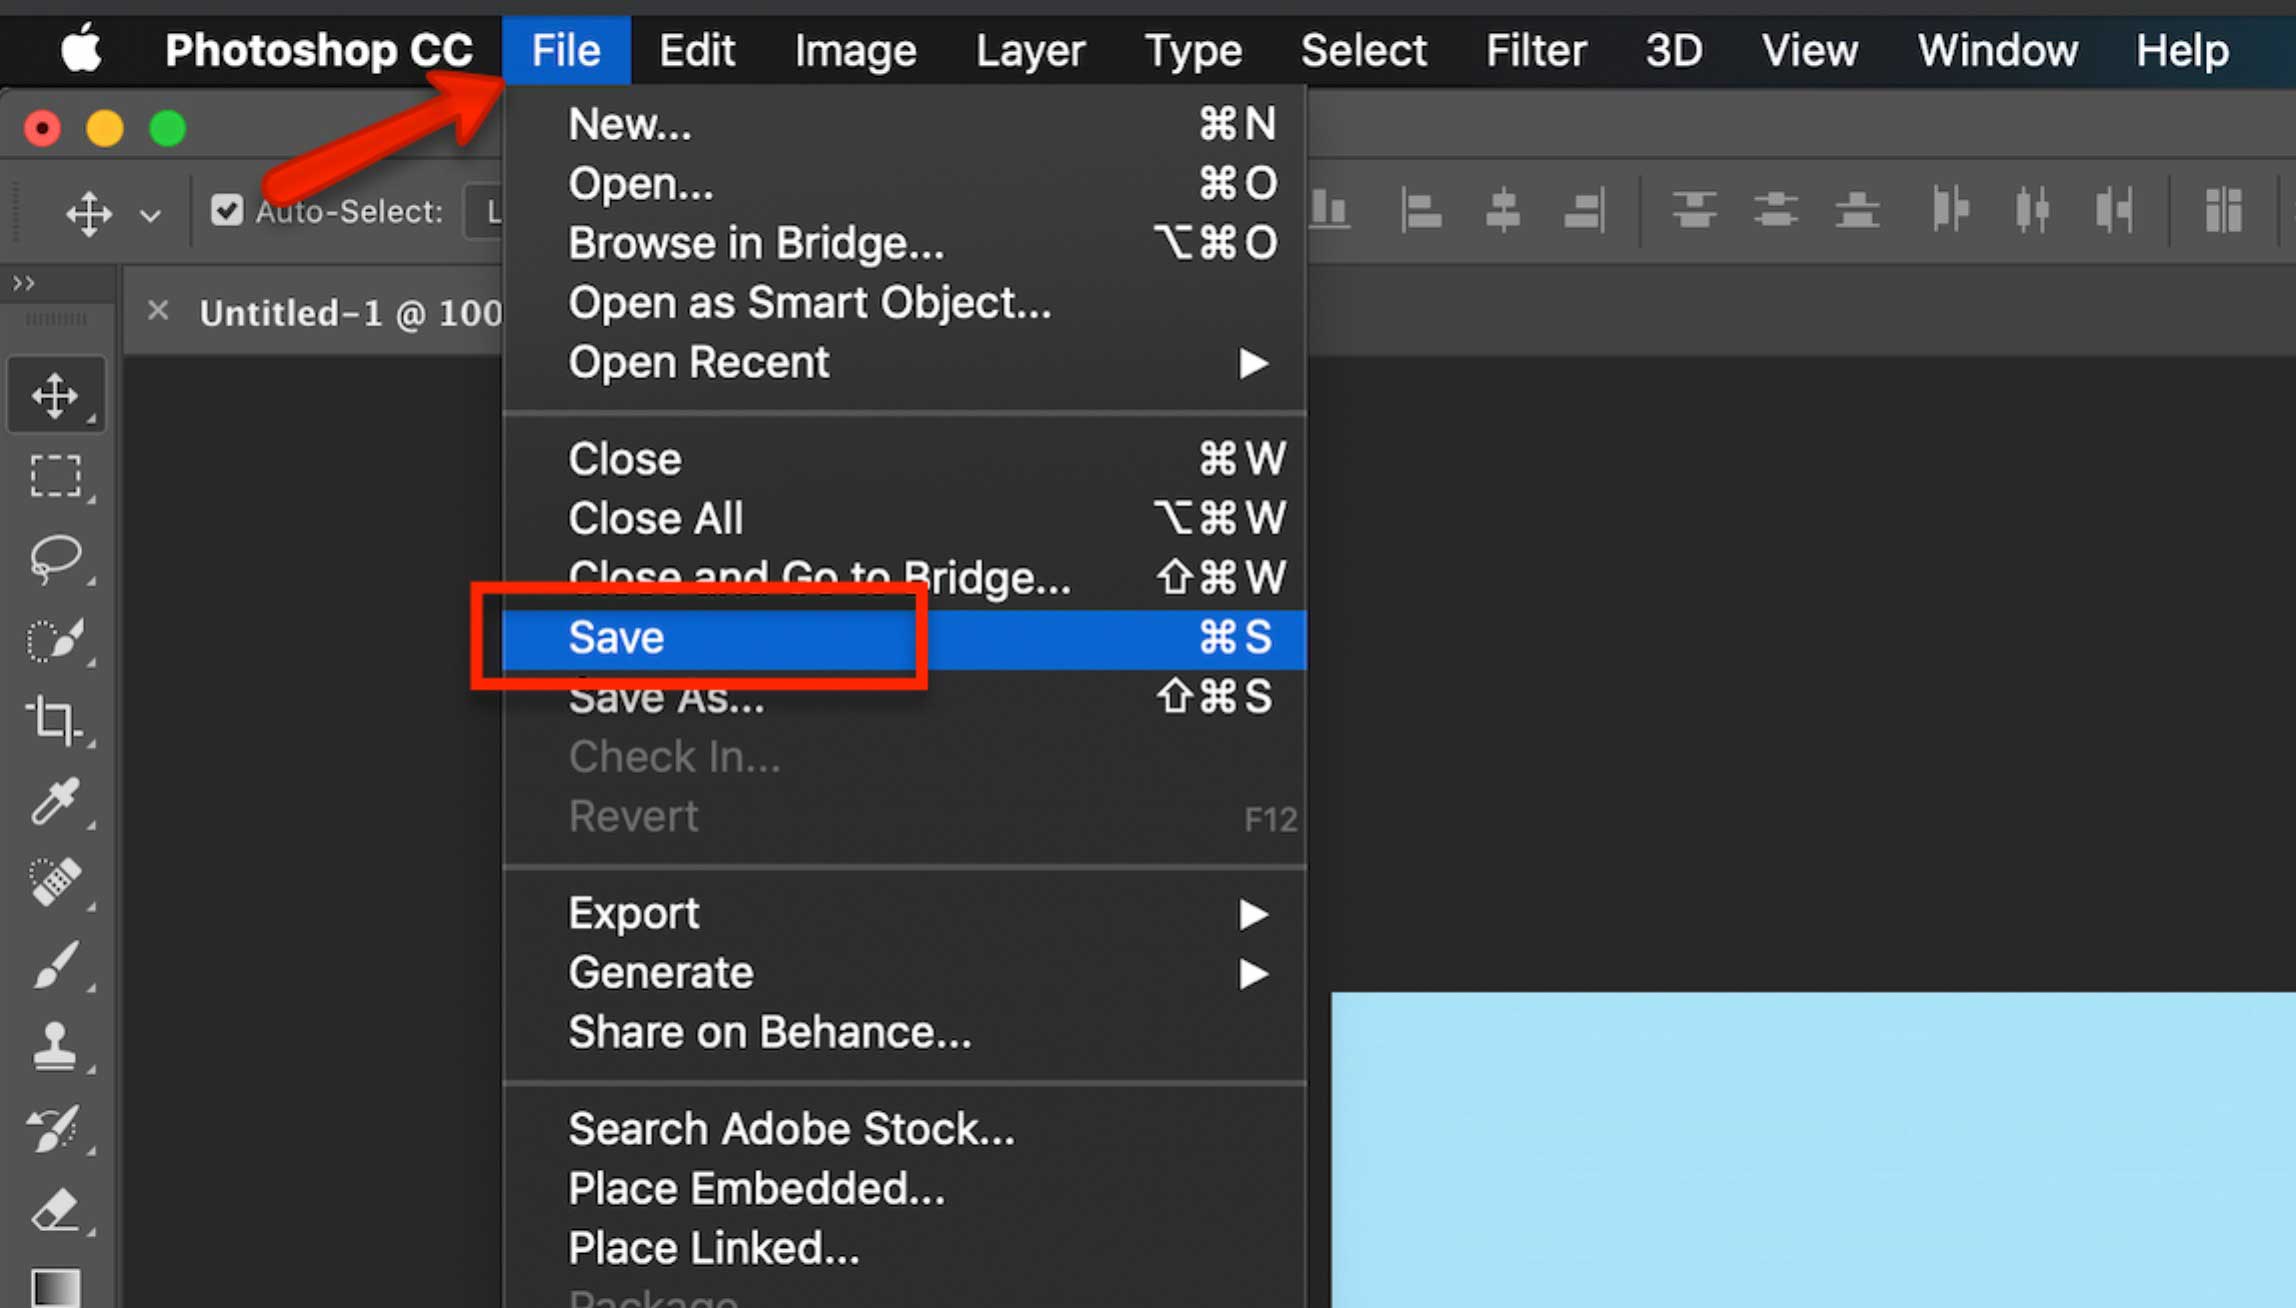
- Saving: You can either go to File – Save, give a name to your file if already not given, and click on Save. This will save your file in the default Photoshop format, PSD. Or you can simply press ctrl + s for Windows and Command + s for Mac to save the file
- Save As – You also have the save as option. In this, you can choose from various formats to save the file. Like the save option, you can select the save as from the file menu or you can press ctrl + shift + s for Windows and command + shift + s for Mac.

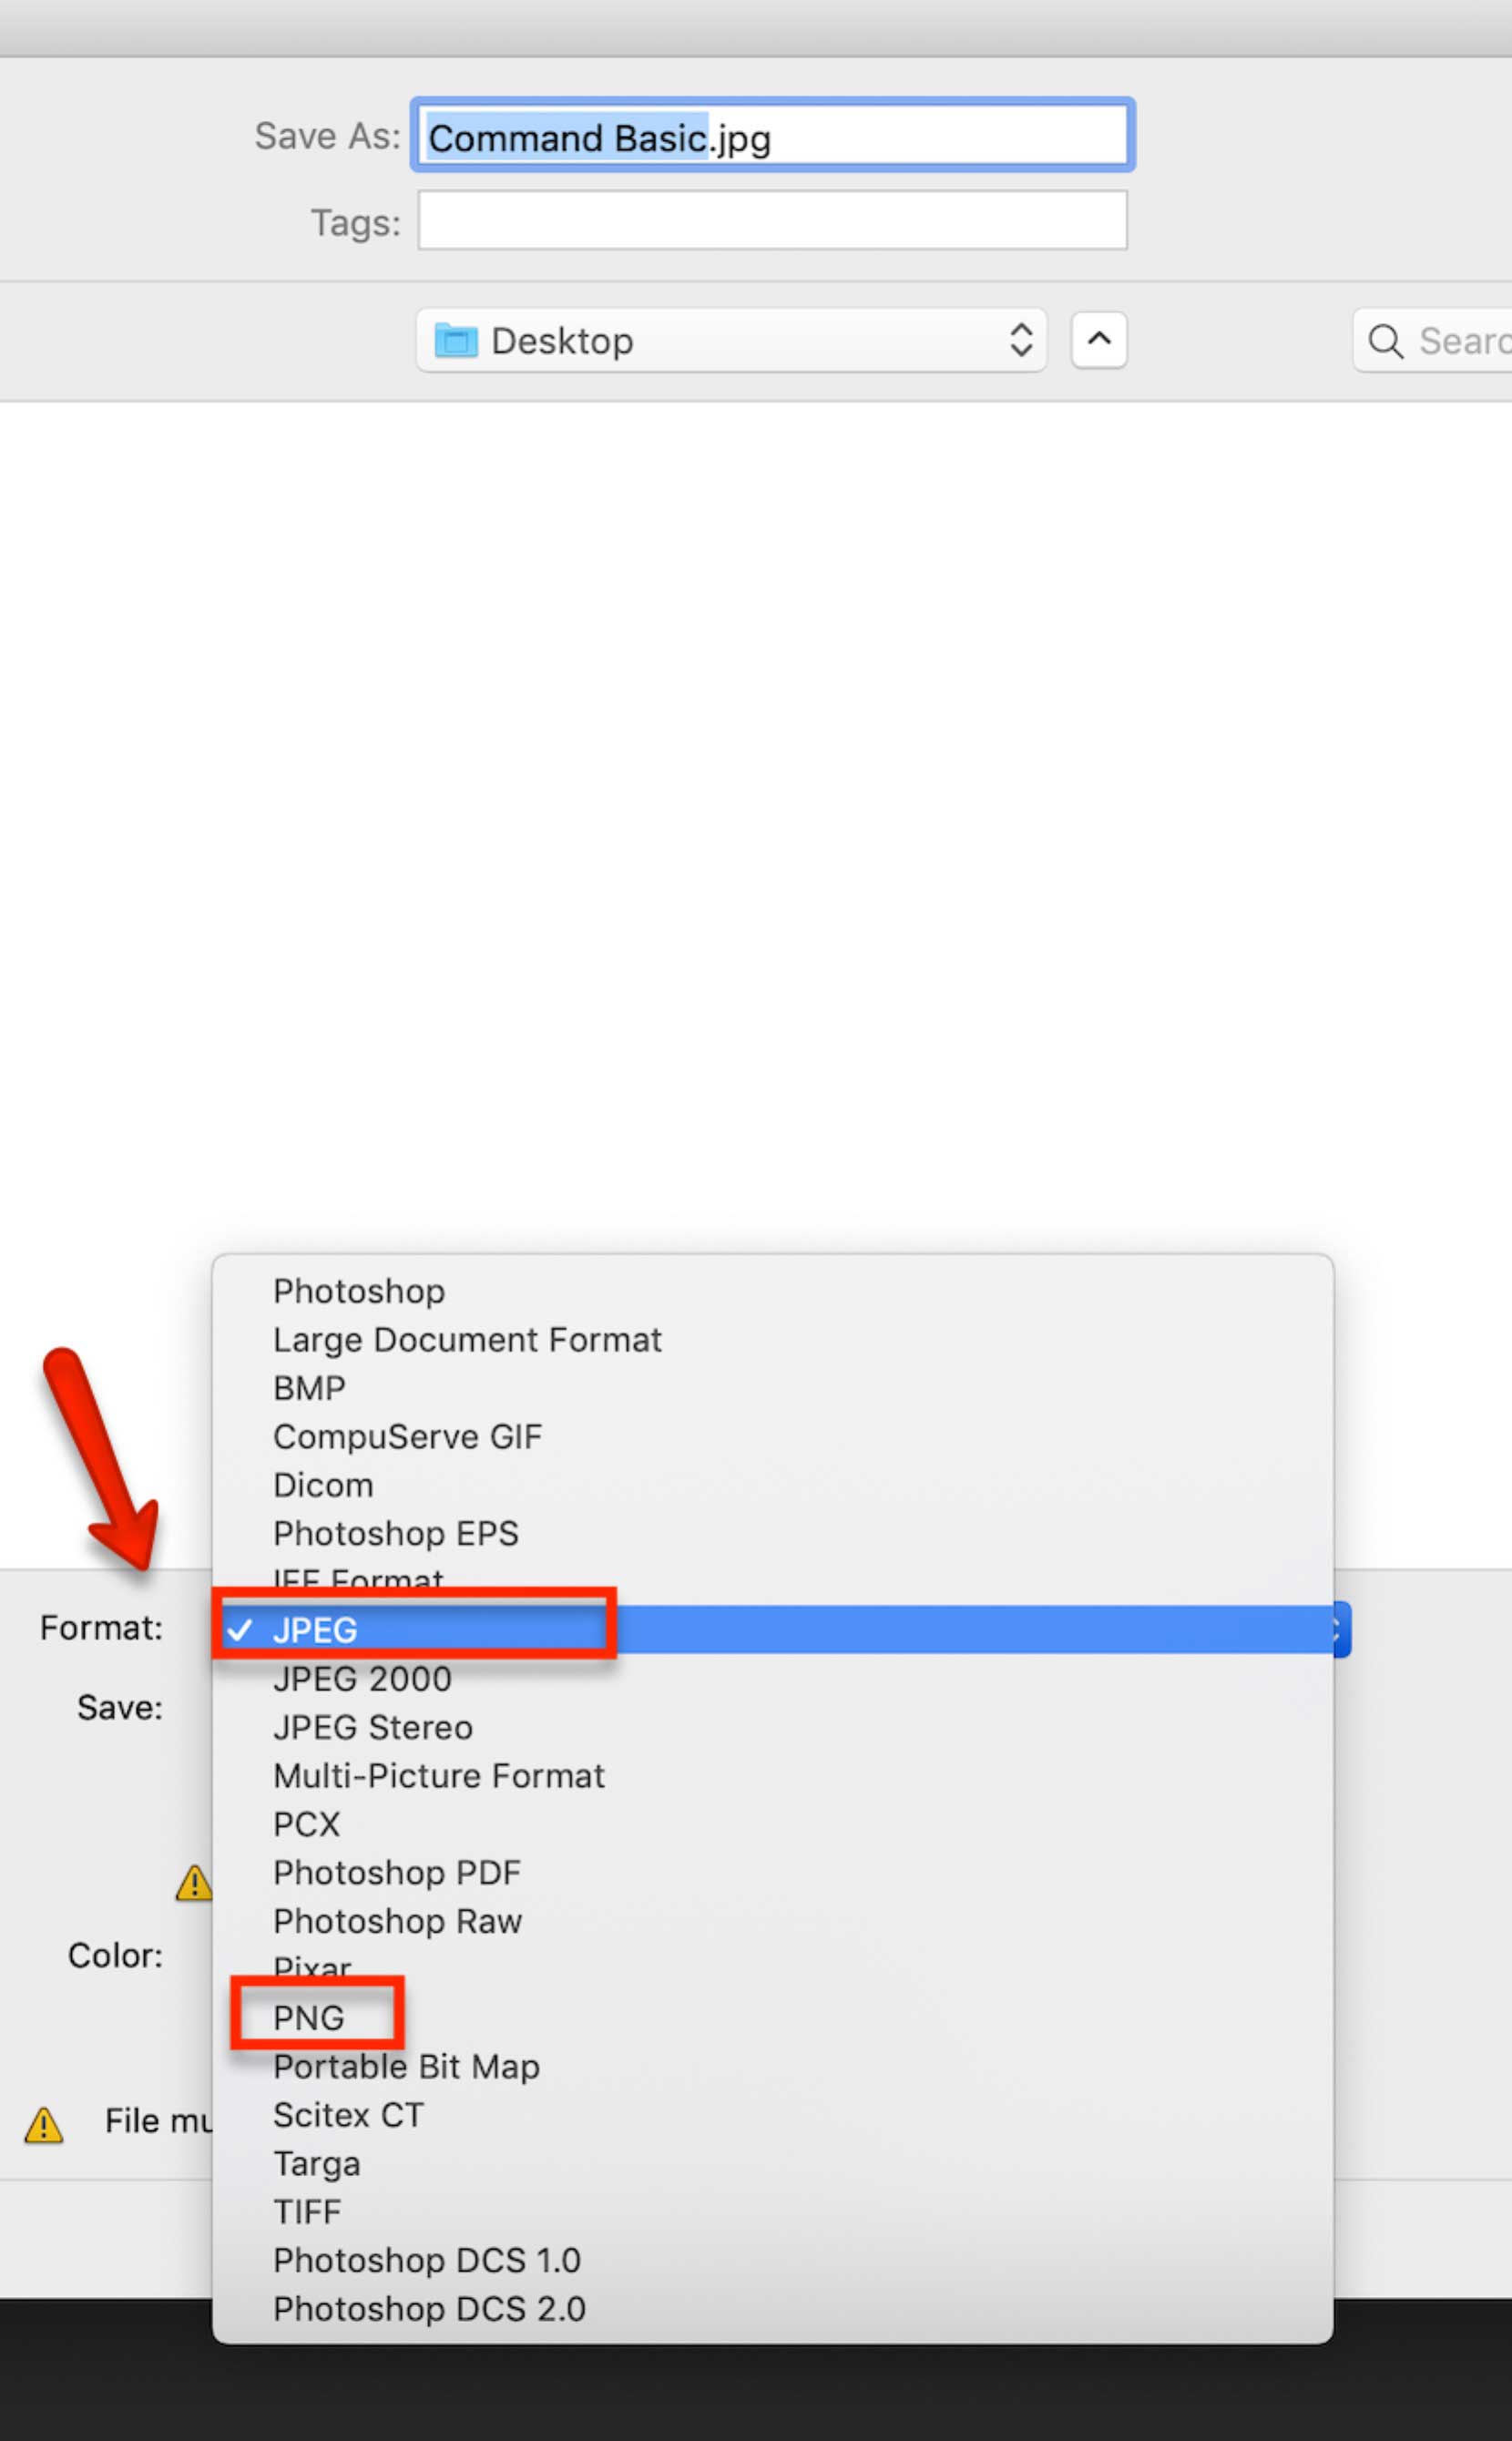
- Formats: There are different default formats available for you to save your file in. Usually, the most commonly used formats are JPEG and PNG. However, you can choose the format per your need from the drop-down list while saving your file.
Immediate Adobe Photoshop Commands
Now that we know how to begin with the Photoshop command, let us move further and understand the other commands to use the software.
- Move Tool: One of the basic tools is the move tool. You can select it from the toolbar or simply press V for it.
- Eraser Tool: To erase anything, you can select the eraser tool from the toolbar or press
- Pen Tool: The pen tool is one of the most used tools in Photoshop. You can get it from the toolbar or use the Photoshop command, i.e. press P.
- Direct Selection Tool: This is mostly used for selecting a particular node or area. Select it from the toolbar or press A for it.
- Undo: If you have to undo something or go back to the previous step, you can press Ctrl + z for Windows and Command + z for Mac. But this Photoshop command will only take you one step back. To go backward, press ctrl + alt + z for Windows and command + option + z for Mac.
- Crop: To crop an image, you can directly do it by selecting the crop tool from the toolbar or by pressing
- Text: To write anything, you can select the text tool from the toolbar of press
- Shapes: To draw different shapes like rectangles, square, ellipses, polygons, etc, you can select any of them from the toolbar or press. You can toggle between different shapes by pressing U until you get your desired shape.
- Hand Span: If you wish to span your image on the workspace, select the hand tool from the toolbar. Or hold and press the spacebar and move your cursor.
- Zoom: To zoom in or out, select the magnifying tool from the toolbar or press Ctrl and + to zoom in for Windows and ctrl and – to zoom out for Windows. For Mac, you can press command and + to zoom in and command and – to zoom out.

Advanced Adobe Photoshop Commands
Some of the advanced commands are:
- Switch Colors: You can swap between foreground and background colors by pressing X
- New Layer: By pressing Cntrl + Alt + Shift + N, you can insert a new empty layer, above the active layer, in Windows. For Mac users, the command is command + option + shift + N
- Duplicate layer: You can duplicate the selected layer by pressing Ctrl + J for Windows and Command + J for Mac. If any selection is made on the active layer, that selected area will be duplicated to a new layer.
- Merge Layer: You can merge two or more layers by selecting them and pressing Ctrl + e for Windows and Command + e for Mac.
- Group Layers: Cntrl + g in Windows and command + g in Mac will group the selected layers.
- Select the same color: you can pick up the same color with the eyedropper tool. Select it from the toolbar or simply press ‘I’.
- Free Transform: Cntrl + T for Windows and Command + T for Mac; this Photoshop command is very handy when using the free transform tool.
- Select All: Cntrl + a and command +a to select all the visible objects in the selected layer in Windows and Mac, respectively.
- Deselect: Press Ctrl + d for Windows and command + d for Mac to deselect any area.
- Invert selection: If you want to invert the selection, you can do it by pressing Ctrl + I for Windows and command + I for Mac.
Recommend Articles
This has been a guide to Adobe Photoshop Commands. Here we have discussed basic and advanced Adobe Photoshop Commands and some immediate Photoshop commands to use the software easily. You may also look at the following article to learn more –
