Updated April 4, 2023

Introduction to React Native Login Screen
A login screen can be defined as a screen that requires a set of credentials that are used to authenticate the user. Logging is the process of authenticating a user and providing him/her the access to his/her account. Login Screen majorly consists of User ID or User Name and password. Login Screen can also include fingerprint, biometric identifier, passcode, PIN number, or Retina Scan. React Native provides the best platform to create Login Screen because of the availability of a wide variety of templates available for the same. Login Screens developed are the best user experience and are very easy to use.
Syntax
1. Importing Login Screen in React Native
Syntax:
Transition-property: value of property to be applied;2. Creating Login Screen Component
Syntax:
<LoginScreen spinnerEnable spinnerVisibility source={source}
switchValue={switchValue}
onPressSettings={() => alert("Settings Button is clicked")} onPressLogin={() => alert("Login Button is clicked")} onSwitchValueChange={switchValue => setSwitchValue(switchValue)} usernameOnChangeText={username => setUsername(username)} passwordOnChangeText={password => alert("Password is: ", password)}
>
<View
style={{
position: "relative", alignSelf: "center", marginTop: 65
}}
>
<Text style={{ color: "white", fontSize: 29 }}>{switchValue}</Text>
</View>
</LoginScreen>
Examples of React Native Login Screen
Below are the examples with React Native Login Screen:
Components of TabPages Folder
1. Form.js
Code:
import React, { Component } from 'react';
import { StyleSheet
, Text
, View
, TextInput
, TouchableOpacity
, AsyncStorage
, Keyboard } from 'react-native';
import {Actions} from 'react-native-router-flux';
export default class Form extends Component {
constructor(props){ super(props); this.state={
email:'', password: ''
}
}
saveData =async()=>{
const {email,password} = this.state;
let loginDetails={ email: email, password: password
}
if(this.props.type !== 'Login')
{
AsyncStorage.setItem('loginDetails', JSON.stringify(loginDetails));
Keyboard.dismiss();
alert("You have registered successfully. " + 'Your credentials are:- User-ID: ' + email + ' P.W.:' + password);
this.login();
}
else if(this.props.type == 'Login')
{
try{
let loginDetails = await AsyncStorage.getItem('loginDetails');
let ld = JSON.parse(loginDetails);
if (ld.email != null && ld.password != null)
{
if (ld.email == email && ld.password == password)
{
alert('Welcome Back !');
}
else
{
alert('Mentioned Email and Password doesnot
exist!');
}
}
}catch(error)
{
alert(error);
}
}
}
showData = async()=>{
let loginDetails = await AsyncStorage.getItem('Login Details Are'); let ld = JSON.parse(loginDetails);
alert('email: '+ ld.email + ' ' + 'password: ' + ld.password);
}
render() {
return(
<View style={styles.container}>
<TextInput style={styles.inputBox} onChangeText={(email) => this.setState({email})} underlineColorAndroid='rgba(0,0,0,0)' placeholder="User ID"
placeholderTextColor = "#850c22" selectionColor="#fff" keyboardType="email-address"
onSubmitEditing={()=> this.password.focus()}/>
<TextInput style={styles.inputBox} onChangeText={(password) => this.setState({password})} underlineColorAndroid='rgba(0,0,0,0)' placeholder="Enter Password"
secureTextEntry={true}
placeholderTextColor = "#850c22" ref={(input) => this.password = input}
/>
<TouchableOpacity style={styles.button}>
<Text style={styles.buttonText} onPress={this.saveData}>{this.props.type}</Text>
</TouchableOpacity>
</View>
)
}
}
const styles = StyleSheet.create({ container: {
justifyContent: 'center', alignItems: 'center',
},
inputBox: {
width: 299, backgroundColor: '#ede8e8', borderRadius: 24,
paddingHorizontal: 15,
fontSize: 15,
color: '#991172',
marginVertical: 9
},
button: {
width: 299,
backgroundColor: '#b8236b', borderRadius: 24,
marginVertical: 9,
paddingVertical: 11
},
buttonText: {
fontSize: 15,
fontWeight: '500', color: '#ffffff', textAlign: 'center'
}
});
2. Login.js
Code:
import React, { Component } from 'react'; import { StyleSheet
, Text
, View
, TextInput
, TouchableOpacity
, AsyncStorage
, Keyboard } from 'react-native';
import {Actions} from 'react-native-router-flux';
import Form from './Form';
export default class Login extends Component {
signup() {
Actions.signup()
}
render() {
return(
<View style={styles.container}>
<Text>{'\n'}</Text>
<Text>{'\n'}</Text>
<Form type="Login"/>
<View style={styles.signupTextCont}>
<Text style={styles.signupText}>Not a User? </Text>
<TouchableOpacity onPress={this.signup}><Text style={styles.signupButton}>Register here</Text></TouchableOpacity>
</View>
</View>
)
}
}
const styles = StyleSheet.create({ container: {
flex: 1,
justifyContent: 'center', alignItems: 'center', backgroundColor: '#ffffff',
},
signupTextCont: { flexGrow: 1,
justifyContent: 'center', alignItems: 'flex-end', paddingVertical: 15, flexDirection: 'row',
},
signupText: { color: '#bd157a', fontSize:15,
},
signupButton: { color: '#700d49', fontSize:15,
fontWeight: '500',
}
});
3. Signup.js
Code:
render() {
return(
<View style={styles.container}>
<Text>{'\n'}</Text>
<Text>{'\n'}</Text>
<Form type="Register"/>
<View style={styles.signupTextCont}>
<Text style={styles.signupText}>Do have an account?
</Text>
<TouchableOpacity onPress={this.goBack}><Text style={styles.signupButton}>Log in</Text></TouchableOpacity>
</View>
</View>
)
}
}
const styles = StyleSheet.create({
container: {
flex: 1,
justifyContent: 'center', alignItems: 'center', backgroundColor: '#ffffff'
},
signupTextCont: { flexGrow: 1,
justifyContent: 'center', alignItems: 'flex-end', paddingVertical: 15, flexDirection: 'row'
},
signupText: { color: '#c7226c', fontSize:15
},
signupButton: { color: '#c7226c', fontSize:15, fontWeight: '500'
}
});
4. Routes.js (Router)
Code:
import React, { Component } from 'react'; import {Router
, Stack
, Scene} from 'react-native-router-flux';
import Login from './Login'; import Signup from './Signup';
export default class Routes extends Component { render() {
return (
<Router barButtonIconStyle ={styles.barButtonIconStyle} hideNavBar={false} navigationBarStyle={{backgroundColor: '#b51271',}} titleStyle={{color: '#ffffff',}}
>
<Stack key="root">
<Scene key="login" component={Login} title="Login Page"/>
<Scene key="signup" component={Signup} title="Register
here"/>
</Stack>
</Router>
)
}
}
const styles = { barButtonIconStyle: {
tintColor: '#ffffff'
}
}
5. App.js
Code:
import React, { Component } from 'react'; import {
StyleSheet, View, StatusBar
} from 'react-native';
import Routes from './pages/TabPages/Routes';
export default class App extends Component   { render() {
return (
<View style={styles.container}>
<StatusBar backgroundColor="#6e052f"
barStyle="light-content"
/>
<Routes/>
</View>
);
}
}
const styles = StyleSheet.create({ container: {
flex: 1,
}
});
Output:
- Image 1 shows the Login Screen and Image 2 shows the Register Screen that will appear when you click Register here button in the bottom of Login Screen.
- Image 3 shows the pop-up window that will appear when you successfully register with the email ID and password.
- Image 4 shows the pop-up window that will appear when you Login with your registered email ID.
- Image 5 shows the pop-up window that will appear when you try Login with the wrong credentials.

Image 1 and Image 2
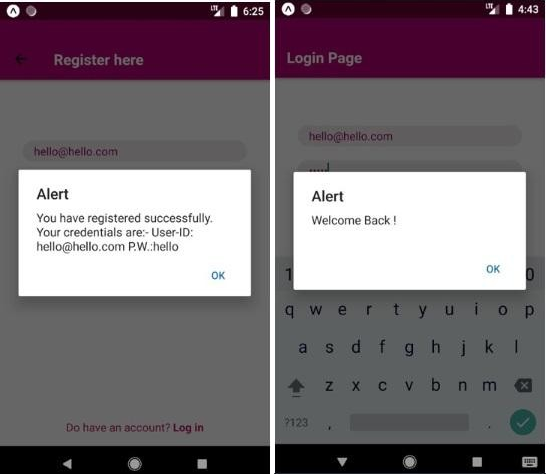
Image 3 and Image 4
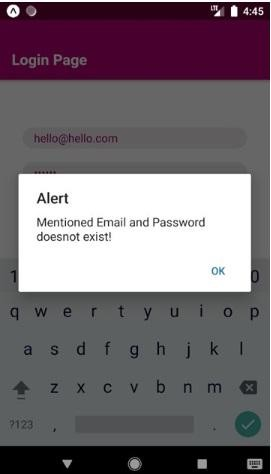
Image 5
Conclusion
On the basis of the above discussion, we got to know about importing a Login Screen and creating a Login Screen component. The example that we had created is a basic cum advanced example of creating a Login Screen. So, with the help of this example, one can create basic Login Screen as well as the advance Login Screen with a separate screen for registration as created in the example. The Login Screen that we have created is very easy to use and React Native provides the best platform in creating advanced Login Screens.
Recommended Articles
This is a guide to React Native Login Screen. Here we discuss the introduction, syntax and examples of React Native Login Screen along with Code. You can also go through our other suggested articles to learn more –

