Updated June 17, 2023
Introduction to QlikView Left Join
Join is an operation that merges two tables into a single table. Generally, the data we use to analyze in QlikView will combine multiple data sources in the form of different tables. When these tables have a common field (the field that can be used to identify a record uniquely), then that field can be used to join the two tables into one virtual table. The resulting table is a horizontal extension of the current table by adding columns from the second table.
How to Use Left Join in QlikView?
In QlikView, the Joins are defined at the script level. The tables that are already available in the script can only be joined. Once the tables are joined, QlikView will not see the individual tables, but it will only work only on the joined tables. This will be in the form of a single internal table that will be saved in QlikView. Before using a Join, we need to consider a few points as follows.
- The resultant table is usually large in size, which may lead to a slowdown in the dashboard performance.
- Data loss is possible, and the number of records in the original table may not be similar to the resultant table.
- The tables can be joined only when one or more fields are in common in the two tables.
- Having the same field name as the common key fields used to join is recommended.
- The number of common fields we will require to join is based on our personal choice.
- The fields that are joined must be of the same data type.
Before we look into the Left Join in detail, let’s understand all the types of joins available. These joining concepts are the same as the ones used in SQL.
- Inner Join: The Inner Join is used to merge and display only the common rows in the Left and Right tables.
- Outer Join: The Outer Join is used to merge and display all the available rows in the Left and Right table. Wherever there are no common fields, there will be Null values for the unmerged rows.
- Right Join: The Right Join is used to merge and display all rows from the Right table and only the matching or common rows from the Left table.
- Left Join: The same logic applies for the Left Join, where all rows from the Left table are displayed, and only the matching or common rows from the Right table are displayed.
Let’s look at an example of two tables and how the resultant table will look when a Left Join is applied. Below are two sample data sources: Sales data and Sales Volume data.
|
Sales Data |
|
| Market |
Sales (In Millions) |
|
Italy |
20 |
| Germany |
45 |
|
France |
22 |
| Austria |
10 |
|
Finland |
12 |
| Ireland |
9 |
|
Sales Volume |
|
|
Market |
Vehicles Sold |
|
Britain |
40000 |
| Italy |
20000 |
|
Austria |
2000 |
| Finland |
3000 |
|
Romania |
4000 |
| Portugal |
1000 |
Output:
|
Left Join Output |
||
|
Market |
Sales (in Millions) |
Vehicles Sold |
|
Italy |
20 | 20000 |
| Germany | 45 |
Null |
|
France |
22 | Null |
| Austria | 10 |
2000 |
|
Finland |
12 | 3000 |
| Ireland | 9 |
Null |
We will notice in the above output that all records from the ‘Sales Data,’ which is the left table, are displayed, and only matching or common rows from the ‘Sales Volume’ table is displayed. Wherever there are no common fields, there will be Null values.
Examples of QlikView Left Join
Below are the examples of QlikView Left Join:
Example #1
Open QlikView, load the first table using the script editor and name the table. The script will look something like the one below.
Code:
Sales_Data:
LOAD Market,
[Sales (in millions)]
FROM
[C:\Users\smoham87\Desktop\Sales Data.xlsx]
(ooxml, embedded labels, table is [Sales Data]);
Example #2
Load the second table using the script editor and name the table with a different name. The script will now look like the one below.
Code:
Sales_Data:
LOAD Market,
[Sales (in millions)]
FROM
[C:\Users\smoham87\Desktop\Sales Data.xlsx]
(ooxml, embedded labels, table is [Sales Data]);
Sales_Volume:
LOAD Market,
[Vehicles sold]
FROM
[C:\Users\smoham87\Desktop\Sales Volume.xlsx]
(ooxml, embedded labels, table is [Sales Volume]);
Example #3
Add the Left Join script in between the two tables in the script editor window as below.
Code:
Sales_Data:
LOAD Market,
[Sales (in millions)]
FROM
[C:\Users\smoham87\Desktop\Sales Data.xlsx]
(ooxml, embedded labels, table is [Sales Data]);
LEFT JOIN(Sales_Data)
Sales_Volume:
LOAD Market,
[Vehicles sold]
FROM
[C:\Users\smoham87\Desktop\Sales Volume.xlsx]
(ooxml, embedded labels, table is [Sales Volume]);
Click OK on the script editor window and reload the script.
Example #4
Let’s create a Table Box by adding all the fields from both tables to display the output of the Join. The Table Box will look something like the one below.
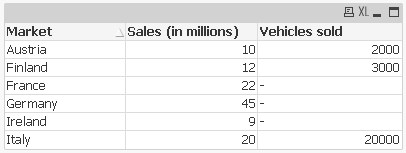
We will find that in the above Table Box, all records from the ‘Sales Data,’ which is the left table, are displayed and only matching or common rows from the ‘Sales Volume’ table.
How does the Join function differ from the Concatenate function in QlikView?:
The Join function is used to combine data rows from multiple tables. It uses a common field to merge similar rows from two tables into one, whereas the concatenated table is used to append two tables. The concatenate function will work without a common field. It will simply append the two tables even if the rows are repeating. No conditions need to be satisfied for the concatenate to take place, whereas the Join will work only when the two tables have a common field.
How does the Join Function Differ from Keep Function in QlikView?:
The Join function will combine two tables into one table using a common field, whereas the Keep function will use the same logic as the Join function but will maintain the two tables separately.
Conclusion
In most scenarios, we must work with one or more data sources. We can only bring meaningful insights from these data sources when they are merged logically. Hence, Data Joining is vital in creating these merges using a common field from both tables.
Recommended Articles
This is a guide to QlikView Left Join. Here we discuss how to use the Left Join function in QlikView and its Examples with code implementation. You can also go through our suggested articles to learn more –
