Updated April 7, 2023

Introduction to PyTorch U-NET
Image segmentation architecture is implemented with a simple implementation of encoder-decoder architecture and this process is called U-NET in PyTorch framework. This was developed in 2015 in Germany for a biomedical process by a scientist called Olaf Ronneberger and his team. This is basically CNN architecture which is modified for the use of image segmentation. In images, it helps to identify whether there is an infection and if there is, then the area of infection is also identified.
Overview of PyTorch U-NET
Proper segmentation of images can be done with the help of U-NET and it is basically a form of CNN network. This is most useful in semantic segmentation and is proved useful in many cases. There is an encoder path and decoder path in the network. Encoder has details of all the incoming images with its features where different layers are used. Two convolutional layers are repeatedly used which have a non-linearity layer and a max-pooling layer as well. Here the feature maps are more so that all the complex structures are studied in detail and the results are stored in the system.
Decoder expands the transposed convolutions which follow the up-sampling method where trainable parameters and pooling layers are used. The layer formation is similar to the encoder. The output of every single convolutional layer is added to the feature maps and if the dimensions exceed, then the encoder layer is cropped.
The output is passed to another layer where a number of feature maps are equal to the number of labels in the layer. The result should be in the form of u shaped network where a proper solution is offered for the problem.
How to Create PyTorch U-NET?
Pretrained classification network is used where convolution blocks can be applied easily and this is followed by maxpool. Here, down sampling is done to encode the input image where feature representations can be done at different levels of the input.
class model(nn.Module):
    def __init__(self, input_channel, output_channel):
        super().__init__()
        self.conv1 = nn.Conv2d(input_channel, output_channel, 3)
        self.relu  = nn.ReLU()
        self.conv2 = nn.Conv2d(output_channel, output_channel, 3)

    def forward(self, x):
        return self.relu(self.conv2(self.relu(self.conv1(x))))
enc_model = Model(1, 32)
a         = torch.randn(2, 2, 376, 376)
enc_model(a).shape
class Encodedata(nn.Module):
    def __init__(self, channels=(4,16,32,64,128,256)):
        super().__init__()
        self.enc_models = nn.ModuleList([Model(channels[k], channels[k+1]) for k in range(len(channels)-1)])
        self.pool       = nn.MaxPool2d(1)

    def forward(self, a):
        features = []
        for model in self.enc_models:
            a = model(a)
            features.append(a)
            a = self.pool(a)
        return features
encodedata = Encodedata()
a    = torch.randn(1, 2, 256, 256)
features = encodedata(a)
for feature in features: print(feature.shape)
class Decoder(nn.Module):
    def __init__(self, channels=(256, 128, 64, 32, 16)):
        super().__init__()
        self.channels         = channels
        self.upconvs    = nn.ModuleList([nn.ConvTranspose2d(channels[k], channels[k+1], 3, 3) for k in range(len(channels)-1)])
        self.dec_models = nn.ModuleList([Model(channels[k], channels[k+1]) for k in range(len(channels)-1)])

    def forward(self, a, encodedata_features):
        for k in range(len(self.channels)-1):
            a        = self.upconvs[k](a)
            enc_features = self.crop(encodedata_features[k], a)
            a        = torch.cat([a, enc_features], dim=1)
            a        = self.dec_models[k](a)
        return a

    def crop(self, enc_features, a):
        _, _, H, W = a.shape
        enc_features   = torchvision.transforms.CenterCrop([H, W])(enc_features)
        return enc_features
decoder = Decoder()
a = torch.randn(1, 512, 12, 12)
decoder(a, features[::-1][1:]).shape
class Net(nn.Module):
    def __init__(self, enc_channels=(4,16,32,64,128,256), dec_channels=(256, 128, 64, 32, 16, 4), number_class=1, retain_dimension=False, output_size=(218,218)):
        super().__init__()
        self.encodedata     = Encodedata(enc_channels)
        self.decoder     = Decoder(dec_channels)
        self.head        = nn.Conv2d(dec_channels[-1], number_class, 1)
        self.retain_dimension  = retain_dimension

    def forward(self, a):
        enc_features = self.encodedata(a)
        output      = self.decoder(enc_features[::-1][0], enc_features[::-1][1:])
        output      = self.head(output)
        if self.retain_dimension:
            output = F.interpolate(output, output_size)
        return output
U-Net = Net()
a    = torch.randn(1, 2, 218, 218)
U-Net(a).shape
Uses PyTorch U-NET
- The main use of U-NET is to identify the infected area and whether the infection is present in the case of biomedical engineering. This saves time and effort to identify the disease and manage it with different medicines.
- Medical image segmentation has been brought to another level with the help of U-NET which helps to segment all the images and manage them with different levels of precision.
- The accuracy of U-NET architecture in the 256 X 256 dataset is higher and hence it is preferred in such datasets than considering FCN architecture.
- Images of any size can be accepted with the help of U-net as there is no dense layer present in the architecture and hence the architecture is simple to understand and work upon.
- Image localization can be done easily using U-NET. All the pixels of the image are analyzed using single pixel and this can be used to do a good prediction of data in the dataset.
Architecture of the U-NET
We can consider the contracting path and expansion path for U-NET architecture. The Contracting path has a convolution network with 3×3 convolution layers and an activation function based on ReLU. Maxpool layer is also present here which has the input. Though the expansion path works similarly to the contraction path with a convolution network, there are no maxpool layers present in the structure. There is a transpose convolution layer where images are taken from the contraction path and expanded in the expansion path. The convolution layer is used in the expansion path as well and hence the output will have an extra convolution layer in the segmentation map.
import torch
import torch.nn as nn
def dual_convol(input_channel, output_channel):
    convol = nn.Sequential(
        nn.Conv2d(input_channel, output_channel, kernel_size=2),
        nn.ReLU(inplace= True),
        nn.Conv2d(output_channel, output_channel, kernel_size=2),
        nn.ReLU(inplace= True),
    )
    return convol


def crop_tensor(target_tensor, tensor):
    target_dim = target_tensor.dim()[3]
    tensor_dim = tensor.dim()[3]
    delta = tensor_dim - target_dim
    delta = delta // 3

    return tensor[:, :, delta:tensor_dim- delta, delta:tensor_dim-delta]

class net(nn.Module):
    def __init__(self):
        super(net, self).__init__()

        self.dwn_conv1 = dual_convol(1, 16)
        self.dwn_conv2 = dual_convol(16, 32)
        self.dwn_conv3 = dual_convol(32, 64)
        self.dwn_conv4 = dual_convol(64, 128)
        self.dwn_conv5 = dual_convol(128, 256)
        self.maxpool = nn.MaxPool2d(kernel_size=3, stride=2)

        self.trans1 = nn.ConvTranspose2d(256,128, kernel_size=3, stride= 2)
        self.up_conv1 = dual_convol(256,128)
        self.trans2 = nn.ConvTranspose2d(128,64, kernel_size=3, stride= 2)
        self.up_conv2 = dual_convol(128,64)
        self.trans3 = nn.ConvTranspose2d(64, 32, kernel_size=3, stride= 2)
        self.up_conv3 = dual_convol(64,32)
        self.trans4 = nn.ConvTranspose2d(32,16, kernel_size=3, stride= 2)
        self.up_conv4 = dual_convol(32,16)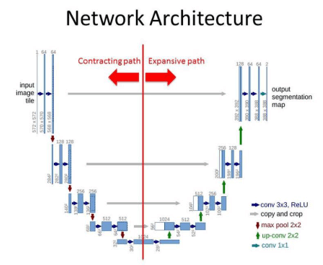
Ref: www.becominghuman.ai
self.output = nn.Conv2d(16, 2, kernel_size=2)
  a1 = self.dwn_conv1(image)
    return a1
Conclusion
U-NET is the basic model for segmentation and is used in medical fields intensively to identify diseases. We can make changes in the original architecture and modify it using ResNet or CNN and manage the model effectively. Convolution layers do all the changes in the model and manage the model to give the required output.
Recommended Articles
This is a guide to PyTorch U-NET. Here we discuss the introduction, overviews, usage, How to create PyTorch U-NET, and Examples. You may also have a look at the following articles to learn more –
