Updated April 7, 2023
Introduction to PyTorch Object Detection
Basically, object detection means a computer technique, in which that software can detect the object, location as well as has the capability to trace the object from given input with the help of some deep learning algorithm. The input will be either image or video format. The main advantage of object detection in PyTorch is that it can define or we can say that identifies the class of objects as well as their coordinates from the given input. The class of object means that it shows a category of objects, which means either it belongs to a person or system or table etc.
What is PyTorch object detection?
Item discovery is a PC vision procedure in which a product framework can distinguish, find, and follow the article from a given picture or video. The drawing box could possibly precisely find the situation of the item. The capacity to find the item inside a picture characterizes the exhibition of the calculation utilized for location.
These item location calculations may be pre-prepared or can be prepared without any preparation. In most use cases, we utilize pre-prepared loads from pre-prepared models and afterward calibrate them according to our prerequisites and diverse use cases.
Named information is of fundamental significance in these undertakings, and each calculation when incorporated requires a great deal of all-around named information. The calculations require information of changing nature to work effectively, and this should be possible effectively by either gathering significantly more examples of information or expanding the accessible information in some structure.
Information Augmentation is needed in such situations when we have especially restricted admittance to named information. Henceforth, by information expansion, we make pictures that are viably containing a similar picture yet their understanding is done another way by the calculations.
How to use PyTorch object detection?
In the above point, we already discussed what object detection is. Now let’s see how we can use object detection with different steps as follows.
1. First, we need to install the Pytorch on our system.
2. Now we need to access the vision computing models from the Pytorch so for that purpose we also need to install the Torchvision on our system.
3. We also need to install some standard packages on our system such as NumPy, imutils, matplotlib, and tqdm, etc. The main advantage of these packages is that we can install them all through the pip command.
4. Now we need to configure the development environment as per the requirement.
5. If we are working on any specified project then we need to understand the structure of the project that means where we need to store the dataset, where the output directory and script that we wrote.
6. After completion of the development environment, we need to configure prerequisites of object detection that means we need to create the custom object detection data processor.
7. Now let’s see how we can build the object detection architecture. Here we assume we use pre-trained data set models and that is splitted into two different parts: label and box and these two-part act as individual models and it has its own weight.
8. Now trained in object detection as per our requirement by using a training data set and some deep learning algorithms.
9. In the next step, we need to access the object detection and draw the object detector.
PyTorch object detection networks
Let’s consider the ImageNet challenge that comes under the de facto classification that is the COCO dataset. In the COCO dataset, we have 90 different types of common classes that are well known.
The main vision and deep learning scientists create, train, and assess cutting-edge object identification networks on the COCO dataset.
Most scientists additionally distribute the pre-prepared loads to their models so PC vision experts can undoubtedly consolidate object recognition into their own activities.
By using the following network classification, we can implement the object detection as follows.
1. Quicker R-CNN with a ResNet50 spine (more precise, yet slower)
2. Quicker R-CNN with a MobileNet v3 spine (quicker, yet all the same less precise)
3. RetinaNet with a ResNet50 spine (great harmony among speed and precision)
Steps by Steps PyTorch object detection script
Now let’s see the step-by-step implementation of object detection in Pytorch as follows. In this example, we use the pre-trained R CNN model as below.
COCO_CLSSIFICATION_NAMES = ['__background__', 'person', 'bicycle', 'car', 'motorcycle', 'airplane', 'bus', 'train', 'truck',
'couch', 'potted plant', 'bed', 'N/A', 'dining table', 'N/A', 'N/A', 'toilet', 'N/A', 'tv', 'laptop', 'mouse', 'remote', 'keyboard', 'cell phone', 'microwave', 'oven', 'toaster', 'sink', 'refrigerator', 'N/A', 'book', 'clock', 'vase', 'scissors', 'teddy bear', 'hair drier', 'toothbrush', 'cat', 'dog', 'horse', 'sheep', 'cow', 'elephant', 'bear', 'zebra', 'giraffe', 'N/A', 'backpack', 'umbrella', 'N/A', 'N/A', 'handbag', 'tie', 'suitcase', 'frisbee', 'skis', 'snowboard', 'sports ball', 'kite', 'baseball bat', 'boat', 'traffic light', 'fire hydrant', 'N/A', 'stop sign', 'parking meter', 'bench', 'bird', 'baseball glove', 'skateboard', 'surfboard', 'tennis racket', 'bottle', 'N/A', 'wine glass', 'cup', 'fork', 'knife', 'spoon', 'bowl', 'banana', 'apple', 'sandwich', 'orange', 'broccoli', 'carrot', 'hot dog', 'pizza', 'donut', 'cake', 'chair',]
Now we need to write the code to make the prediction as follows.
def prediction(specify the images the path', ths):
img_obj = Image.open('specify the images the path')
transform = Tr.Compose([Tr.ToTensor()])
img_obj = transform(img_obj)
pre_model = p_model([img_obj)
pre_class = [COCO_CLSSIFICATION_NAMES [i] for i in
list(pre_model[0]['labels'].numpy())]
pre_boxe = [[(i[0], i[1]), (i[2], i[3])] for i in
list(pre_model[0]['boxes'].detach().numpy())]
pre_score = list(pre_model[0]['scores'].detach().numpy())
pre_t = [pre_score.index(x) for x in pre_score if A > ths][-1]
pre_boxe = pre_boxe[:pre_t + 1]
pre_class = pre_class[:pre_t + 1]
return pre_boxe, pre_class
Now let’s see how we can get the object as follows.
def obj_detection(specified image path, thrs=0.4, r_t=2, t_s=2, t_t=2):
  boxe, pre_cls = prediction(specified path, ths)
  img_obj = cv2.imread(specified path)
  img_obj = cv2.cvtColor(img_obj, cv2.COLOR_BGR2RGB)
  for i in range(len(boxe)):
    cv2.rectangle(img_obj, boxe[i][0], boxe[i][1],color=(255, 0,0), thickness=r_t)
    cv2.putText(img_obj,pre_cls[i], boxe[i][0], cv2.FONT_HERSHEY_SIMPLEX, t_s, (255,0,0),thickness=t_t)
    plt.figure(figsize=(20,30))
    plt.imshow(img_obj) plt.xticks([]) plt.yticks([]) plt.show()
Explanation
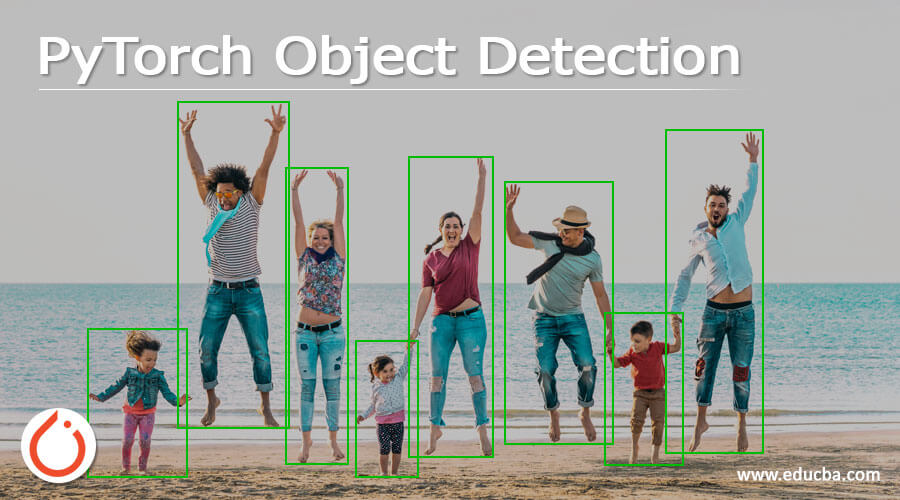
In the above example, we try to implement object detection in Pytorch. PyTorch object detection results
In the above example, we write the code for object detection in Pytorch. In this example, we use an already trained dataset. The final output of the above program we illustrated by using the following screenshot as follows.

Conclusion
We hope from this article you learn more about PyTorch object detection. From the above article, we have taken in the essential idea and we also see the representation and example. From this article, we learned how and when we PyTorch object detection.
Recommended Articles
We hope that this EDUCBA information on “PyTorch Object Detection” was beneficial to you. You can view EDUCBA’s recommended articles for more information.
