Updated April 7, 2023
Definition of PyTorch Autoencoder
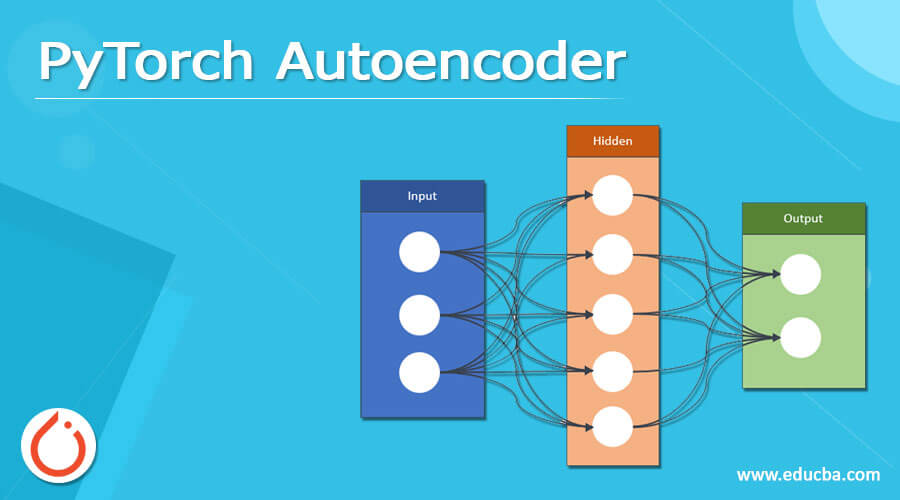
Pytorch autoencoder is one of the types of neural networks that are used to create the n number of layers with the help of provided inputs and also we can reconstruct the input by using code generated as per requirement. Basically, we know that it is one of the types of neural networks and it is an efficient way to implement the data coding in an unsupervised manner. The encoder structure depends on the conventional, feed-forward network that is used to predict the representation of input data. In another word, we can say that it is used to extract the most important feature of data and reconstruct the input.
What is pytorch autoencoder?
Autoencoders are the variations of Artificial Neural Networks which are by and large used to become familiar with proficient information coding in an unaided way. They ordinarily learn in a portrayal learning plan where they get familiar with the encoding for a bunch of information. The organization reproduces the information in a much comparative manner by learning its portrayal. In the architecture, most parts include an info layer, a yield layer, and at least one secret layer that interfaces information and yield layers. The yield layer has a similar number of hubs as info layers in light of the reason that it remakes the information sources. In its overall structure, there is just one secret layer, however, in the event of profound autoencoders, there are various secret layers. This expanded profundity lessens the computational expense of addressing a few capacities and it diminishes the measure of preparing the information needed to gain proficiency with certain capacities. The famous uses of autoencoder incorporate peculiarity identification, picture handling, data recovery, drug disclosure, and so on.
PyTorch autoencoder Implementing
Now let’s see how we can implement the PyTorch autoencoder as follows. For the implementation of autoencoders, we need to follow the different steps as follows.
Step 1: Importing required Packages and Modules:
First, we need to import the required modules that we want. We will utilize the torch. optim and the torch.nn module from the light bundle and datasets and changes from the torchvision bundle. In this article, we will utilize the well-known MNIST dataset including grayscale pictures of manually written single digits somewhere in the range of 0 and 9.
Step 2: Import the dataset:
In this step, we need to load the required dataset into the loader with the help of the DataLoader module. We can use the downloaded dataset for image transformation. Utilizing the DataLoader module, the tensors are stacked and fit to be utilized.
Step 3: Now create the Autoencoder class:
In this step, we need to create the autoencoder class and it includes the different nodes and layers of ReLu as per the requirement of the problem statement.
Step 4: Model Initializing:
Here we need to declare the model that we want to implement into our project and it totally depends on what type of requirement we have that we call model initialization.
Step 5: Output Creator:
The yield against every age is registered by passing as a boundary into the Model () class and the last tensor is put away in a yield list. The misfortune work is determined utilizing MSELoss work and plotted. In the streamlining agent, the underlying angle esteems are made to zero utilizing zero_grad(). loss.backward() processes the graduate qualities and put away. Utilizing the progression () work, the streamlining agent is refreshed. The first picture and the recreated picture from the yields list are withdrawn and changed into a NumPy Array for plotting the pictures.
Step 6: Reconstruction of Input:
In this step, we need to reconstruct the input by using the PyTorch autoencoder.
Create pytorch Autoencoder
Now let’s see how we can create an autoencoder as follows.
Code:
import torch
import torchvision
from torch import nn
from torch.utils.data import DataLoader
from torchvision import transforms
from torchvision.datasets import MNIST

img_tran = transforms.Compose([
    transforms.ToTensor(),
    transforms.Normalize([0.6], [0.6])
])

datainfo = MNIST('./data', transform=img_tran, download=True)


class autoencoder_l(nn.Module):
    def __init__(self):
        super().__init__()
        self.encoder_fun = nn.Sequential(
            nn.Linear(24 * 24, 124),
            nn.ReLU(True),
            nn.Linear(64, 32),
            nn.ReLU(True),
            nn.Linear(32, 10),
            nn.ReLU(True),
            nn.Linear(10, 2))
        self.decoder_fun = nn.Sequential(
            nn.Linear(10, 2),
            nn.ReLU(True),
            nn.Linear(32, 10),
            nn.ReLU(True),
            nn.Linear(64, 32),
            nn.ReLU(True),
            nn.Linear(124, 24 * 24),
            nn.Tanh())

    def forward(self, A):
        lat = self.encoder_fun(A)
        A = self.decoder_fun(lat)
        return A, lat

    n_ep = 8
    b_s = 124
    l_r = 2e-2
    dataloader = DataLoader(datainfo, b_s=b_s, shuffle=True)

    model = autoencoder_l()
    model.cuda()
    crit = nn.MSELoss()
    opti = torch.optim.AdamW(
        model.parameters(), lr=l_r)

    for ep in range(n_ep):
        for info in dataloader:
            image, label_info = info
            image = imahe.view(image.size(0), -1).cuda()

            result, lat = model(image)
            loss = crit(result, image)

            loss.backward()
            opti.step()
            opti.zero_grad()

        print(Result, 'epoch_n [{epoch + 1},{n_ep}], loss of info:{loss.info.item()}')
Explanation
In an example first, we import all required packages after that we download the dataset and we extract them. Here we use MINSET dataset for image extraction. After that, we write the code for the training dataset as shown. The final result of the above program we illustrated by using the following screenshot as follows.

If you want to see the in graph structures, then we need to add the matplotlib. That depends on the requirement.
PyTorch autoencoder Test Model Effect
An autoencoder is a neural organization model that looks to become familiar with a packed portrayal of information. An autoencoder is a neural organization that is prepared to endeavor to duplicate its contribution to its yield. Autoencoders are commonly prepared as a component of a more extensive model that endeavors to reproduce the info. As well as we can generate the n number of input from a single input.
PyTorch autoencoder Modules
Basically, an autoencoder module comes under deep learning and uses an unsupervised machine learning algorithm. It has different modules such as images extraction module, digit extraction, etc. that mean as per our requirement we can use any autoencoder modules in our project to train the module.
Conclusion
We hope from this article you learn more about the Pytorch autoencoder. From the above article, we have learned the basic concept as well as the syntax of the Pytorch autoencoder and we also see the different examples of the Pytorch autoencoder. From this article, we learned how and when we use the Pytorch autoencoder.
Recommended Articles
We hope that this EDUCBA information on “PyTorch Autoencoder” was beneficial to you. You can view EDUCBA’s recommended articles for more information.
