Updated March 28, 2023

Definition of Nginx Autoindex
Nginx autoindex is used the ngx http autoindex module to process the requests which was ending with the “/” slash character and it will produce the listing directory. Basically, the request is passed by using the ngx http autoindex module when the specified module will not find the index. If suppose we are using the nginx as a web server and we want to display an nginx directory with nginx autoindex.
What is Nginx Autoindex?
We can achieve by creating the index.html file, for creating autoindex we need to use the ngx http autoindex module. If suppose we don’t have an index.html file in a specified directory which we want to generate, then we can navigate the URL and path, and the same will return the error 404 i.e. page not found. However, the autoindex in nginx is providing an easy way for a directory that is particular to generate a listing automatically. Adding nginx autoindex in the nginx configuration file is very easy. Below is the syntax shown to add into the nginx configuration file is as follows.
Syntax –
location /directory_name/ {

autoindex on;

}
In the above syntax, location is nothing but the directory location on which we have specified the directory. Location is the directive uses in nginx. The directory name specifies the name of a directory which we are using for specifying the location. The name of the directory is very important. We also need to define the autoindex parameter to use the autoindex in the nginx configuration file.
At the time when we did the above changes, we need to restart the nginx server, without restarting the nginx server those parameter is not affecting the current environment. After restarting the nginx server now instead of returning the 404 (page not found) error the web server will return the index of the nginx directory. It is very useful and important to list the index automatically. We can define the indexes by using directives of nginx autoindex. There are multiple directives are available in the nginx to define the indexes.
How to Change nginx autoindex?
We can change the autoindex in nginx using the following steps.
- In the first step, we need to install the nginx server in our system. We can install the nginx server by using rpm, source as well as by using the binary installation.
apt-get install nginx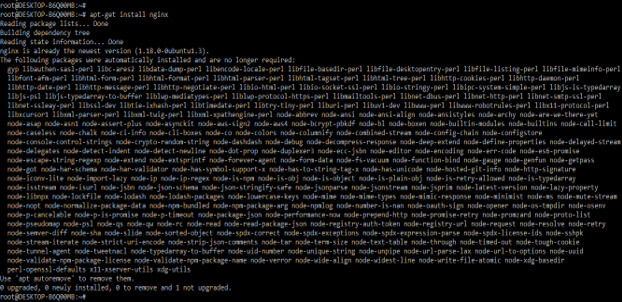
2. After installing the server of nginx, we need to start the nginx server by using “service nginx start” command. After starting the nginx service we can check the status of the service. We have installed the nginx version as 1.18 as follows.
service nginx statusnginx –V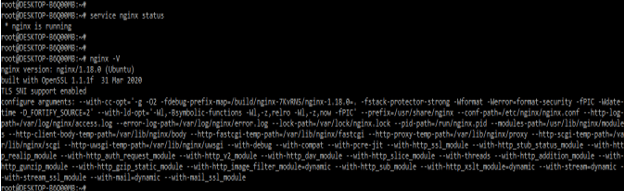
3. In this step we are creating the directory of our website from which we are using the auto indexes. We are creating the directory name as nginx_autoindex. After creating the directory we are providing the 755 umask value to the specified directory as follows.
mkdir -p /nginx_autoindex

chmod -R 755 /nginx_autoindex
4. After creating the directory and providing the umask value to the same now we are opening the nginx configuration file to add the configuration of nginx autoindex as follows.
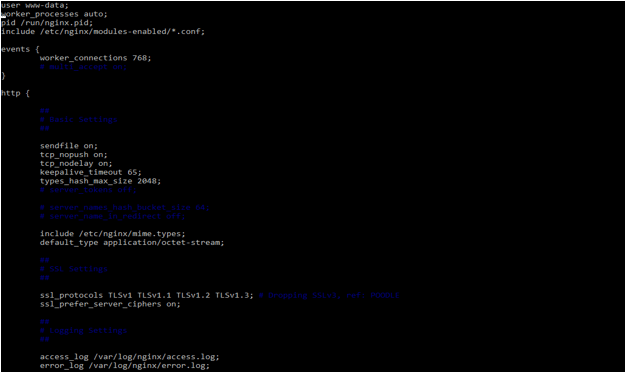
5. After opening the configuration files now we are adding the nginx autoindex configuration into the configuration files. We are adding the below code into the configuration file as follows.
Code –
location /nginx_autoindex/ {

autoindex on;

}
6. To take the effect of the above change we need to restart the nginx server by using the following command. Before that, we need to check that our configuration is valid in the nginx configuration file by using the following command.
nginx –t

service nginx restart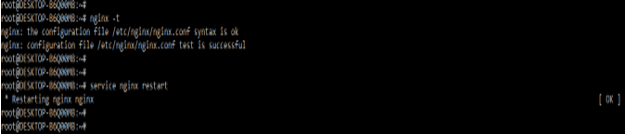
Nginx autoindex module
While using autoindex on or off we can also use three directives modules as follows.
- autoindex_exact_size – This directive of the nginx autoindex will specify that nginx will display the exact size of the file for the output into the index. This directive into the nginx module contains two options, i.e. on or off.
- autoindex_format – This directive will specify which format of the nginx index will be listed and the same has been output. This directive contains the four types of options, i.e. xml, json, jsonp, and html.
- autoindex_localtime – This directive in the module will specify whether directory time should be output as UTC or time which was local. This directive into the nginx autoindex module contains two options i.e. on and off.
The below example shows the nginx module of autoindex as follows. In the below example, we are using all the directives.
Code –
location /nginx_autoindex/ {

autoindex on;

autoindex_exact_size off;

autoindex_format html;

autoindex_localtime on;

}
Nginx autoindex Example
We have already installed the nginx server so we have no need to install it again.
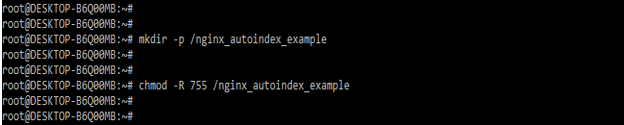
First, we are creating the data directory name as nginx_autoindex_example for defining the example. After creating the directory then we are providing the 755 umask value to this directory as follows.
mkdir -p /nginx_autoindex_example
chmod -R 755 /nginx_autoindex_example
After creating the directory name as nginx_autoindex_example now we are opening the configuration file of nginx to add the configuration.

After opening the file of nginx configuration now we are adding the following configuration into the nginx configuration file as follows. We are adding autoindex_exact_size and autoindex_format parameter by using autoindex as an option.
Code –
location /nginx_autoindex/ {

autoindex on;

autoindex_exact_size off;

autoindex_format xml;

}
After adding the autoindex configuration now we are checking the syntax and restarting the nginx server.
nginx –t

service nginx restart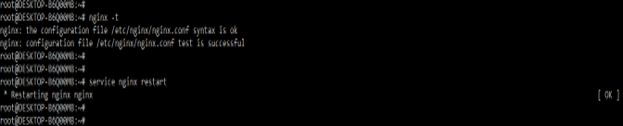
Conclusion
We can achieve this by creating the index.html file, for creating autoindex we need to use the ngx http autoindex module. Basically, the request is passed by using the ngx http autoindex module when the specified module will not find the index.
Recommended Articles
This has been a guide to Nginx Autoindex. Here we discussed the Definition, What is Nginx Autoindex, How to Change it with examples and code implementation. You can also go through our other suggested articles to learn more –
