Updated May 30, 2023
Introduction to MySQL Replication
The following article provides an outline for MySQL Replication. For maintaining the high availability of the database and load balancing when a large number of users are accessing the MySQL database, various strategies need to be implemented, and multiple database servers can be used that work together with the server and the users. In this case, it is straightforward to provide this facility if all the operations are read-only, which means no operation is performed on the data present in the database servers. Only the available data is retrieved.
But in the case of reading or writing servers that involve all kinds of manipulations on the database’s data becomes difficult. This is because a single change in one database should be reflected in all the servers serving the users. This is called replication of the data. A single change in the database server must be done in all the servers with which it works to provide high availability to the end users.
Working on MySQL Replication
Given below is the working of MySQL Replication:
- In MySQL, one database server typically serves all the modification-related operations and requests. Other database servers, such as agent or standby servers, receive and apply these changes.
- That means the master nodes are always the senders of the replicated data, while slave nodes receive the replicated data and apply the same changes over there.
Setup of Replication
To demonstrate the master-slave configuration of replication, it is necessary to have two instances of MySQL running. However, you can have any number of slaves where the replication should be maintained. We will consider two nodes over the private network for the current demonstration. One will be the master, and the other will be a slave.
- master IP: 172.16.2.4
- slave IP: 172.16.2.15
Firstly, we will set up the master. For this, you will have to follow the following steps:
Given below are the steps:
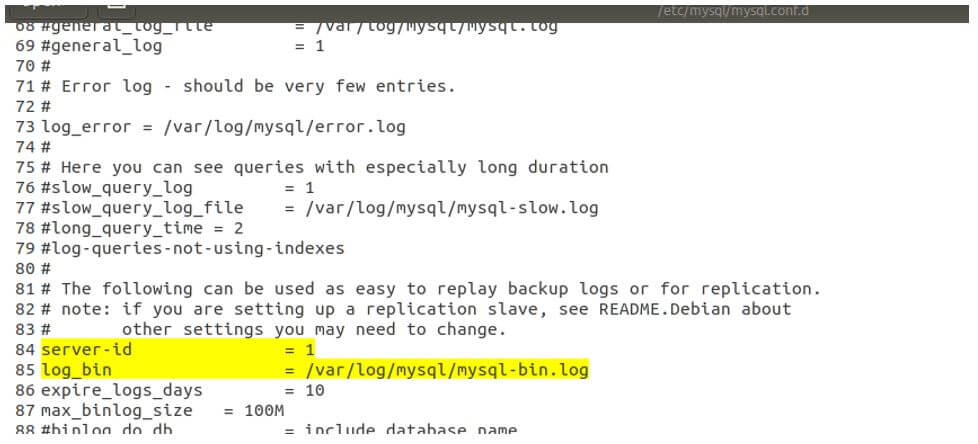
1. Set the configuration file
The first thing to do is add the following lines in your configuration file mysqld.cnf. The bind-address statement will ensure that your master is listening at that address. The server-id will be set to 1. This id needs to remain unique within the network of master-slaves in which your replication will work. This is used to identify the node. Further, the log_bin is specified as what will determine the path where the logs will be stored.
- bind-address: 172.16.2.4
- server-id: 1
- log_bin: /var/log/mysql/mysql-bin.log
We have changed configurations in the configuration file located in /etc/mysql/mysql.conf.d/mysqld.cnf folder.

2. Reflect changes made in the configuration file, restart the MySQL service
To ensure the proper application of all the changes made in the configuration file during the setup process, it is necessary to restart the MySQL server by executing the following statement.
Code:
sudo systemctl restart mysqlOutput:

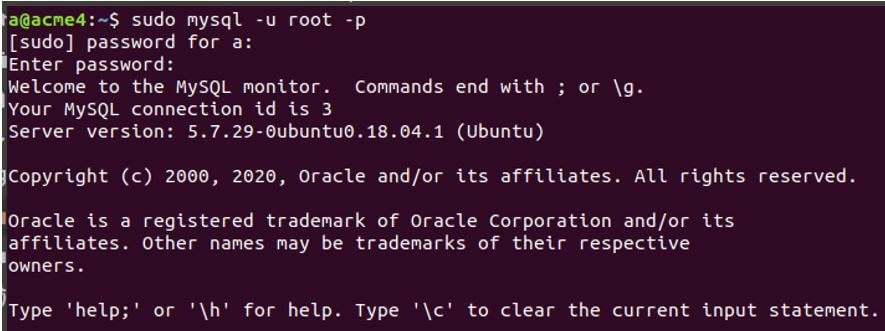
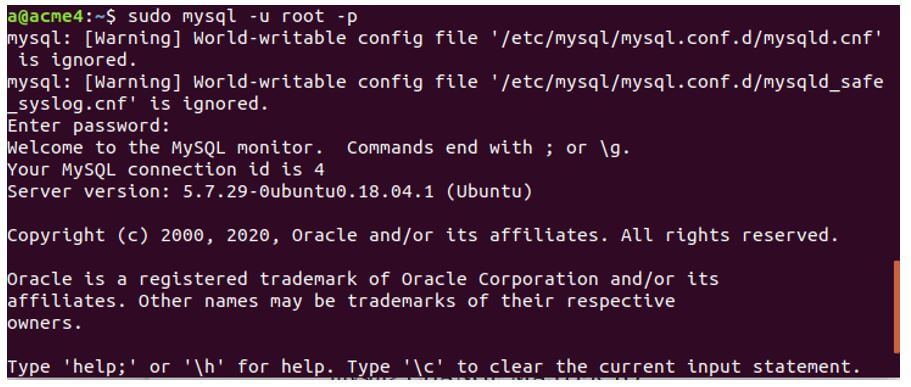
3. Create a user who can have replication privileges
We will create a new user named newUserForRep that will be used for communication between slaves and masters. For that, the created user must have the privilege of replication on the slave.
Code:
sudo mysql -u root -pOutput:
Code:
CREATE USER 'newUserForRep'@'172.16.2.15' IDENTIFIED BY 'passwordForSlave';Output:

Code:
GRANT REPLICATION SLAVE ON *.* TO 'newUserForRep'@'172.16.2.15';Output:

4. Lock the master database
Now, we will have to lock the database for write operations to perform only read operations. This is necessary to lock master data to get the snapshot of the slave and is required until we dump the database. That is our further step. To lock masters, we will use the following command.
Code:
FLUSH TABLES WITH READ LOCK;Output:

5. Store log position of master replication for further reference
Now, we need to note the location of the logs where they will be stored. This information will be utilized later when setting up the slave node.
Code:
SHOW MASTER STATUS;6. Dumping of the master database
Now, we will dump our master database using the following command.
Code:
sudo mysqldump -u root -p --all-databases --master-data > dbdump.sqlOutput:

7. Unlock the master database
After dumping our master database, we can now unlock the tables using the following command.
Code:
UNLOCK TABLES;Output:

8. Copy the dumped file to the slave node
Now, we will copy the master data that we had dumped earlier to the slave node by copying the dumped file to the slave node.
For example, using scp and the following command, we can copy master data to the slave.
Code:
scp dbdump.sql 172.16.2.15:/tmpOutput:
![]()
Configuration of the Slave
Given below is the configuration of the slave:
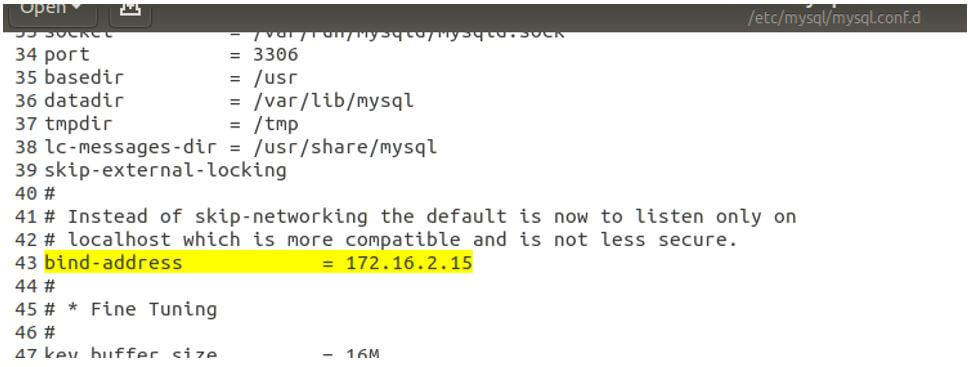
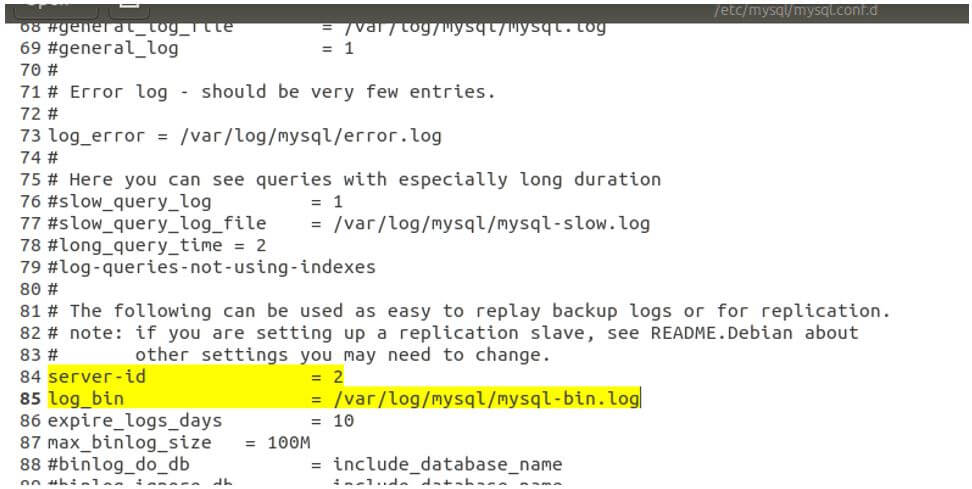
1. Set the configuration file
Like the master process, we will make changes to the configuration file for the slave node setup by making the following changes.
- bind-address: 172.16.2.15
- server-id: 2
- log_bin: /var/log/mysql/mysql-bin.log
2. Reflect the changes made in the configuration file, restart the MySQL service
The next step is for the slave to restart the MySQL service using the following command.
Code:
sudo systemctl restart mysqlOutput:

3. Import the dumped file for the database
The next step is to import the master data dumped at the master node to the slave node using the following command.
Code:
mysql -u root -p < /tmp/dbdump.sql4. Setup the slave node to communicate with the master
Now, we will make sure that the slave and master are communicating properly by stopping it and setting the master to our master by mentioning the things we had noted earlier and using the user we had created for replication, and restarting the slave node.
Code:
sudo mysql -u root -pOutput:
Code:
STOP SLAVE;
CHANGE MASTER TO
MASTER_HOST='172.16.2.4',
MASTER_USER='newUserForRep',
MASTER_PASSWORD='passwordForSlave',
MASTER_LOG_FILE='mysql-bin.000001',
MASTER_LOG_POS=613;
START SLAVE;
5. Check the working of the replication
This is it. You have completed your setup for replication. Now, all you have to do is to check whether replication is working fine by creating a new table or inserting the values in the table on the master node and then check on the slave node whether the updated data is written over there too by retrieving the records and viewing the schema.
Conclusion – MySQL Replication
We can provide high availability and balance the load on the database server by maintaining multiple database servers that can work together and implement replication to serve many users without affecting the performance much in the MySQL database. When performing replication, it is crucial to exercise caution and ensure that all the settings are accurately configured for the respective database servers, considering the role they will fulfill in replication and request handling.
Recommended Articles
We hope that this EDUCBA information on “MySQL Replication” was beneficial to you. You can view EDUCBA’s recommended articles for more information.
