Updated May 30, 2023

Introduction to MySQL ALTER TABLE Add Column
In MySQL, you use the ALTER TABLE command to perform various operations on tables, such as changing the table name, renaming columns, adding new columns, removing existing columns, and modifying data types, lengths, and indexes of columns. You commonly combine this command with ADD, DROP, and MODIFY statements to execute specific operations on tables, columns, or indexes. We can even change the sequence of the columns in the table using the ALTER TABLE command. In this article, we will learn the syntax and the usage of the ALTER TABLE command statement to add a column to a table with the help of examples.
ALTER TABLE statement with ADD command
We can add one or more columns in the existing table by using the ALTER TABLE statement with the ADD command. The syntax of adding the columns using the ALTER statement is as follows –
ALTER TABLE name_of_table
ADD name_of_new_column details_of_column
[ FIRST | AFTER name_of_existing_column ];- name_of_table – This is the name of the existing table in which we wish to add a new column using the ALTER query.
- name_of_new_column – This is the name of the new column we add to the table.
- details_of_column – This helps specify the details and definition of the new column we are adding, including the column’s datatype and other attributes such as NULL or NOT NULL, UNIQUE, etc.
- name_of_existing_column – We can specify the column position we are adding concerning the existing position of the columns in the table named name_of_table by using the FIRST and AFTER keywords. FIRST represents that the new column will be placed in the beginning, while AFTER signifies the position of the new column after the name_of_existing_column named column in the table. The default position where the new column is added is at the last.
Example using command-line
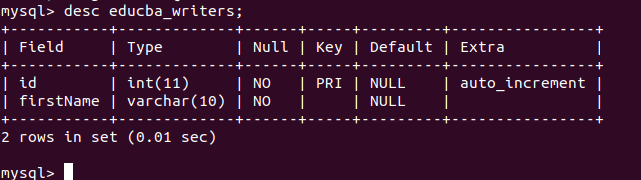
The educab_writers table consists of the following columns:
DESC educba_writers;Output:
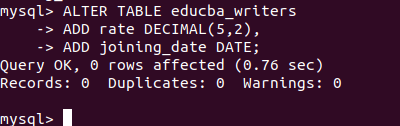
We want to add two columns named rate and joining_date columns to the educba_writers table using the ALTER TABLE command. The datatype of the rate will be decimal with precision and scale as (5,2), and the datatype of joining_date should be DATE. We can write the ALTER TABLE query with ADD statement in it to add two columns in the following way –
ALTER TABLE educba_writers
ADD rate DECIMAL(5,2),
ADD joining_date DATE;
Execution of the above query statement gives the following output on the command line –
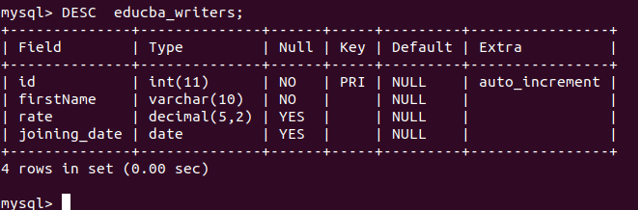
Let us describe the educba_writers table once again to check whether our columns are added successfully by using the following query statement –
DESC educba_writers;that gives the following output –
Let us retrieve the records in the educab_writers table and see the value for the added columns for existing records –
select * from educba_writers;that gives the following output –
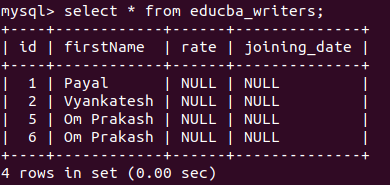
All column values have a default value of NULL.
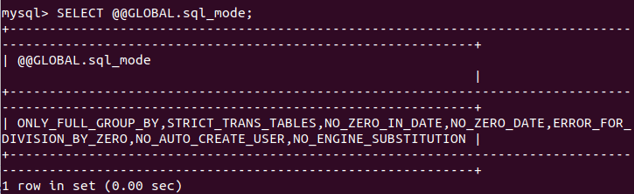
The default value of the newly added columns depends on the value of the SQL mode. To check the default value assigned to a column in MySQL, you can execute the following query:
SELECT @@GLOBAL.sql_mode;That gives the following output on my command-line database server-
Example using SQLYog client tool –
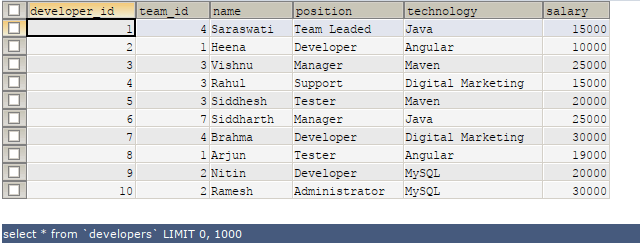
Let us consider an existing table named developers. After executing the following SELECT command –
SELECT * FROM 'developers';it gives the following output –
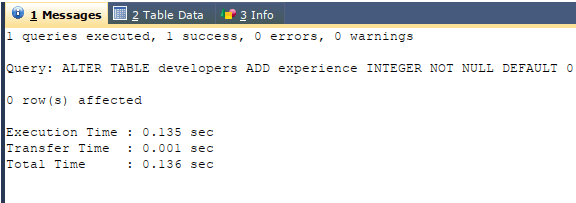
We want to add one more column named experience, which is of integer datatype, as it will store value in years. For this, we can make use of the ALTER TABLE statement with ADD command, and the query will be somewhat like this –
ALTER TABLE developers
ADD experience INTEGER NOT NULL DEFAULT 0;
executing the above query will give the following result –
Let us check the records by selecting them using this query –
SELECT * FROM 'developers';that provides the following output –
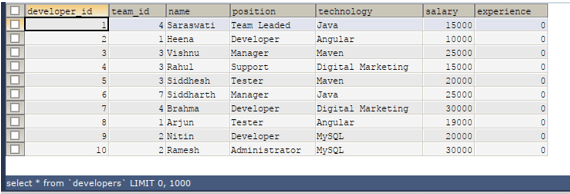
Please note that we set the value of the newly added “experience” column to 0, as stated in the column definition
We can even add multiple columns in a single query statement. Suppose we add three more columns named joiningDate, age, and address. We can do so by executing the following ALTER TABLE command –
ALTER TABLE developers
ADD joiningDate DATE
FIRST,
ADD age INT NOT NULL
AFTER NAME,
ADD address VARCHAR(100) NOT NULL
AFTER experience;
that gives the following output –

Let us now retrieve the records from the developers’ table to view our changes by executing the following select query –
SELECT * FROM 'developers';that gives the following output –
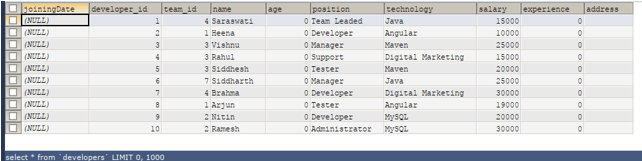
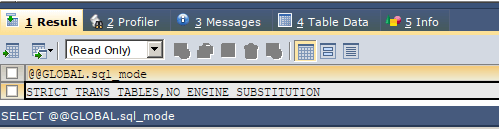
All the new columns are added at the positions we specify and are initialized to their default values based on their data types. The default value of the integer datatype column is 0, varchar, i.e., the string is “” blank and NULL for a date. The default value of the newly added columns depends on the value of the SQL mode. You can check this value by executing the following query:
SELECT @@GLOBAL.sql_mode;That gives the following output on my remote server for which we are using the client-side tool named SQL yog that is used above –
Conclusion: MySQL ALTER TABLE Add Column
We can use the ALTER TABLE command to add, modify, and drop the table’s columns and rename the columns and the table names. With the ALTER TABLE command, we can use the ADD statement to add one or more columns to existing tables. This allows us to define the new column’s data type and specify constraints and restrictions.
In MySQL, the database will assign a default value if you don’t specify default values for a newly added column. The default value can be NULL or a value based on the column’s data type. For example, a VARCHAR datatype column may have an empty string (“”) as the default value, while an INT or INTEGER datatype column may have a default value of 0 (zero). The actual default value assigned depends on factors such as the strict SQL mode and the values assigned to other SQL variables.
Recommended Articles
We hope that this EDUCBA information on “MySQL ALTER TABLE Add Column” was beneficial to you. You can view EDUCBA’s recommended articles for more information.
