Updated June 3, 2023
Definition of MariaDB bind-address
When we install the MariaDB database server, it only accepts the connection of its localhost. Suppose users need to connect with different remote client computers from a remote relocation. In that case, we cannot connect remote users, so we can use the MariaDB bind-address concept to connect databases from different remote clients from different remote locations. When a configuration is correct, we can establish a connection between them. If the database is connected to the internet, we are able to access it from anywhere around the world where the internet facility is available. MariaDB server runs on a default IP address that is 127.0.0.1.
Syntax:
grant all privileges on *.* to 'user name'@'IP address.%' identified by 'new password of user' with grant option;Explanation:
In the above syntax, we use the grant all privileges command to list out all allowed privileges, after that, we use *.* This symbol defines which table or database has these privileges followed by the user name with their IP address, or we can say host address to connection purpose, and the password field is an optional part of this syntax. Another important thing is that the % symbol is used for a wildcard entry.
How bind-address works in MariaDB?
Let’s see how bind-address works in MariaDB as follows.
Basically, MariaDB packages bind with by default IP address that is 127.0.0.1. In old packages, they used skip-networking, and nowadays we use bind addresses. So let’s see one by one.
skip networking: This is a very simple method to configure, and in this method, MariaDB runs without any TCP/IP protocols.
bind address: In this method, we required two networking interfaces, which are a Loopback network device and a physical NIC the NIC means Network Interface Card, which allows us to communicate with the network. Actually, this is not required because we have a different option for that purpose. The default IP address of MariaDB is suitable to connect them in a bind-address network that refers to the local IP address, or we will receive a fatal error, and MariaDB will not start. So if we need to connect them in the network, we need to remove the bind-address directive (The MariaDB supports one bind-address if the bind-address directive is left out).
If the bind-address runs with 127.0.0.1 (localhost) address so, at that time, no one is able to connect to the MariaDB server from a different host or different remote location.
Now let’s see the different steps to bind the address as follows.
The first step we need to find out the default files. We need to enable MariaDB to listen to remote location connections, so we need to edit the default file, which means we need to edit my. cnf file as per our requirement.
The second step is editing the default file. After getting the configuration file, the next step is to open that file in the edit tool and try to find the below lines.
[mysqld]
……
…..
skip - networking
……
bind – address = < specified ip – address>
….
There is no need to have the same order mentioned above, sometimes, it may be different.
After finding the abovementioned lines, make sure both are commented on using the # symbol as follows.
mysqld]
……
…..
# skip - networking
……
# bind – address = < specified ip – address>
….
The same thing again here there is no need to have the same order.
Otherwise, we can have another alternative path to add some lines at the end of my. cnf configuration file and the lines we need to add are as follows.
[mysqld]
skip - networking = 0
skip – bind-address
After adding this line save the file and restart the MariaDB service.
The third step, we need to grant user connection from remote hosts. Now installed, MariaDB servers accept connections from remote hosts, as per our requirement, we can add a new user that we need to allow to connect from different remote locations that means other than the localhost.
Examples
Now let’s see the example of MariaDB bind address as follows.
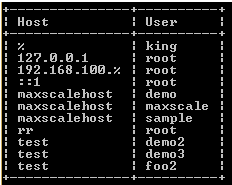
Now first, see the existing remote user from the MariaDB server as follows.
SELECT host, user FROM mysql.user WHERE Host <> 'localhost';Explanation:
In the above example, we use the select and where clause, In this example, we use the select clause with two attributes, such as host and user, as shown in the above statement, after that, we access MySQL.user table, or we can also call a system table that contains all user details. Finally, we add conditions by using the where clause, as shown above, statement. The final output of the show databases queries we illustrate by using the following snapshot.
Suppose we need to create a new user at that time we can use the following syntax as follows.
create user specified user name;Explanation:
In the above syntax, we use to create a user statement to create a new user on the MariaDB server, here, the specified user name means the actual user name that we need to create.
Now see how we can add the user to get remote access from different remote locations as follows.
Example
GRANT ALL PRIVILEGES ON *.* TO 'king'@'198.162.10.1.%'
IDENTIFIED BY 'sample123' WITH GRANT OPTION;
Explanation
In the above example, we use the grant all privileges command to a specified table or database, as shown in the above statement, by using the *.* symbol. Here the king is the username that we need to connect them from different remote locations with their IP address, or we can say the host is used to connecting this user mentioned in the above statement after that, we assign a password, and the password field is an optional part of this syntax, and the most important thing is that % symbol is used for a wildcard. The final output of the show databases queries we illustrate by using the following snapshot.
![]()
Conclusion
We hope from this article, you have understood the MariaDB bind address. From this article, we have learned the basic syntax of MariaDB bind-address, and we also see different examples of MariaDB bind address. This article taught us how and when to use MariaDB bind addresses.
Recommended Articles
We hope that this EDUCBA information on “MariaDB bind-address” was beneficial to you. You can view EDUCBA’s recommended articles for more information.
