Updated May 29, 2023

Introduction to Linux Automount
In the Linux operating system, the automount utility is used to manage the automount points for autofs, i.e., the Linux automounter. The Linux automount functionality provides them with on-demand and an auto unmounting file system to the environment. In this utility, there is no need to do the manual mounting. The major advantage of the automount utility is for remote applications or users. It will automatically access or get the data from the respective storage. The complete activity of the automount is managed by the “autofs” utility.
The autofs utility was written by the Christoph Lameter (email:- [email protected]). It will further be edited by H. Peter Anvin (email:- [email protected]) and Ian Kent (email:- [email protected]).
Syntax of Text Editors
automount [options] [master_map_name]Major file
/etc/auto.master
/etc/auto.XXXX
systemctl start autofs
Note: As such, there is no major command for autofs utility. We need to focus on the above master and automount file configuration majorly.
- automount: We can use the “automount” keyword in the syntax or command. It will take different arguments like options and master_map_name. As per the provided arguments, it will manage the autofs functionality in the Linux environment.
- /etc/auto.master: This is the master file for autofs utility. As the name suggests, it will manage overall automount functionality on the Linux operating system. In this file, we are adding the root directory information for the automount.
- /etc/auto.XXXX: As per the auto master file configuration, we must create the supporting auto DB/file for the automount activity. As per the requirement, we can define the file name. But make share that the file name is similar to the master config and the etc file name.
- systemctl start autofs: Once all the configuration parameters will configure, we need to start the autofs service. As per the requirement, we can restart, stop, or start the autofs service.
How Linux Automount Works?
In the Linux environment, we can mount the different types of file systems in the environment like NFS, ext3, ext4, xfs, etc. But while adding or mounting the file system, we need to run the manual command to mount on the Linux operating system. It is similar to the unmounting process also. But if we would need functionality to mount the file system automatically and no need to add the manual commands in it, then we need to use the “autofs” utility. In this utility, the file system will automatically mount when there is an access request. It will automatically unmount when there is no access request pending or configure the timeout window.
The major drawback of the Linux fstab is the number of mounting point information. When we add the number of mount point information to it, it will assign the dedicated resources to handle it irrespective of how frequently the users are accessing the mounted file system. If it will not handle properly, then there is overhead for the Linux system. Unnecessary system resources are consumed, and the system performance will degrade.
Below is the list of options we can use with the automount command.
| Sr No | Option | Description |
| 1 | -h –help | It will print the automation option and exit it |
| 2 | – p –pid-file f | It will write the process id |
| 3 | -t –timeout n | As the value of “n,” It will unmount the file system. |
| 4 | -v –verbose | It will print the processing information |
| 5 | -d –debug | It will help with the log debugging information |
| 6 | -D –define | It will define the global macro variable |
| 7 | -O –global-options | It will help to specify the global mount options |
| 8 | -l –set-log-priority priority path [path,…] | Help to set up the daemon log verbosity |
| 9 | -C –dont-check-daemon | It will not check the daemon if it is already in a running state |
| 10 | -F –force | It will forcefully clean up the known automount at the start |
| 11 | -V –version | It will print the version information and exit it |
Examples to Implement Linux Automount
Here are the following examples mentioned below:
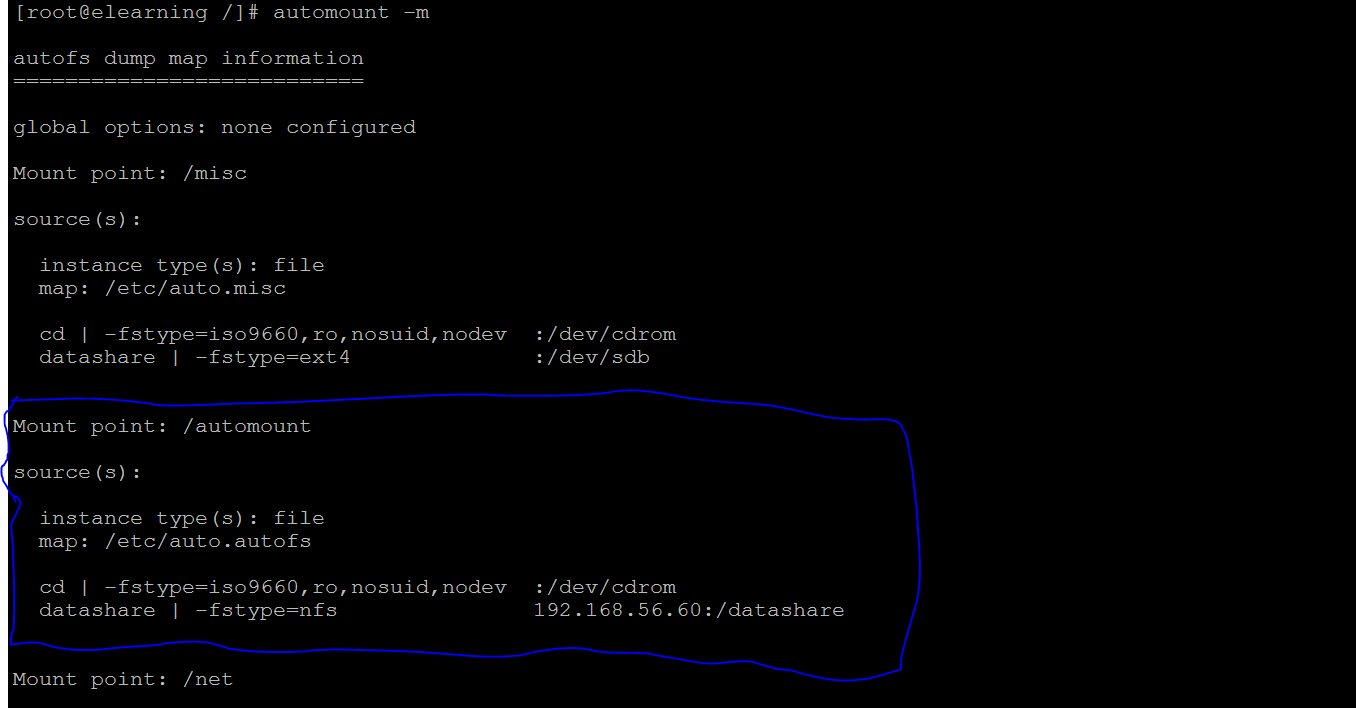
Example #1 – List of Automount
In the automount command, we are able to find the list of automount file systems in the Linux environment. We must use the “-m” option with the automount command.
Command :
automount -mExplanation :
As per the above command, we are able to find the list of automount file systems in the system.
Output :

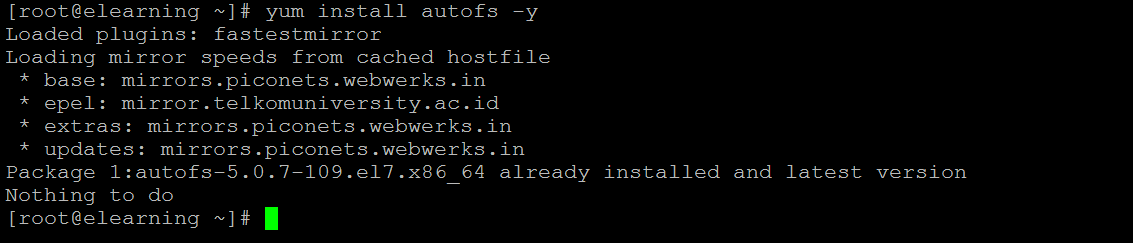
Example #2 – Install Packages
In Linux, the autofs package is not available. We need to install the autofs packages with the necessary dependency.
Command :
yum install autofs -yExplanation :
With the help of the above yum command, we are installing the autofs packages in the system.
Output :
Example #3 – Edit Master File
In automount, we need to configure the auto master file. The same file helps to identify the automount information.
Command :
vi /etc/auto.master
“/automount      /etc/auto.autofs        --timeout=40”
Explanation :
We edit to add the information in the master file i.e. /automount, mount directory on the “/” path, “/etc/auto.autofs” mount file, and “–timeout=40”, ideal timeout value.
Output :
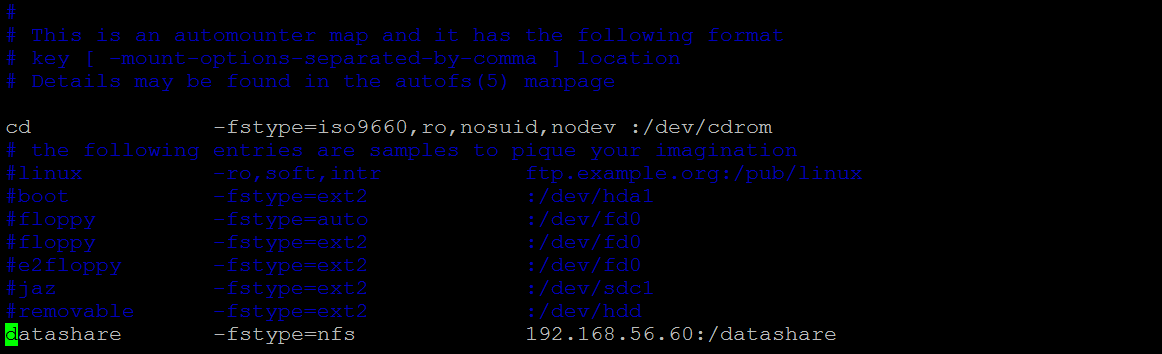
Example #4 – Edit Mount File
In Linux, while working with the automount we need to configure the mount file information.
Command :
vim /etc/auto.autofs
datashare       -fstype=nfs             192.168.56.60:/datashare
Explanation :
As per the above command, we are adding the mount information i.e. “datashare” share directory name, “-fstype=nfs” file system type, and “192.168.56.60:/datashare” share location path.
Output :
Example #5 – Start the Autofs Service
Once the complete configure will complete. We need to start the autofs service and check whether the file system is available in the automount environment or not.
Command :
systemctl start autofsExplanation :
We are starting the autofs service and printing the list of automount file system.
Output :

Example #6 – Check the Share Data
In the Linux Automount, once the file systems will automount then we are able to check the data in the shared location.
Command :
cd /automount/datashare/; lsExplanation :
As per the above command, we are checking the share data.
Output :

Conclusion
We have seen the uncut concept of “Linux Automount” with the proper example, explanation, and command with different outputs. As per the requirement, we can configure the automount file system. There is no need to automount and unmounts. It will reduce the system overhead.
Recommended Articles
We hope that this EDUCBA information on “Linux Automount” was beneficial to you. You can view EDUCBA’s recommended articles for more information.

