Table of Contents
- How to Use? (Methods to Create)
- How to Insert Data?
- How to Format Data?
- How to Hide Rows/Columns?
- How to Share a Google Sheet?
How to Use Google Sheets? (Methods to Create)
If you are new to Google Sheets and want to learn how to use Google Sheets, this article is to go. In case you want to learn the basics of a Google Sheet and how to open it, refer to this article: What is Google Sheet?
First, let us see how to make a Google Sheet. For this, you just need to have a Google account (creating a Google account is free).
There are 4 ways to create a spreadsheet:
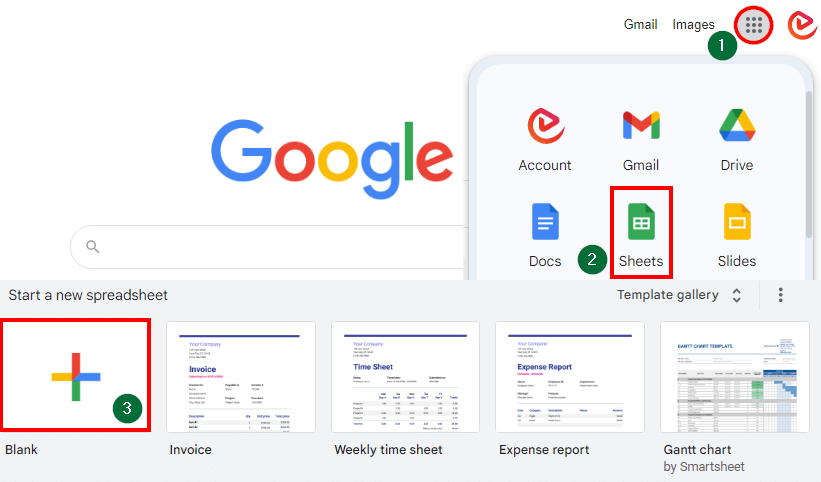
1. Using Google Home Screen
⇒ Visit google.com
⇒ You will see 9 dots on the top right corner of the screen. Click on the 9 dots.
⇒ Then click on Sheets and Blank.
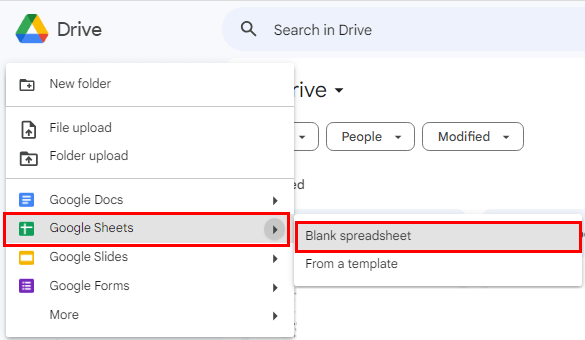
2. Using Google Drive
⇒ Go to Google Drive.
⇒ Click the “+ New” button on the left sidebar.
⇒ Click on “Google Sheets” and then on “Blank Spreadsheet”.
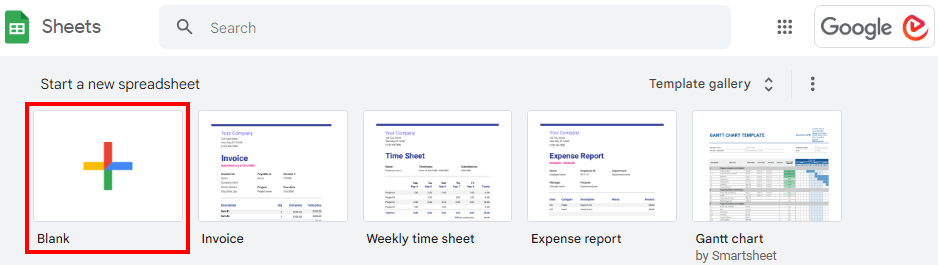
3. Directly in Google Sheets
⇒ Visit sheets.google.com
⇒ Click the “+ Blank” option to create a new spreadsheet.
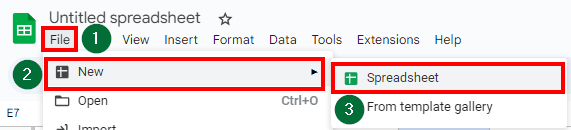
4. Using Existing Spreadsheet
⇒ If you already have an existing spreadsheet open, click on File > New > Spreadsheet.
How to Insert Data to Google Sheets?
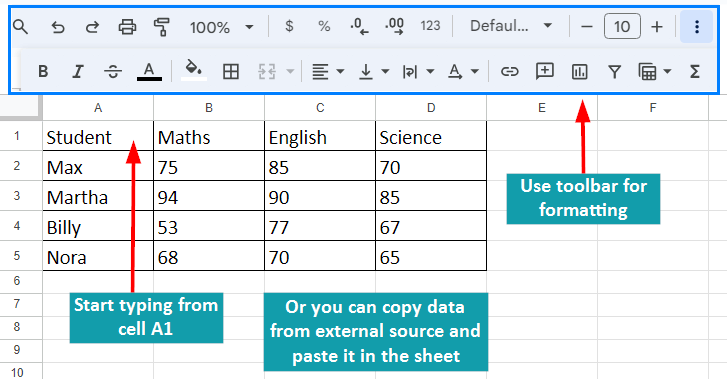
To insert data into a Google Sheets spreadsheet, follow these instructions:
- Click on the cell where you want to insert your data.
- Start typing the data you want to insert. You can enter text, numbers, dates, or any other information.
- You can also copy data from another source (e.g., a website, another spreadsheet, or a document) and paste it into Google Sheets.
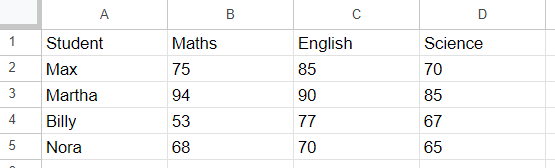
Example:
We have entered student mark sheet data in Google Sheets, as shown below:
How to Format Data?
Formatting data in Google Sheets includes adjusting the font, alignment, and cell formatting using the toolbar at the top of the Google Sheets interface. You can also change the data type (e.g., currency, percentage, date).
To format text data in Google Sheets:
- Select the text.
- Use the formatting toolbar to change font, size, style, color, and alignment.
Tools:
| Tool | Use it to: |
| Search | Search for specific functions and options in the menus. |
| Undo | Reverse the last action, one step at a time. |
| Redo | Reapply undone changes, moving forward in the editing history. |
| Initiate printing of the sheet. | |
| Paint Format | Copy and paste formatting options from one cell to another. |
| Zoom | Adjust the display size of cells and text for better visibility. |
| Format as Currency | Display numbers in currency format. |
| Format as Percent | Display numbers in a percentage format. |
| Decrease Decimal Places | Reduce decimal places in numerical cells (e.g., from 0.000 to 0.00). |
| Increase Decimal Places | Increase decimal places in numerical cells (e.g., from 0.0 to 0.00). |
| More Formats | Access additional formatting options for cells. |
| Font | Change the font style of selected text in cells. |
| Font Size | Adjust the size of the selected text in cells. |
| Bold | Apply bold formatting to selected text in cells. |
| Italic | Apply italic formatting to selected text in cells. |
| Strikethrough | Add strikethrough style to selected text in cells. |
| Text Color | Change the color of the text in selected cells. |
| Fill Color | Customize the background color of selected cells. |
| Borders | Add or customize borders around selected cells. |
| Merge Cells | Combine multiple cells into one. |
| Horizontal Align | Modify the horizontal alignment of text within cells. |
| Vertical Align | Adjust the vertical alignment of text within cells. |
| Text Wrapping | Control text wrapping within cells. |
| Text Rotation | Rotate text within cells to a specific angle for presentation. |
| Insert Link | Insert hyperlinks to selected cells. |
| Insert Comment | Add comments to cells for context or collaboration. |
| Insert Chart | Insert various types of charts for data visualization. |
| Create a Filter | Add a filter to display specific data based on criteria. |
| Filter Views | Create and manage multiple filter views for data exploration. |
| Functions | Access available functions and formulas with explanations and examples. |
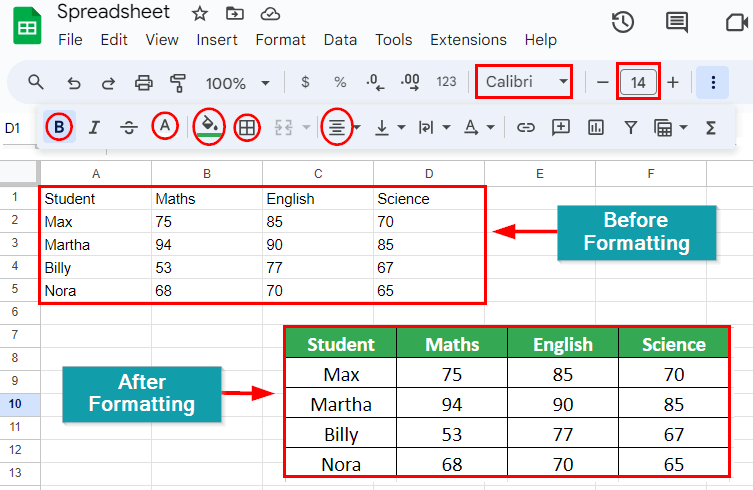
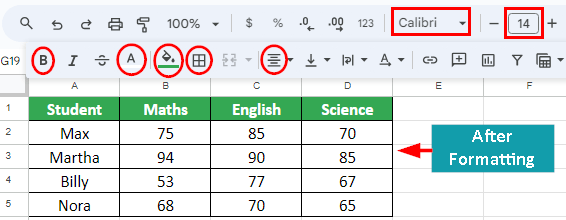
Example:
Let’s improve the appearance of the student mark sheet. We have used borders, aligned the text, changed the text style and size, bolded the headings, and even applied colors to the text and cells.
Before Formatting:
After Formatting:
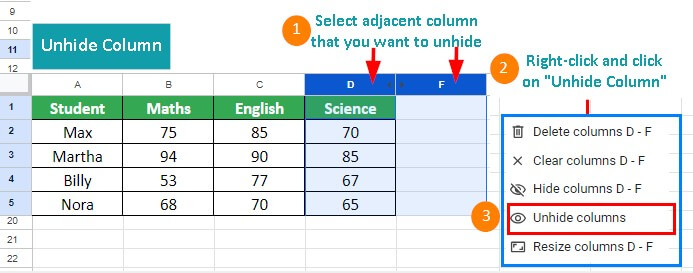
How to Hide Rows/Columns?
To hide rows/columns in Google Sheets:
- Select the row/column you want to hide.
- Right-click and choose “Hide row” or “Hide column.”

To unhide, click on the arrow at the top of the column or select the adjacent rows or columns > right-click > “Unhide row” or “Unhide column.”
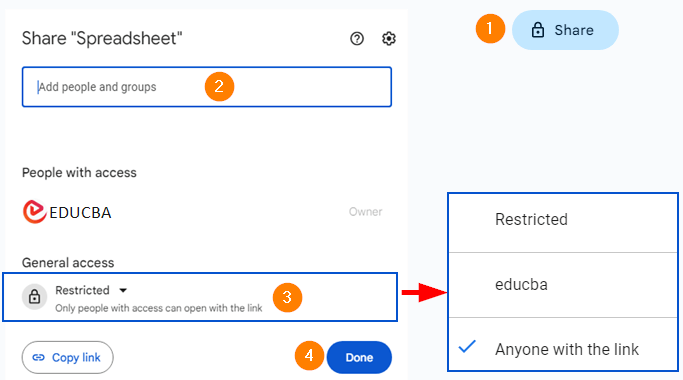
How to Share a Google Sheet?
To share a Google Sheet with others, follow these steps:
1. Through Email
⇒ In the upper-right corner, click the Share button.
⇒ Enter the email addresses of the people you want to share with.
2. Managing General Access
⇒ Click on the Share option on the top right corner of your Google Sheet.
⇒ Under the General Access section of the dialog box that appears, click on the drop-down button near the Restricted option.
⇒ Choose whichever option you want as per your requirements. You can also select the appropriate access level (view, comment, or edit).
⇒ Add a message or instructions to the invite if needed. This is entirely optional.
⇒ Click the “Done” button to send the sharing invitation.
Frequently Asked Questions (FAQs)
Q1. How do I create a formula in Google Sheets?
To use a built-in formula, you can use the Google Sheet formulas. However, if you want to create your own custom formula, you can use the conditional formatting option in Google Sheets to set restrictions, permissions, and rules.
Q2. Is Google Sheets the same as Excel?
No, Google Sheets is not the same as Microsoft Excel. There are several differences between Google Sheet and Excel, such as:
- Google Sheets allows real-time collaboration, while Excel allows only one user to work on the file.
- It is an online application accessible from anywhere, while Excel is not.
- It is free, while users must buy the Microsoft Office suite to use Excel.
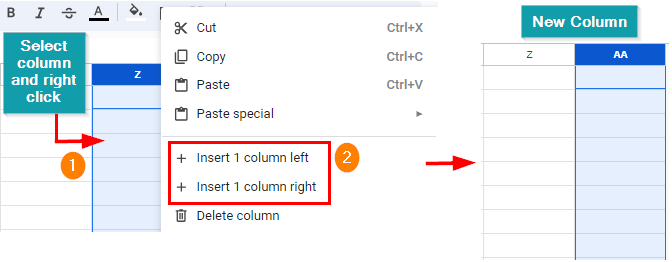
Q3. How do I add columns in Google Sheets?
By default, Google Sheets has 26 columns starting from A to Z. If you want to add more columns after the Z column, follow these steps:
- Right-click on the column near which you want to add a new column.
- Choose where you want to add the new column: Insert 1 Column Left or Insert 1 Column Right.
A new column will appear in your selected location.
Recommended Articles
We hope that this article on how to use Google Sheets benefited you. For more such articles, refer to the following:
