EDUCBA

EDUCBA

MENUMENU
  • Free Tutorials
  • Free Courses
  • Certification Courses
  • 280+ Courses All in One Bundle
  • Login
Home Design Design Tutorials Design Basic Tutorial GIMP erase to transparent
Secondary Sidebar
Design Basic Tutorial
  • GIMP
    • What is GIMP
    • GIMP Versions
    • GIMP brushes
    • GIMP line tool
    • GIMP blend tool
    • GIMP clone tool
    • GIMP magic wand tool
    • GIMP 3D Text
    • GIMP healing tool
    • GIMP Layers
    • GIMP Fonts
    • GIMP Toolbox
    • Blur Effect in GIMP
    • GIMP Change Background Color
    • GIMP Floating Selection
    • GIMP?batch processing
    • GIMP Crop
    • GIMP Filters
    • GIMP GMIC
    • GIMP?opacity
    • Animation in GIMP
    • GIMP import image
    • GIMP replace color
    • GIMP text outline
    • GIMP video editing
    • GIMP Alternatives
    • GIMP vector graphics
    • GIMP text shadow
    • GIMP resize image
    • GIMP pixel art
    • GIMP invert colors
    • GIMP GIF
    • GIMP move selection
    • GIMP normal map
    • GIMP remove background
    • GIMP rotate
    • GIMP grid
    • GIMP text effects
    • GIMP erase to transparent
    • GIMP resize layer
    • GIMP Patterns
    • GIMP extensions
    • GIMP blur background
  • Basics and Advanced
    • Pro Tools Version
    • What is Autodesk BIM?
    • Animation Character
    • Autodesk Pixlr
    • Sketch plugins
    • Graphic designer requirements
    • Online Gaming Platforms
    • InDesign eyedropper tool
    • InDesign rounded corners
    • InDesign align
    • InDesign resize image
    • InDesign scripts
    • InDesign export to word
    • InDesign newsletter templates
    • InDesign Magazine
    • InDesign Missing Fonts
    • InDesign line spacing
    • InDesign Fonts
    • InDesign Preview Shortcut
    • InDesign Extension
    • InDesign columns
    • InDesign overset text
    • InDesign data merge
    • InDesign grid template
    • InDesign layers
    • InDesign reset preferences
    • InDesign master pages
    • InDesign layout
    • InDesign portfolio template
    • InDesign invoice template
    • InDesign word count
    • InDesign underline
    • InDesign superscript
    • InDesign presentation templates
    • InDesign drop cap
    • InDesign how to add page numbers
    • InDesign resume template
    • InDesign import pdf
    • InDesign table of contents
    • InDesign change page size
    • InDesign book templates
    • InDesign link text boxes
    • InDesign vertical text
    • InDesign Bullet Points
    • InDesign center text vertically
    • InDesign newspaper template
    • InDesign shortcuts
    • InDesign gap tool
    • InDesign paragraph styles
    • InDesign Grid
    • InDesign margins
    • InDesign highlight text
    • InDesign Wrap Text
    • ZBrush ZRemesher
    • Animation Software
    • Principles of Animation
    • 3d Animation Software
    • 3D Modeling Software
    • 3D Software Design
    • 2D Animation Software
    • 10 Quick Tips For Adobe InDesign Users
    • ADOBE FLASH CS6
    • Affinity Photo Brushes
    • Adobe Lightroom For Free
    • Lightroom Background Color
    • Lightroom?Shortcuts
    • Lightroom XMP
    • Lightroom editing
    • Masking Layers in Adobe After Effects
    • Adobe Premiere Pro Plugins
    • Adobe Speedgrade
    • Install Adobe Creative Cloud
    • Install Adobe Premiere Pro
    • What is Adobe Creative Cloud
    • What is Adobe Illustrator
    • Adobe InDesign Templates
    • What is Adobe InDesign
    • Adobe Indesign Uses
    • InDesign Background Color
    • What is Adobe Lightroom
    • What is Adobe Muse
    • What is Adobe Prelude
    • What is Adobe Premiere Pro
    • Careers in 3D
    • Careers in 3D Modeling
    • Careers in 3D Printing
    • Best Editing Software
    • Video Editing Application
    • Video Editing Tools
    • Career In Designing
    • Careers in Game Development
    • 3D Printing Models
    • Adobe Editing Softwares
    • Types of Adobe
    • Types of Illustration
    • What is Graphic Design
    • Best Graphic Design Software
    • Best Photo Editors
    • Game Testing Interview Questions
    • VFX Softwares
    • Unity Scripting
    • Unity Principle of Design
    • Unity JSON
    • Unity webGL
    • Unity 2D
    • Unity 3D Games
    • VFX Companies
    • How To Use Indesign
    • New Features InDesign CS6
    • What is Houdini?
    • Advantages of 3D Printing
    • What is Autodesk
    • Autodesk Character Generator
    • Autodesk Vault
    • Autodesk Viewer
    • Autodesk Navisworks
    • Autodesk Desktop Connector
    • Designers and Architects
    • 2D and 3D Shapes
    • Keyboard Shortcuts for Premiere Pro
    • Unreal Engine Tutorial
    • Best Audio Editors
    • Digital Image Processing
    • What is Motion Graphics
    • What is Digital Design
    • Design Pattern Interview Questions
    • Graphic Design Interview Questions
    • UX designer Interview Questions
    • Is Unreal Engine Free
    • What Is Design Pattern
    • What is VFX
    • What is Audacity
    • What is Unreal Engine
    • What is CATIA
    • What is Blueprint
    • Sony Vegas Pro for Free
    • 3D Graphics Software
    • Best Online Photo Editor
    • Photo Editing App
    • Vector Graphics Editor
    • ArchiCAD
    • ArchiCAD Shortcuts
    • Audacity Keyboard Shortcut
    • Davinci Resolve Shortcuts
    • What is pixel art?
    • Picmonkey Alternatives
    • Adobe Flash Player Alternative
    • Pro tools shortcuts
    • Pro Tools Plugins
    • Architectural Design Software
    • Architectural Design Principles
    • Architecture Design Types
    • Architectural design tools
    • Application of Digital Image Processing
    • Digital Image Processing Fundamentals
    • OpenGL Versions
    • Revit Keyboard Shortcuts
    • Revit plugins
    • Indesign version
    • What is DirectX?
    • DirectX Versions
    • Cinema 4D Plugins
    • Cinema 4d shortcuts
    • Godot Engine
    • Godot tilemap
    • Krita Animation
    • Krita Software
    • Krita Shortcuts
    • Krita eraser
    • Krita brushes
    • Krita Pixel Art
    • Krita Plugins
    • Skencil
    • Fusion 360 Keyboard Shortcuts
    • Anim8or
    • Affinity photo plugins
    • What is Affinity Photo?
    • FL Studio Plugins
    • Vectorworks
    • Architectural Design Elements
  • Inkscape
    • What is Inkscape?
    • Inkscape layers
    • Inkscape Crop
    • Inkscape text
    • Inkscape G-code
    • Inkscape mirror
    • Inkscape rounded rectangle
    • Inkscape EPS
    • Inkscape image to vector
    • Inkscape unlock
    • Inkscape Curved Text
    • Inkscape laser cutting
    • Inkscape background color
    • Inkscape arrow
    • Inkscape vector
    • Inkscape animation
    • Inkscape 3D
    • Inkscape SVG
    • Inkscape Dark Theme
    • Inkscape trace bitmap
    • Inkscape gradient
    • Inkscape Greek Letters
    • Inkscape shadow
    • Inkscape snap to grid
    • Inkscape Fonts
    • Inkscape extensions
    • Inkscape PNG to SVG
    • Inkscape Art
    • Inkscape transparent background
    • Inkscape Alternatives
    • Inkscape Remove Background
    • Inkscape text to path
    • Inkscape logo
  • Figma
    • Figma Libraries
    • Figma fonts
    • Figma Plugins
    • Figma grid
    • Figma Alternatives
  • SketchUp
    • SketchUp Keyboard Shortcuts
    • SketchUp geolocation
    • SketchUp animation
    • SketchUp Change Dimensions
    • SketchUp Import
    • SketchUp 2D
    • SketchUp rendering
    • Sketch software
    • Figma Shortcuts
    • SketchUp Layers
    • SketchUp landscape design
    • SketchUp group
    • SketchUp intersect faces
    • SketchUp Rotate
    • SketchUp Architecture
    • SketchUp 3D Models
    • SketchUp Vray
    • SketchUp Units
    • SketchUp garden design
    • SketchUp Layout
    • SketchUp Mirror
    • SketchUp Extensions
    • SketchUp Unhide
    • SketchUp kitchen
    • SketchUp background
    • SketchUp library
    • SketchUp dynamic components
    • SketchUp CutList
    • SketchUp Array
    • SketchUp Woodworking
    • SketchUp resize component
    • SketchUp Ungroup
    • SketchUp Deck Design

Related Courses

Maya Course

Photoshop course

After Effects Course

GIMP erase to transparent

GIMP erase to transparent

Introduction to GIMP Erase to transparent.

Erase to transparent can be understood as a technique through which you can convert the background of any object of any particular image into transparent or converting some particular area of the image into transparent according to your requirement and in GIMP, we can do this by using some tools of tool panel of it and also by managing some parameters of menus of the Menu bar of it. We do this by using the Add alpha channel option of the layers menu, which is a very important part of this process and provides a transparent background to any layer of the layer panel. So let us find how we can do this.

How to ‘Erase to transparent’ process in GIMP?

We do this work for making a different type of manipulation in our editing or designing work in GIMP. For doing it, we have to make some parametrical change in different features of GIMP. So let us have an image for this purpose. I will use a downloaded image. You use your own image.

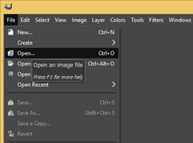
For having an image in GIMP, go to the File menu of the menu bar and click on it. Then click on the Open option of the drop-down list, or you can press Ctrl + O as the shortcut key of this option, or you can simply drag your desired image in GIMP from its saved folder with the help of the mouse button.

GIMP erase to transparent output 1

Start Your Free Design Course

3D animation, modelling, simulation, game development & others

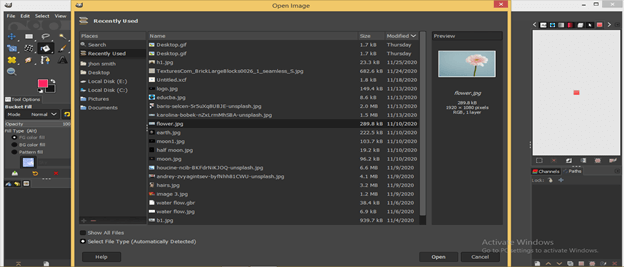
An ‘Open Image’ dialog box will be open. Please select your desired image from its saved location in this box. I will choose this flower image. You can also see the preview of your chosen image in this dialog box. Now hit the Ok button of this dialog box.

GIMP erase to transparent output 2

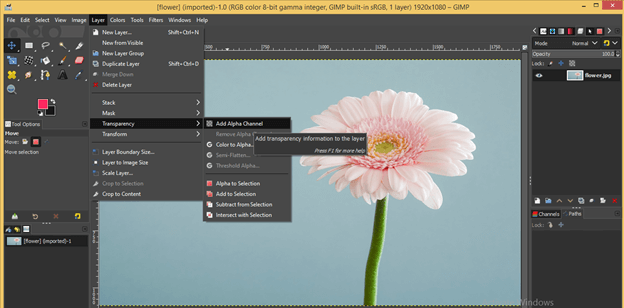
The first thing you have to do for this purpose is go to the layer panel, select the layer you want to have a transparent background, and make a right-click on it. A drop-down list will be open; click on the ‘Add Alpha Channel’ option of this list. This option will convert your selected layer into a transparent background layer.

GIMP erase to transparent output 3

You can also find this option from the Layer menu of the menu bar. Just go to the layer menu and click on it, then go to the Transparency option of the drop-down list and click on the ‘Add Alpha Channel’ option of the new drop-down list.

GIMP erase to transparent output 4

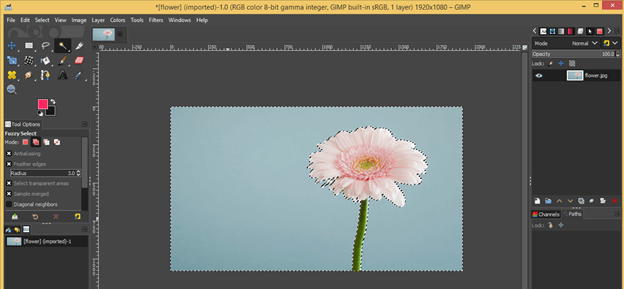
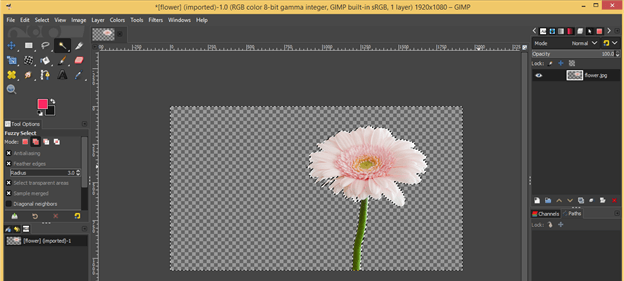
You will see transparency after erasing the background of this image or any particular area of this image. So let us do this. Now go to the tool panel and take the Fuzzy Select tool by click on its icon, or you can press U as a shortcut.

GIMP erase to transparent output 5

Make a click on the background of the flower with a fuzzy select tool for making a selection around the flower. Once you make a click, a selection will highlight with magenta color if the Draw Mask option of this tool is enabled in the parameters panel of this tool. You can make multiple clicks for making a better selection.

GIMP erase to transparent output 6

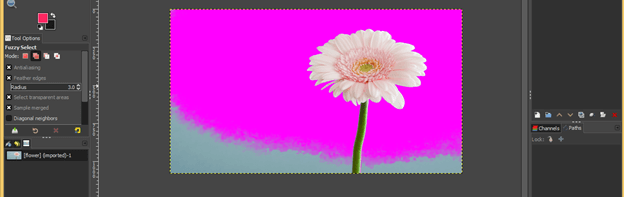
And my selection will act like this.

All in One Design Bundle(280+ Courses, 100+ projects)
AutoCADHoudiniAdobe Premiere ProPhotoshop
SolidworksVFX Visual EffectsCorelDrawUnreal Engine
Price
View Courses
280+ Online Courses | 100+ projects | 2000+ Hours | Verifiable Certificates | Lifetime Access
4.6 (64,868 ratings)

GIMP erase to transparent output 7

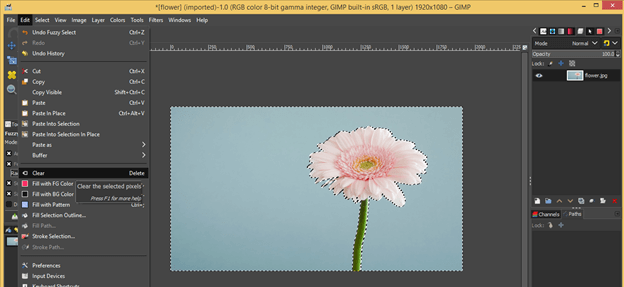
Now make right-click anywhere on the image area, and a drop-down list will be open. Go to the Edit option, then click on the Clear option of the new drop-down list.

GIMP erase to transparent output 8

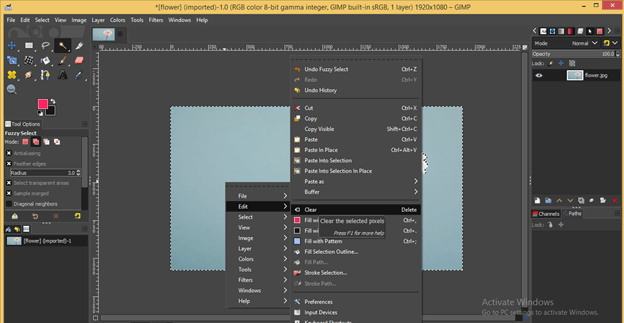
Or you can find this option in the scroll-down list of the Edit menu of the menu bar, or you can simply press the Delete button on the keyboard.

GIMP erase to transparent output 9

And the background of our flower will erase like this. This way, you can erase any background to transparent.

output 10

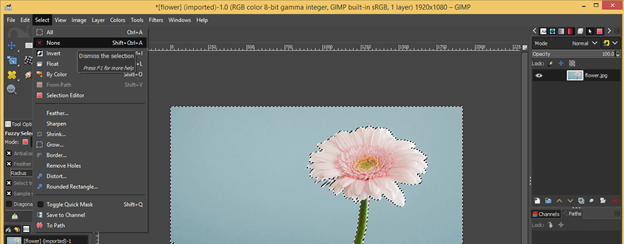
Let us also understand another aspect of erasing to transparent feature. Now undo this background by pressing the Ctrl + Z button on the keyboard and enabling selection around this flower. For enabling selection around this flower, go to the Select menu of the menu bar and click on it. Then click on the ‘None option of the drop-down list of it.

output 11

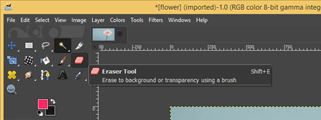
Now take Eraser Tool from the tool panel or press Shift + E as the shortcut key of it.

output 12

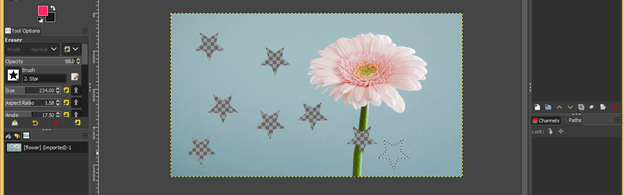
This time we will erase the small area of this image to transparent. Just drag the brush tip of the eraser tool on any area of the image, and it will erase the background area from that particular section. You will see transparency in that section because we have converted this layer to transparent.

output 13

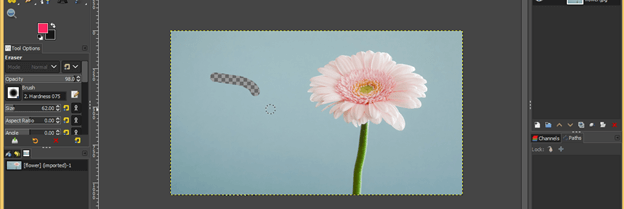
Because the eraser tool has a brushstroke on its tip, you can choose any pattern from a parameter of the brush of the Eraser tool for erasing any area of the image to transparent.

output 14

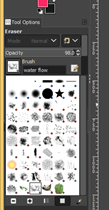
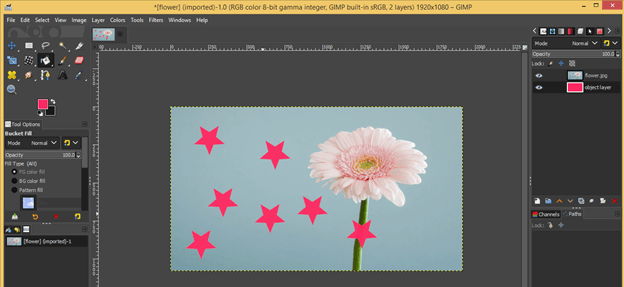
I will choose this star shape pattern as the brush tip of the eraser tool and make a click on the background of this image, and you will notice that the area where I use patterned eraser has transparency. So this way, you can make any pattern on the image with erased transparency of that pattern.

output 15

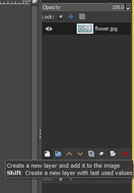
Now go to the bottom of the layer panel and click on the Create new layer button for having a new layer in the layer panel.

output 16

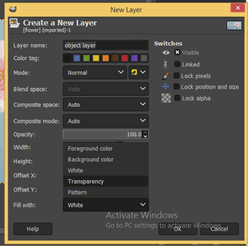
Create a transparent layer by choosing the Transparency option in the ‘Fill with’ option of this ‘New Layer’ dialog box and hit on the Ok button of it.

output 17

Now move this transparent layer below to the image layer with the help of the mouse left button.

output 18

Now select your desired color in the foreground color box of the tool panel.

output 19

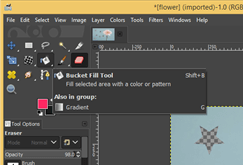
Now go to the tool panel and take the Bucket tool or press the Shift + B button as short cut key.

output 20

Select the transparent layer on the layer panel and click on the transparent pattern area of the flower image with the help of the bucket tool. It will fill the transparent layer with your selected color, and you can see this color through a transparent pattern of the flower image layer.

output 21

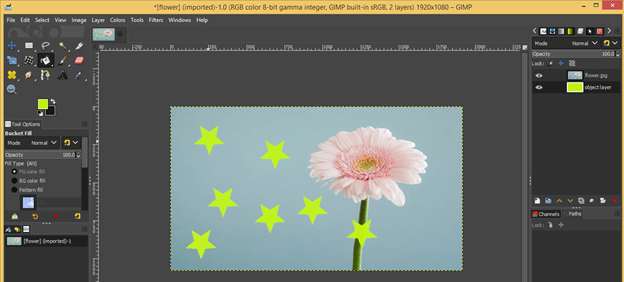
You can change the color of the pattern at any time by changing the color of the background layer of the transparent layer.

output 22

So this is the nice way you can erase any particular area of any image into transparent and use it to make a good design.

Conclusion

This was a good explanation about how you can erase any image’s background to transparent or any particular area of that image into transparent and use that area for making any effective design. You can also go through the other parameters of this feature for a better understanding of it.

Recommended Articles

This is a guide to GIMP erase to transparent. Here we discuss How to ‘Erase to transparent’ process in GIMP and other parameters of this feature to understand better. You may also have a look at the following articles to learn more –

  1. GIMP Alternatives
  2. Photoshop Gold Gradient
  3. CorelDRAW Logo Design
  4. Adobe After Effects Plugins
Popular Course in this category
Maya Training (10 Courses, 7+ Projects)
  10 Online Courses |  7 Hands-on Projects |  100+ Hours |  Verifiable Certificate of Completion
4.7
Price

View Course

Related Courses

Photoshop Training (10 Courses, 12+ Projects)4.9
After Effects Training (3 Courses, 3+ Projects)4.8
0 Shares
Share
Tweet
Share
Primary Sidebar
Footer
About Us
  • Blog
  • Who is EDUCBA?
  • Sign Up
  • Live Classes
  • Corporate Training
  • Certificate from Top Institutions
  • Contact Us
  • Verifiable Certificate
  • Reviews
  • Terms and Conditions
  • Privacy Policy
  •  
Apps
  • iPhone & iPad
  • Android
Resources
  • Free Courses
  • Photoshop Tutorial
  • 3ds Max Tutorial
  • All Tutorials
Certification Courses
  • All Courses
  • Design Course - All in One Bundle
  • Photoshop Course
  • Maya Course
  • Unreal Engine Course
  • Unity Course
  • DaVinci Resolve Course
  • Pro Tools Course

ISO 10004:2018 & ISO 9001:2015 Certified

© 2022 - EDUCBA. ALL RIGHTS RESERVED. THE CERTIFICATION NAMES ARE THE TRADEMARKS OF THEIR RESPECTIVE OWNERS.

EDUCBA
Free Design Course

Banner Creation, Object Selection, Sky Replacement, Advance Filters & others

*Please provide your correct email id. Login details for this Free course will be emailed to you

By signing up, you agree to our Terms of Use and Privacy Policy.

EDUCBA Login

Forgot Password?

By signing up, you agree to our Terms of Use and Privacy Policy.

EDUCBA
Free Design Course

3D animation, modelling, simulation, game development & others

*Please provide your correct email id. Login details for this Free course will be emailed to you

By signing up, you agree to our Terms of Use and Privacy Policy.

EDUCBA

*Please provide your correct email id. Login details for this Free course will be emailed to you

By signing up, you agree to our Terms of Use and Privacy Policy.

Let’s Get Started

By signing up, you agree to our Terms of Use and Privacy Policy.

This website or its third-party tools use cookies, which are necessary to its functioning and required to achieve the purposes illustrated in the cookie policy. By closing this banner, scrolling this page, clicking a link or continuing to browse otherwise, you agree to our Privacy Policy

Loading . . .
Quiz
Question:

Answer:

Quiz Result
Total QuestionsCorrect AnswersWrong AnswersPercentage

Explore 1000+ varieties of Mock tests View more