EDUCBA

EDUCBA

MENUMENU
  • Free Tutorials
  • Free Courses
  • Certification Courses
  • 280+ Courses All in One Bundle
  • Login
Home Design Design Tutorials Design Basic Tutorial GIMP blur background
Secondary Sidebar
Design Basic Tutorial
  • GIMP
    • What is GIMP
    • GIMP Versions
    • GIMP brushes
    • GIMP line tool
    • GIMP blend tool
    • GIMP clone tool
    • GIMP magic wand tool
    • GIMP 3D Text
    • GIMP healing tool
    • GIMP Layers
    • GIMP Fonts
    • GIMP Toolbox
    • Blur Effect in GIMP
    • GIMP Change Background Color
    • GIMP Floating Selection
    • GIMP?batch processing
    • GIMP Crop
    • GIMP Filters
    • GIMP GMIC
    • GIMP?opacity
    • Animation in GIMP
    • GIMP import image
    • GIMP replace color
    • GIMP text outline
    • GIMP video editing
    • GIMP Alternatives
    • GIMP vector graphics
    • GIMP text shadow
    • GIMP resize image
    • GIMP pixel art
    • GIMP invert colors
    • GIMP GIF
    • GIMP move selection
    • GIMP normal map
    • GIMP remove background
    • GIMP rotate
    • GIMP grid
    • GIMP text effects
    • GIMP erase to transparent
    • GIMP resize layer
    • GIMP Patterns
    • GIMP extensions
    • GIMP blur background
  • Basics and Advanced
    • Pro Tools Version
    • What is Autodesk BIM?
    • Animation Character
    • Autodesk Pixlr
    • Sketch plugins
    • Graphic designer requirements
    • Online Gaming Platforms
    • InDesign eyedropper tool
    • InDesign rounded corners
    • InDesign align
    • InDesign resize image
    • InDesign scripts
    • InDesign export to word
    • InDesign newsletter templates
    • InDesign Magazine
    • InDesign Missing Fonts
    • InDesign line spacing
    • InDesign Fonts
    • InDesign Preview Shortcut
    • InDesign Extension
    • InDesign columns
    • InDesign overset text
    • InDesign data merge
    • InDesign grid template
    • InDesign layers
    • InDesign reset preferences
    • InDesign master pages
    • InDesign layout
    • InDesign portfolio template
    • InDesign invoice template
    • InDesign word count
    • InDesign underline
    • InDesign superscript
    • InDesign presentation templates
    • InDesign drop cap
    • InDesign how to add page numbers
    • InDesign resume template
    • InDesign import pdf
    • InDesign table of contents
    • InDesign change page size
    • InDesign book templates
    • InDesign link text boxes
    • InDesign vertical text
    • InDesign Bullet Points
    • InDesign center text vertically
    • InDesign newspaper template
    • InDesign shortcuts
    • InDesign gap tool
    • InDesign paragraph styles
    • InDesign Grid
    • InDesign margins
    • InDesign highlight text
    • InDesign Wrap Text
    • ZBrush ZRemesher
    • Animation Software
    • Principles of Animation
    • 3d Animation Software
    • 3D Modeling Software
    • 3D Software Design
    • 2D Animation Software
    • 10 Quick Tips For Adobe InDesign Users
    • ADOBE FLASH CS6
    • Affinity Photo Brushes
    • Adobe Lightroom For Free
    • Lightroom Background Color
    • Lightroom?Shortcuts
    • Lightroom XMP
    • Lightroom editing
    • Masking Layers in Adobe After Effects
    • Adobe Premiere Pro Plugins
    • Adobe Speedgrade
    • Install Adobe Creative Cloud
    • Install Adobe Premiere Pro
    • What is Adobe Creative Cloud
    • What is Adobe Illustrator
    • Adobe InDesign Templates
    • What is Adobe InDesign
    • Adobe Indesign Uses
    • InDesign Background Color
    • What is Adobe Lightroom
    • What is Adobe Muse
    • What is Adobe Prelude
    • What is Adobe Premiere Pro
    • Careers in 3D
    • Careers in 3D Modeling
    • Careers in 3D Printing
    • Best Editing Software
    • Video Editing Application
    • Video Editing Tools
    • Career In Designing
    • Careers in Game Development
    • 3D Printing Models
    • Adobe Editing Softwares
    • Types of Adobe
    • Types of Illustration
    • What is Graphic Design
    • Best Graphic Design Software
    • Best Photo Editors
    • Game Testing Interview Questions
    • VFX Softwares
    • Unity Scripting
    • Unity Principle of Design
    • Unity JSON
    • Unity webGL
    • Unity 2D
    • Unity 3D Games
    • VFX Companies
    • How To Use Indesign
    • New Features InDesign CS6
    • What is Houdini?
    • Advantages of 3D Printing
    • What is Autodesk
    • Autodesk Character Generator
    • Autodesk Vault
    • Autodesk Viewer
    • Autodesk Navisworks
    • Autodesk Desktop Connector
    • Designers and Architects
    • 2D and 3D Shapes
    • Keyboard Shortcuts for Premiere Pro
    • Unreal Engine Tutorial
    • Best Audio Editors
    • Digital Image Processing
    • What is Motion Graphics
    • What is Digital Design
    • Design Pattern Interview Questions
    • Graphic Design Interview Questions
    • UX designer Interview Questions
    • Is Unreal Engine Free
    • What Is Design Pattern
    • What is VFX
    • What is Audacity
    • What is Unreal Engine
    • What is CATIA
    • What is Blueprint
    • Sony Vegas Pro for Free
    • 3D Graphics Software
    • Best Online Photo Editor
    • Photo Editing App
    • Vector Graphics Editor
    • ArchiCAD
    • ArchiCAD Shortcuts
    • Audacity Keyboard Shortcut
    • Davinci Resolve Shortcuts
    • What is pixel art?
    • Picmonkey Alternatives
    • Adobe Flash Player Alternative
    • Pro tools shortcuts
    • Pro Tools Plugins
    • Architectural Design Software
    • Architectural Design Principles
    • Architecture Design Types
    • Architectural design tools
    • Application of Digital Image Processing
    • Digital Image Processing Fundamentals
    • OpenGL Versions
    • Revit Keyboard Shortcuts
    • Revit plugins
    • Indesign version
    • What is DirectX?
    • DirectX Versions
    • Cinema 4D Plugins
    • Cinema 4d shortcuts
    • Godot Engine
    • Godot tilemap
    • Krita Animation
    • Krita Software
    • Krita Shortcuts
    • Krita eraser
    • Krita brushes
    • Krita Pixel Art
    • Krita Plugins
    • Skencil
    • Fusion 360 Keyboard Shortcuts
    • Anim8or
    • Affinity photo plugins
    • What is Affinity Photo?
    • FL Studio Plugins
    • Vectorworks
    • Architectural Design Elements
  • Inkscape
    • What is Inkscape?
    • Inkscape layers
    • Inkscape Crop
    • Inkscape text
    • Inkscape G-code
    • Inkscape mirror
    • Inkscape rounded rectangle
    • Inkscape EPS
    • Inkscape image to vector
    • Inkscape unlock
    • Inkscape Curved Text
    • Inkscape laser cutting
    • Inkscape background color
    • Inkscape arrow
    • Inkscape vector
    • Inkscape animation
    • Inkscape 3D
    • Inkscape SVG
    • Inkscape Dark Theme
    • Inkscape trace bitmap
    • Inkscape gradient
    • Inkscape Greek Letters
    • Inkscape shadow
    • Inkscape snap to grid
    • Inkscape Fonts
    • Inkscape extensions
    • Inkscape PNG to SVG
    • Inkscape Art
    • Inkscape transparent background
    • Inkscape Alternatives
    • Inkscape Remove Background
    • Inkscape text to path
    • Inkscape logo
  • Figma
    • Figma Libraries
    • Figma fonts
    • Figma Plugins
    • Figma grid
    • Figma Alternatives
  • SketchUp
    • SketchUp Keyboard Shortcuts
    • SketchUp geolocation
    • SketchUp animation
    • SketchUp Change Dimensions
    • SketchUp Import
    • SketchUp 2D
    • SketchUp rendering
    • Sketch software
    • Figma Shortcuts
    • SketchUp Layers
    • SketchUp landscape design
    • SketchUp group
    • SketchUp intersect faces
    • SketchUp Rotate
    • SketchUp Architecture
    • SketchUp 3D Models
    • SketchUp Vray
    • SketchUp Units
    • SketchUp garden design
    • SketchUp Layout
    • SketchUp Mirror
    • SketchUp Extensions
    • SketchUp Unhide
    • SketchUp kitchen
    • SketchUp background
    • SketchUp library
    • SketchUp dynamic components
    • SketchUp CutList
    • SketchUp Array
    • SketchUp Woodworking
    • SketchUp resize component
    • SketchUp Ungroup
    • SketchUp Deck Design

Related Courses

Maya Course

Photoshop course

After Effects Course

GIMP blur background

GIMP blur background

Introduction to GIMP blur background

In this article, we are going to learn how to blur background in GIMP. You might have used portrait mode in a mobile camera, which keeps the subject in focus and makes other things out of focus. Though the actual blur can be done by any blur methods such as gaussian blur, for example, but while performing blur on background, the main thing is to keep the subject in focus while blurring the background. We will be doing this in GIMP with the help of a plugin named resynthesizer which will give us some filters to work with. This technique gives a professional look to your images and, at the same time, reduces distractions.

Steps of GIMP blur background

Different are steps mentioned below:

Start Your Free Design Course

3D animation, modelling, simulation, game development & others

All in One Design Bundle(280+ Courses, 100+ projects)
AutoCADHoudiniAdobe Premiere ProPhotoshop
SolidworksVFX Visual EffectsCorelDrawUnreal Engine
Price
View Courses
280+ Online Courses | 100+ projects | 2000+ Hours | Verifiable Certificates | Lifetime Access
4.6 (64,570 ratings)

Step 1: First, we will need some stock images, which you can download from any stock image site like Unsplash or pixels. Download an image with the subject in the foreground with background is in focus.

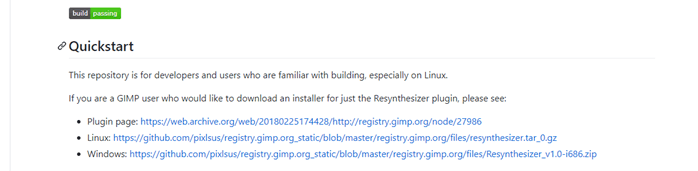
Step 2: Next, we will go to https://github.com/bootchk/resynthesizer/blob/master/README.md to download a GIMP plugin Resynthesizer_v1.0-i686.zip from the windows link. Once the file is downloaded, extract it.

GIMP blur background output 1

Step 3: Then open GIMP and go to Edit -> Preferences and navigate to the Plugin section to find the location of the plugins.
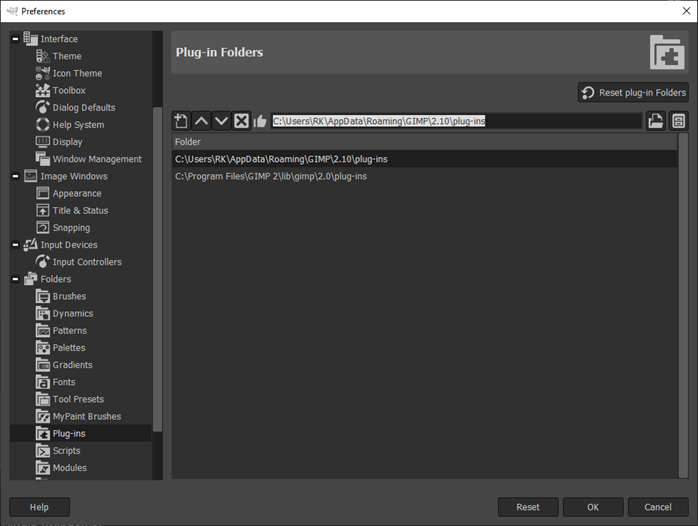
GIMP blur background output 2

Step 4: Copy the path and paste in the explorer and then copy the extracted files of the Resynthesizer plugin into the GIMP plugin path.

GIMP blur background output 3

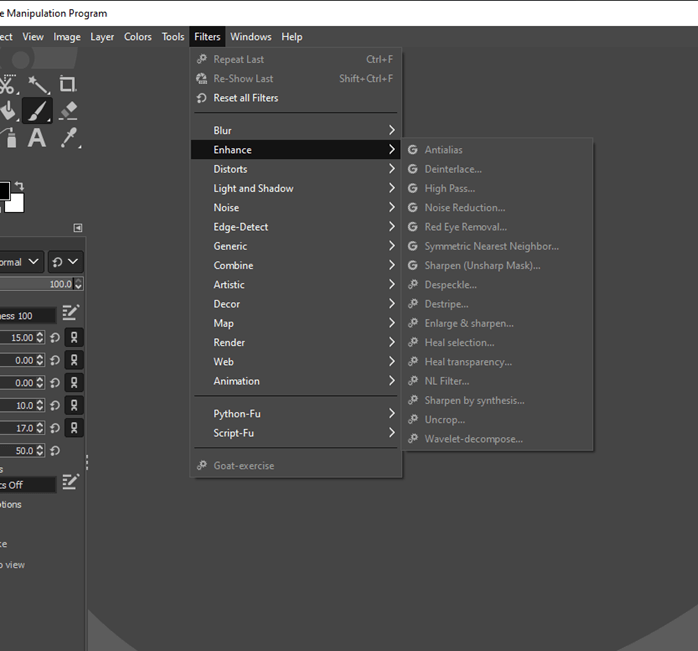
Step 5: Restart GIMP and check the Filter -> Enhance to find new options.

GIMP blur background output 4

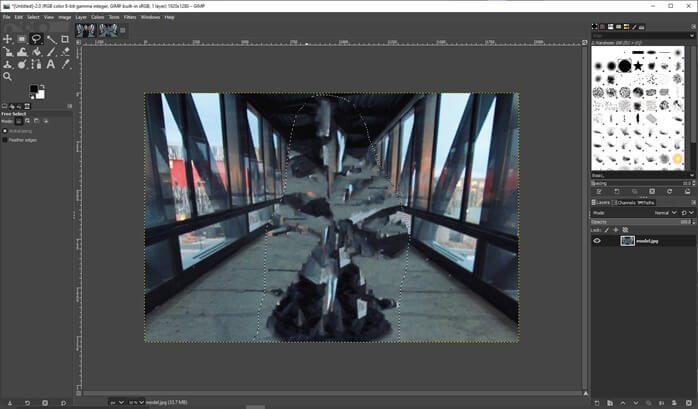
Step 6: Now, open the image in which you want to blur the background in GIMP

GIMP blur background output 5

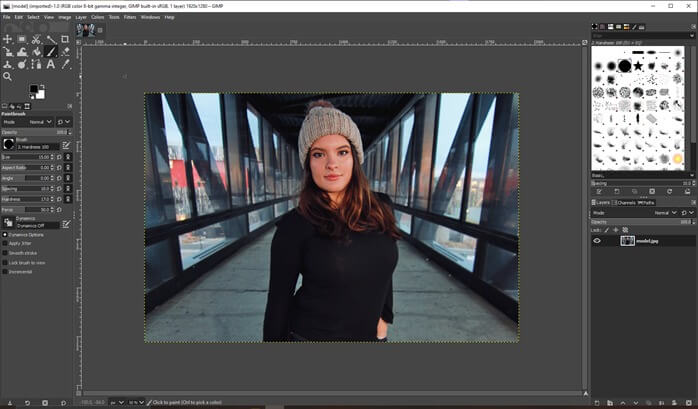
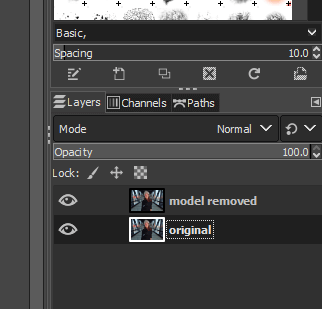
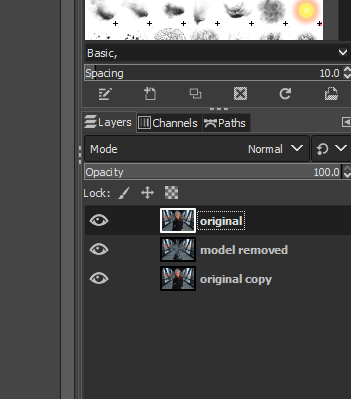
Step 7: Now duplicate the existing layer by right-clicking or clicking on the layers panel icon.

GIMP blur background output 6

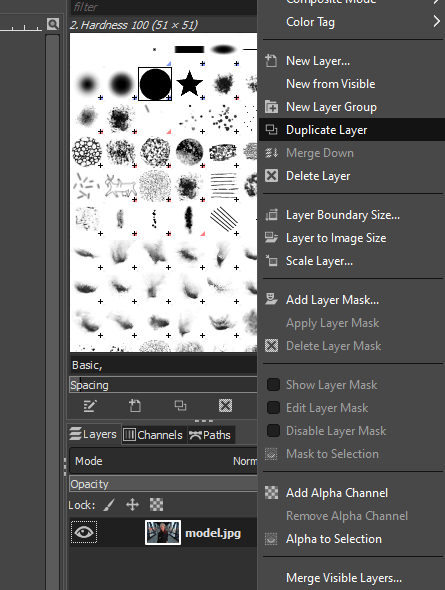
Step 8: Rename the first layer to “model removed” and second to “original.”

GIMP blur background output 7

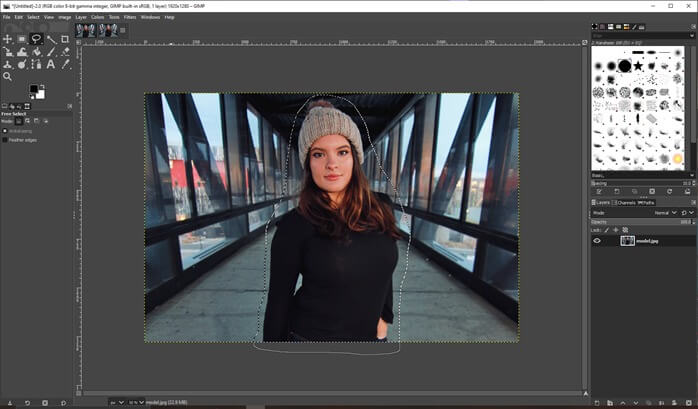
Step 9: Then, use the lasso or free select tool and draw the lasso loosely around the model. You can add and remove from selection by selecting other options if you have made a mistake.

GIMP blur background output 8

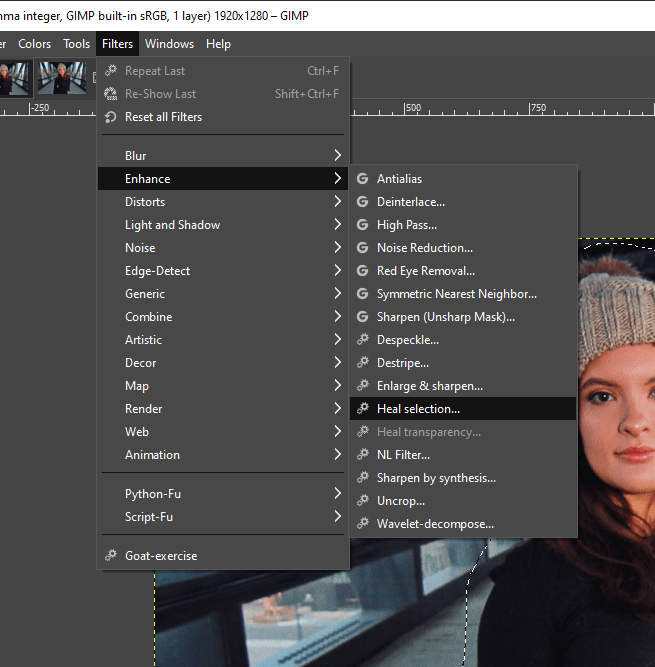
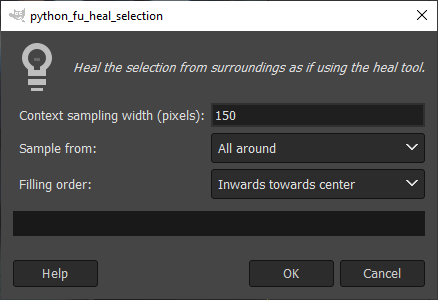
Step 10: Then go to Filters -> Enhance -> Heal Selection. Note that if you do not install the plugin as shown in previous steps, this option will not be shown.

GIMP blur background output 9

Step 11: Set the parameters as shown, which is context sampling width to 150px, and the filling order will be inwards toward the center.

GIMP blur background output 10

Step 12: Since we do not want the color from the model to blur outside of it, so we perform this step which gives us some rough approximation of the background in this space.

GIMP blur background output 11

Step 13: Duplicate the original image on top of the model removed layer. Also, keep a copy of the original just in case if you want to compare it to the original image.

GIMP blur background output 12

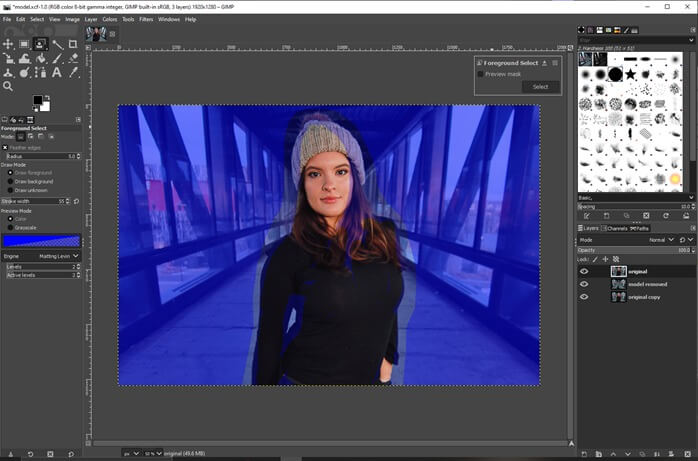
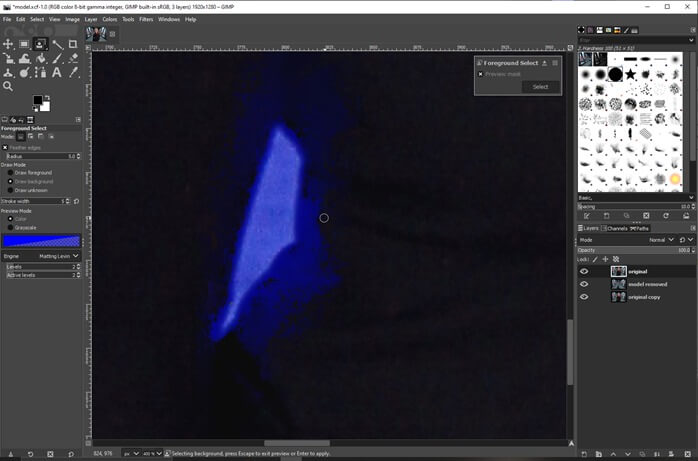
Step 14: Next, we use the foreground select tool to select the model loosely as shown and close the loop.

GIMP blur background output 13

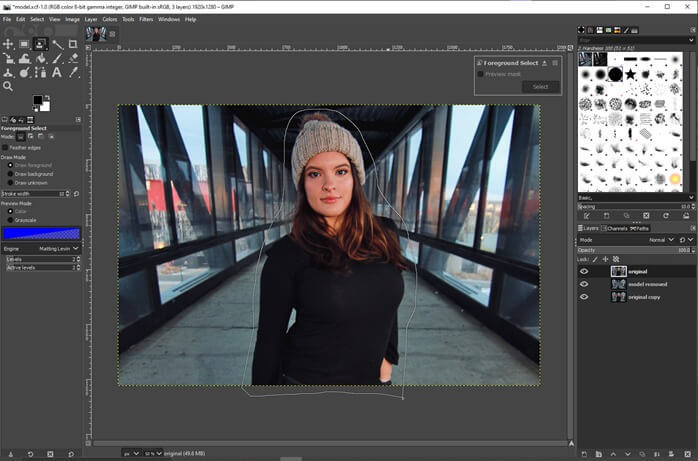
Step 15: Once the selection is made and you have covered the entire model, then press enter. You can see that now the mouse pointer is changed to a paint tool.

GIMP blur background output 14

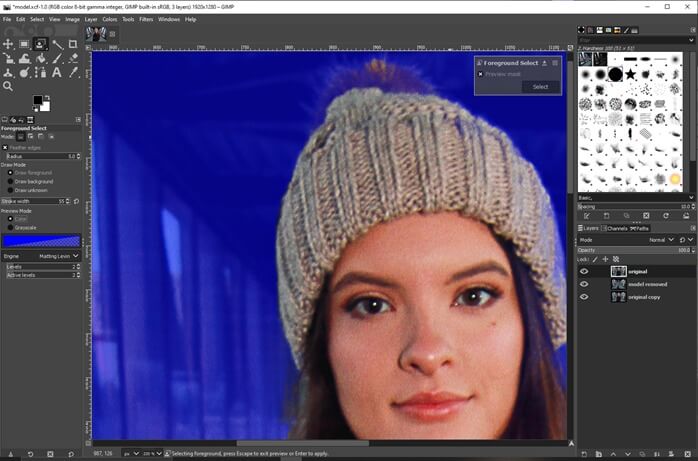
Step 16: Now start painting the model, which is the foreground object and anything in the blue area is the background. Get a good coverage of foreground, but it doesn’t need to be exact. Once done, press enter. Also, make sure that the brush has feathered edges selected, which will give a more realistic blend of background and foreground.

GIMP blur background output 15

Step 17: You can do the fine adjustment now by adding the parts to the foreground if you have missed them.

GIMP blur background output 16

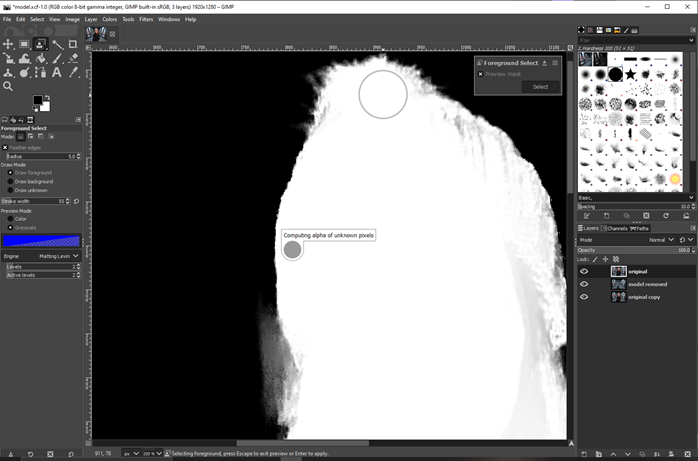
Step 18: You can also look at a grayscale version if you want to preview it like that.

GIMP blur background output 17

Step 19: You can also draw on the background if it is added in the foreground.

output 18

Step 20: Again, you can do fine adjustments using draw on the foreground and background options.

output 19

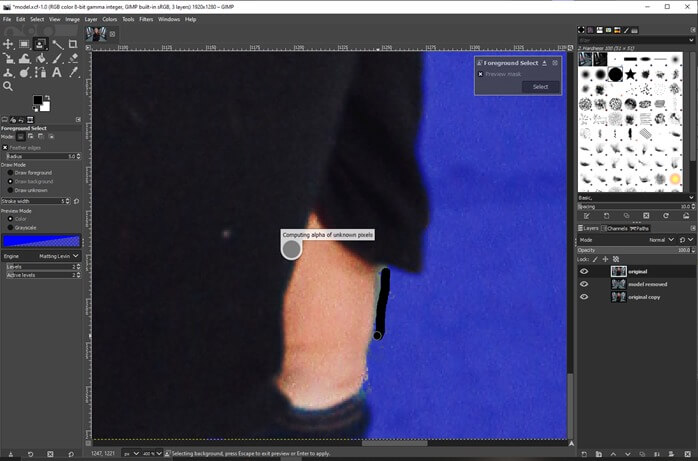
Step 21: As shown, first, the foreground select tool has selected more in the background than need, so we have adjusted by drawing in the foreground. After you finish adjusting, press enter, and the foreground object will be selected.

output 20

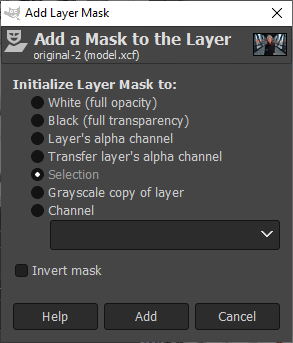
Step 22: Now select the original layer and right-click to add a layer mask.

output 21

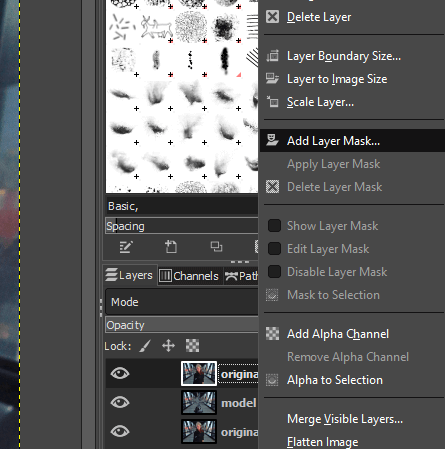
Step 23: Make sure the selection is checked in the options, and the invert mask is unchecked. This will mask everything from this layer except the subject in the selection.
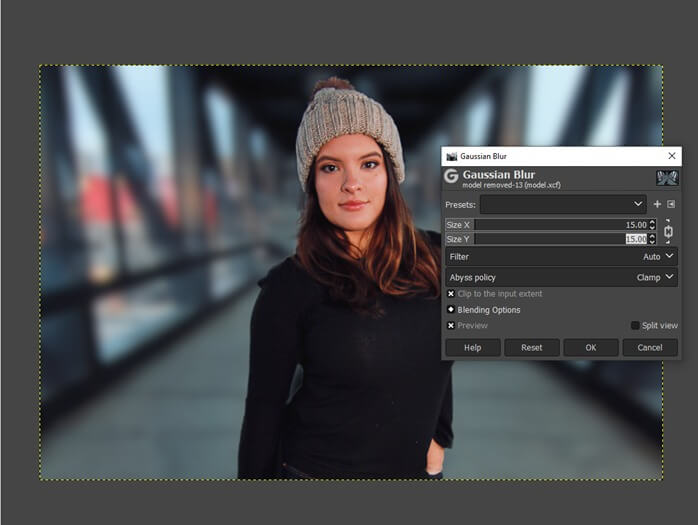
output 22

Step 24: Press ctrl + shift + a if you have still selected the subject, which will deselect it and then select the “model removed” layer and then add a blur using Filters -> Blur -> Gaussian Blur

Output 23

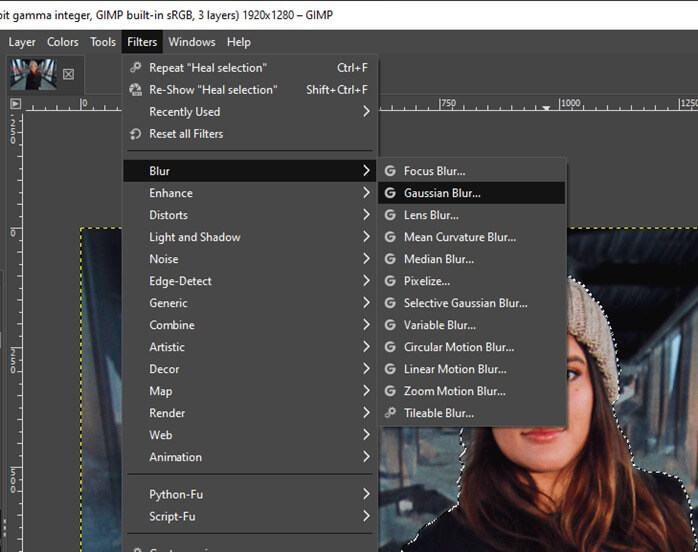
Step 25: Set size x and size y to 15 to get a proper background blur or shallow depth of field.

output 24

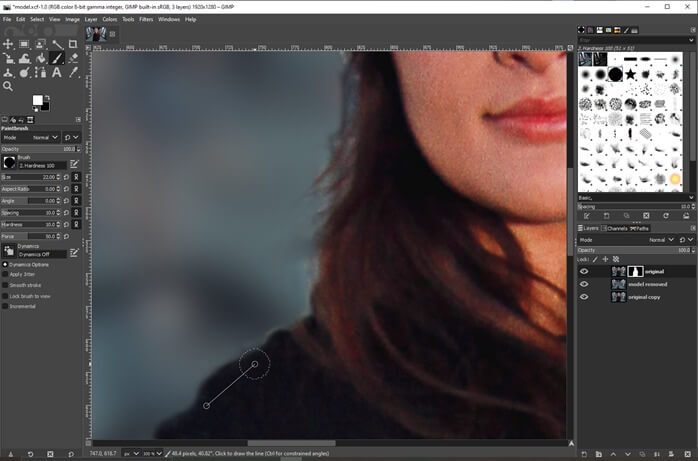
Step 26: Now select the mask to make some finer adjustments and first make sure that the foreground and background are set it to their default values of white and black. Then select the mask paint black to add to the mask and paint white to remove from the mask.

output 25

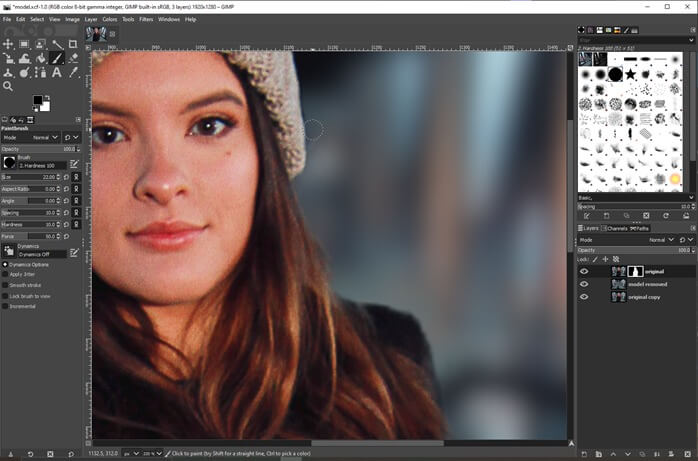
Step 27: You can press X to switch the background and foreground color and set what is masked out and what is not. So, the more time is spent on refining the layer mask and edge between the foreground and the background object; the better will be the final result for the blur background effect.

output 26

Step 28: Then create a new layer name vignette and fill with set to transparency.

output 27

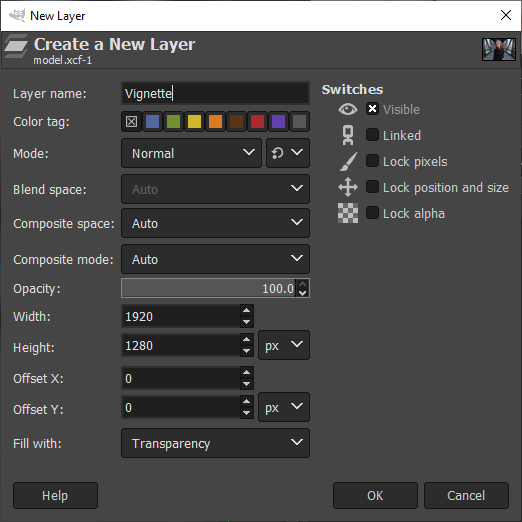
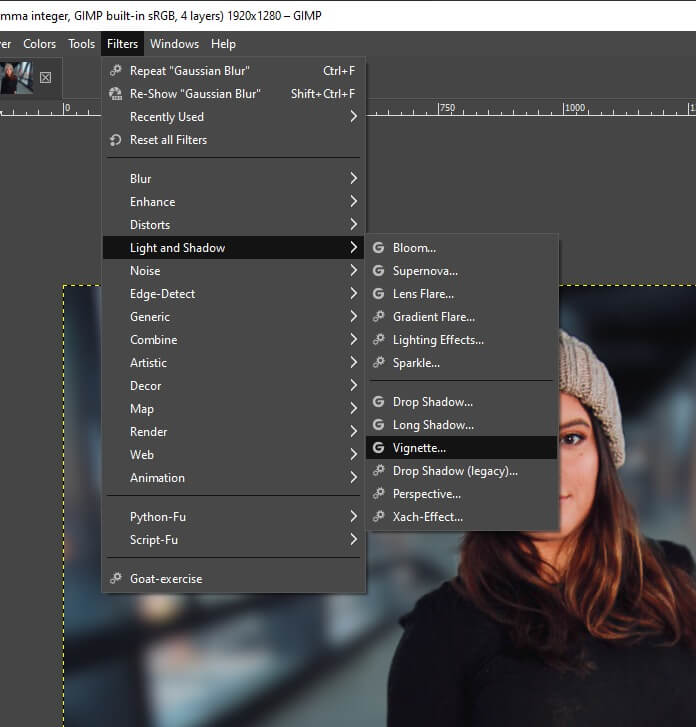
Step 29: Now go to Filters -> Light and Shadow -> Vignette

output 28

Step 30: You can change the radius, softness, gamma and other parameters depending on how prominent you want your subject in focus.

output 29

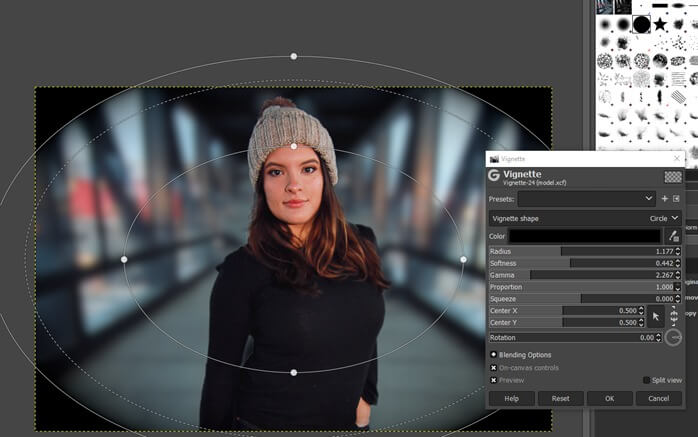
Step 31: Then reduce the opacity of the vignette layer to make it look decent.

output 30

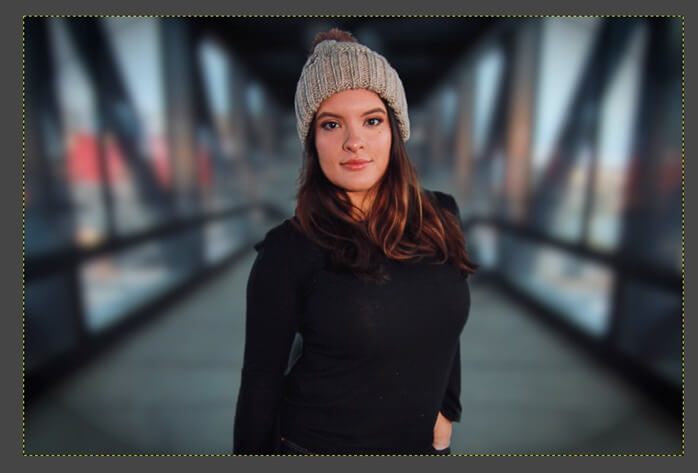
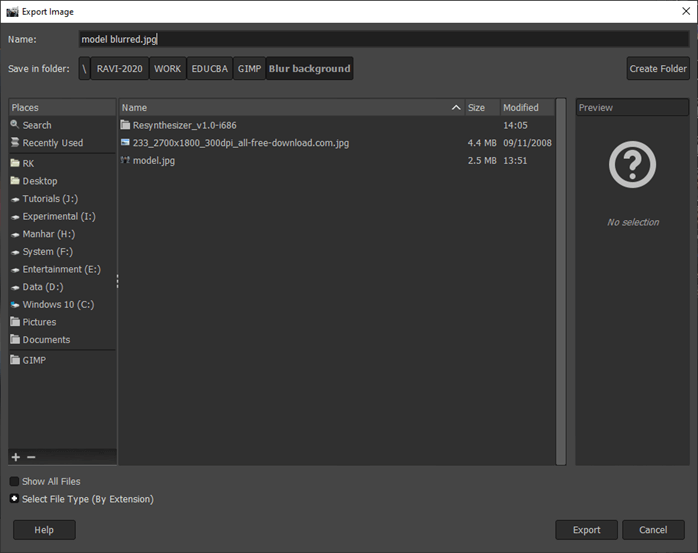
Step 33: Finally, we will export it as a jpg from the file menu to get the result.

output 31

Conclusion

In this article, we have learned how we can do blur background using GIMP. First, we have seen how to use the install resynthesizer plugin, which provides us with necessary tools and then we have selected the subject with foreground select tool and then applied the layer mask to the selection and then enhanced the mask to match to subject as close as possible and then we have finished with some post-processing effects like a vignette.

Recommended Articles

This is a guide to GIMP blur background. Here we discuss the Steps of GIMP blur background and how we can do blur background. You may also have a look at the following articles to learn more –

  1. GIMP Alternatives
  2. Action in Illustrator
  3. Software Design
  4. 3ds Max Interior Design
Popular Course in this category
Maya Training (10 Courses, 7+ Projects)
  10 Online Courses |  7 Hands-on Projects |  100+ Hours |  Verifiable Certificate of Completion
4.7
Price

View Course

Related Courses

Photoshop Training (10 Courses, 12+ Projects)4.9
After Effects Training (3 Courses, 3+ Projects)4.8
0 Shares
Share
Tweet
Share
Primary Sidebar
Footer
About Us
  • Blog
  • Who is EDUCBA?
  • Sign Up
  • Live Classes
  • Corporate Training
  • Certificate from Top Institutions
  • Contact Us
  • Verifiable Certificate
  • Reviews
  • Terms and Conditions
  • Privacy Policy
  •  
Apps
  • iPhone & iPad
  • Android
Resources
  • Free Courses
  • Photoshop Tutorial
  • 3ds Max Tutorial
  • All Tutorials
Certification Courses
  • All Courses
  • Design Course - All in One Bundle
  • Photoshop Course
  • Maya Course
  • Unreal Engine Course
  • Unity Course
  • DaVinci Resolve Course
  • Pro Tools Course

ISO 10004:2018 & ISO 9001:2015 Certified

© 2022 - EDUCBA. ALL RIGHTS RESERVED. THE CERTIFICATION NAMES ARE THE TRADEMARKS OF THEIR RESPECTIVE OWNERS.

EDUCBA
Free Design Course

Banner Creation, Object Selection, Sky Replacement, Advance Filters & others

*Please provide your correct email id. Login details for this Free course will be emailed to you

By signing up, you agree to our Terms of Use and Privacy Policy.

EDUCBA Login

Forgot Password?

By signing up, you agree to our Terms of Use and Privacy Policy.

EDUCBA
Free Design Course

3D animation, modelling, simulation, game development & others

*Please provide your correct email id. Login details for this Free course will be emailed to you

By signing up, you agree to our Terms of Use and Privacy Policy.

EDUCBA

*Please provide your correct email id. Login details for this Free course will be emailed to you

By signing up, you agree to our Terms of Use and Privacy Policy.

Let’s Get Started

By signing up, you agree to our Terms of Use and Privacy Policy.

This website or its third-party tools use cookies, which are necessary to its functioning and required to achieve the purposes illustrated in the cookie policy. By closing this banner, scrolling this page, clicking a link or continuing to browse otherwise, you agree to our Privacy Policy

Loading . . .
Quiz
Question:

Answer:

Quiz Result
Total QuestionsCorrect AnswersWrong AnswersPercentage

Explore 1000+ varieties of Mock tests View more