Updated August 19, 2023
Spell Check in Excel (Table of Contents)
Introduction to Spell Check in Excel
Spell Check, as the name says, helps the user check the spelling of each word and sentence. Using the correct words without grammar mist is essential-akes, making a statement look more professional.
Users can perform spell checks manually or automate them using VBA codes in Excel. To check the spell, we can use the shortcut function key F7, or, from the Review menu tab, we can use the Spelling option under proofing.
Uses of Spell Check in Excel
Spell Check is used to identify spelling errors, typing errors, or any kind of duplicate words (I will explain it with an example) in Excel. It may be a useful tool when using some texts repetitively in Excel. Although many of us play with numbers in Excel, spell check is crucial in creating some reports and datasets that may have text. So, nobody will want to see any errors in it, or you don’t want to upset your managers/bosses with these mistakes.
Examples of Spell Check in Excel
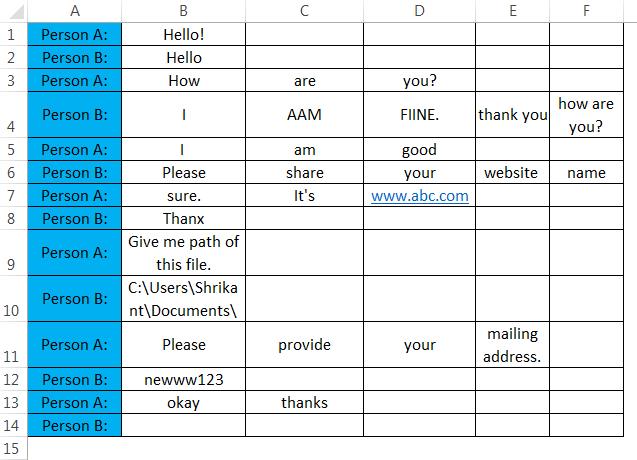
- In the below screenshot, I have the conversation between 2 guys saved in Excel. Don’t go with the content; it’s purely to make you understand better.
Screenshot 1
- In Screenshot 1, you can see there are a lot of typing errors and spelling mistakes.
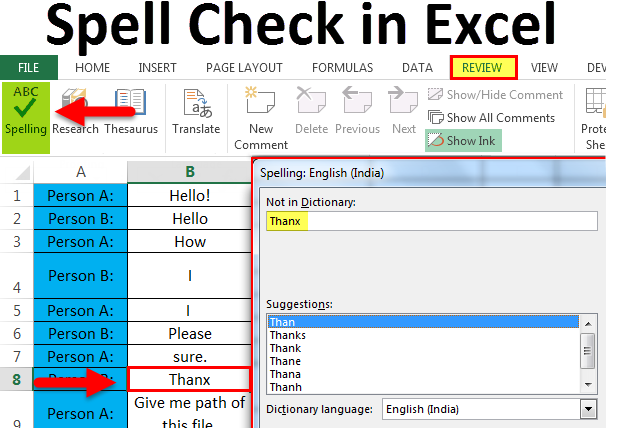
- To run spell check in this particular workbook, you must activate the cells where you want to check spelling or typing errors and go to the “REVIEW” tab in the Excel ribbon, and there you will find the spell check option.
- A shortcut to run spell-check is simply pressing the “F7” button from your keyboard after activating the cells/worksheet.
Screenshot 2
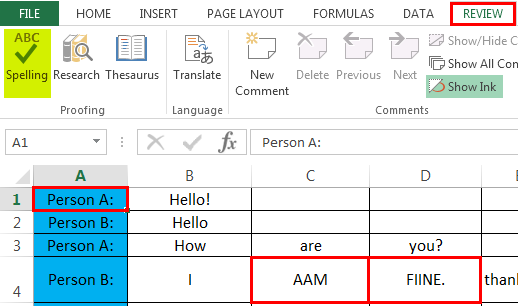
- In the above Screenshot 2, you can notice that I have selected the A1 cell and the spell check option in the review tab.
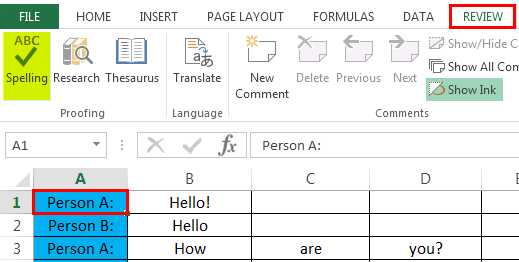
- Key Point: If you select cell A1, it will go through all the cells horizontally, i.e., all columns of the first row, then move to the second row and check all the column cells in the second row (from left to right) and then move to the third row and so on.
- A spelling dialogue box will be displayed after going on to the last cell, where any value is stored and identifies any spelling error.
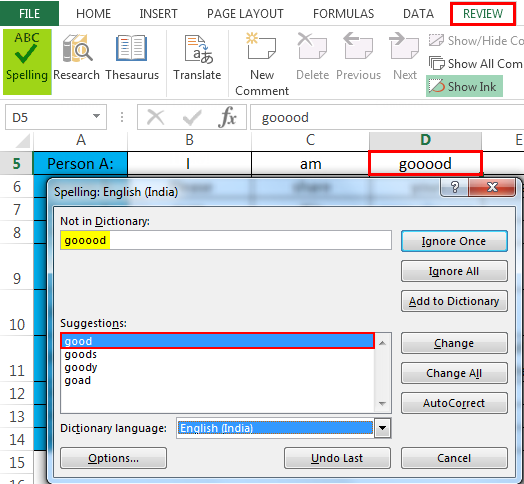
- If you want to start to spell check from somewhere else, let’s take an example, cell D5, it will simply go through all cells of Row 5 and then rows below it, and when done will all rows after D5, it will ask you, “if you want to continue checking at the beginning of the sheet?”. Some dialogue boxes like the below screenshot will appear. If you select yes, it will check the remaining cells (A1 to D5 in our case) and shows suggestion. To make you understand better, I have selected the D5 cell and pressed F7 now; it will check all the cells after it, give spelling correction suggestions & after it will ask you to check the remaining cells or not and work accordingly. For your better understanding, please go through the below Screenshots.
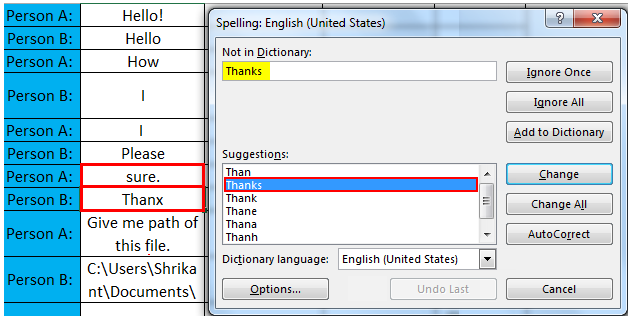
Screenshot 3
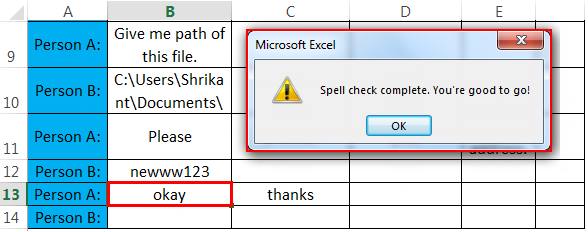
- Pressed F7 after activating B13 cell, now spell check dialogue box will appear with correction suggestions.
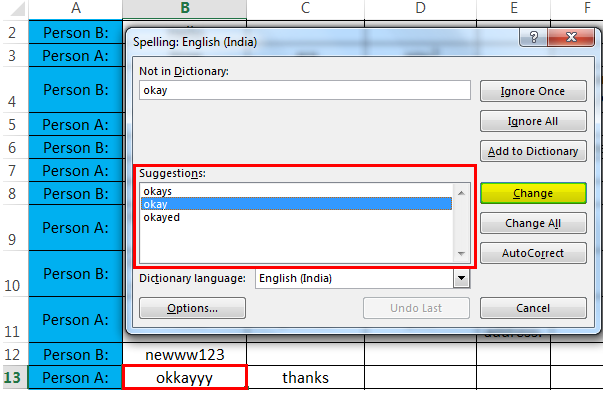
Screenshot 4
- The results of the cell B13 correction through Spell Check is mentioned in the screenshot.
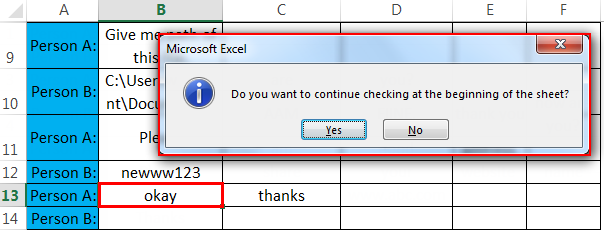
Screenshot 5
- After completing the last cell with correction(C13), it has asked to check from the beginning of the sheet. As discussed above.
Features of Spell Check in Excel Dialog Box
- You might have noticed in the screenshots that many spell-check options are available. Let us discuss them one by one.
- Ignore Once: If there is an error according to Excel, but you want to keep that text like that only, you must click this, and Excel will ignore this error for once.
- Ignore all: If you want to ignore all the instances of that particular word in the given workbook, click this option.
- Add to Dictionary: If there is an error in any text, but you anticipate using the word frequently in the future (such as a name or abbreviation), you can add it to the dictionary in Excel. It will become part of the dictionary and a list of acceptable words. Any word added to Excel’s Dictionary will not be detected as an error in the future in any workbook.
- Change: you can use it when you want to change a word according to suggestions, and it will change it according to the selected suggested word. (You can see in Screenshot 3 the words suggested for text in cell C5.)
- Change all: It will replace all the instances of that word in a worksheet according to the selected suggestion.
- Autocorrect: If you go with this option, it will autocorrect the word with a selected suggestion, and it will be added to the autocorrect list viz; every time you type that word, it will be automatically corrected according to the selected suggestion.
- Dictionary Language: We can change the dictionary used in Excel.
- Options: Used to change the Excel default settings (discussed later in this guide), and it will open an option box where you can make changes accordingly.
- Now I chose to continue to spell check from the beginning of the sheet. And chose options accordingly. All spell checks are done.
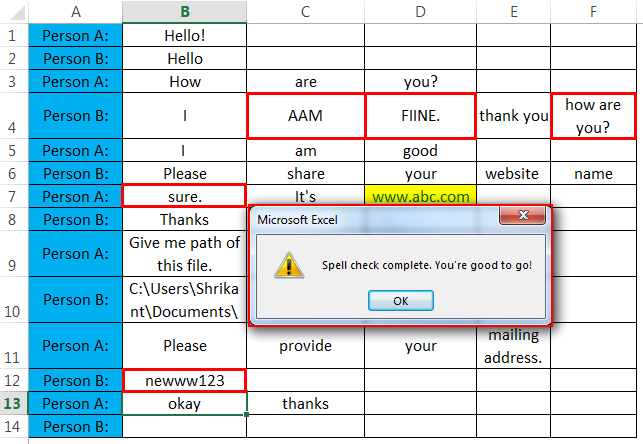
Screenshot 6
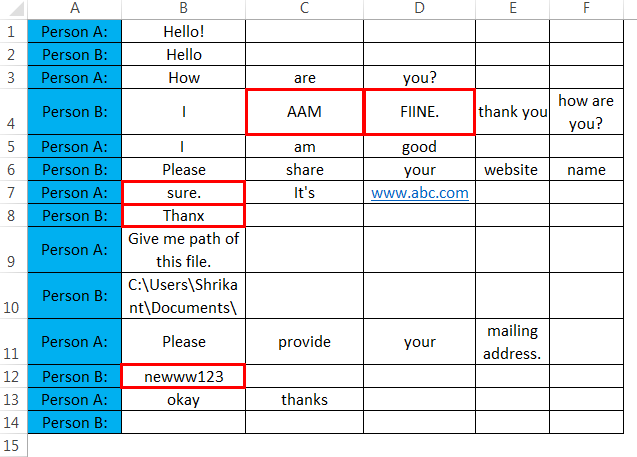
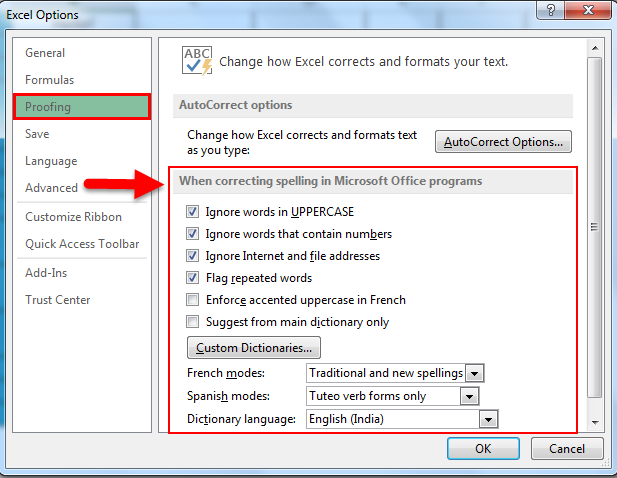
- In the above Screenshot 6, you might have noticed some spelling errors in the worksheet, but Excel isn’t detecting them. Have you noticed? It has brought us to notice the default settings of the Spellcheck, and they are:
- It ignores all errors in the upper case. For e.g., the words “AAM” and “FIINE” in cells C4 & D4 are not marked as errors.
- All words with numbers in them will be ignored too. (cell B12 “newww123”)
- It also ignores all internet addresses and file addresses. (D7 & B12)
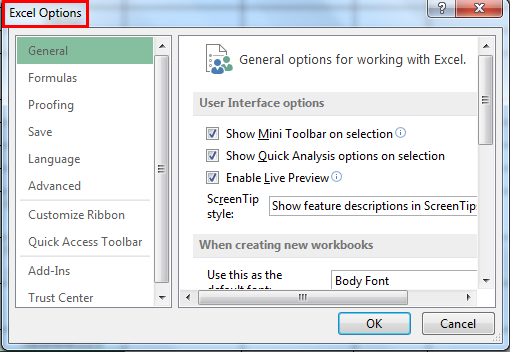
- If you want to change default settings in the Spell check dialogue box, you need to go to the file and then click on the option to get the Excel options menu, as shown below

By clicking the option, You will get the Excel option Menu like this, as shown below
Then you have to click on the proofing to change default settings in the Spell check dialogue box.
Screenshot 7
- Another important feature to note here is Spell check doesn’t ignore repeated words. You can identify it by comparing Screenshot 1 and Screenshot 6 carefully.
Cell F4 has “how are you?” and spell check has detected it. I have deleted it with the delete option, which only appears when we have any kind of repetition in Excel.
Things to Remember
- Excel uses spell check to identify spelling errors.
- It detects the repetition of words.
- You can ignore, change, autocorrect, or add to the dictionary all detected errors according to your requirement.
- It doesn’t detect errors in words written in uppercase or have numbers in it.
- It ignores all file and internet addresses.
Recommended Articles
This is a guide to Spell Check in Excel. Here we discuss Spell Check in Excel and How to use Spell Check in Excel, along with practical examples and downloadable Excel templates. You can also go through our other suggested articles –
