Updated July 10, 2023

Introduction to Docker rm
The ‘docker rm’ command removes or deletes Docker containers. It can be used to delete a single container or multiple containers using a single command. Still, the container must be stopped unless we want to forcefully delete the containers using the ‘-f’ option. This command requires ‘container ID’ or ‘container name’ to be passed to remove or delete the container. It deletes all the data stored inside the container, and there is no way to get it back, so we use persistent storage to store the data to preserve it.
Syntax:
docker rm [OPTIONS] CONTAINER [CONTAINER...]
Options:
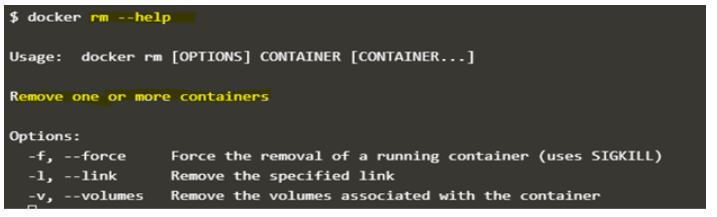
- -f, –force: It is used to remove the running container forcefully using the ‘SIGKILL’ signal.
- -l, –link: It removes a specified existing link.
- -v, –volume: It removes the volumes attached to the container.
We can use the ‘–help’ option to get help anytime.
Code:
docker rm --help
Output:
How does rm Command work in Docker?
- First, Docker CLI must be installed on the host to run the Docker commands.
- When we run the ‘docker rm’ command, the Docker client makes an API call to the Docker daemon, and then the Docker daemon searches for the containers mentioned in the command. Once it finds the container, then it checks the status of the container. If the container is running, then it throws the error that the container is running and suggests us either stop the container before removing the same or force remove. If the container is not running, it simply removes it and outputs the container ID or name, whatever we pass using the command line.
- We have to use the ‘-f’ flag to forcefully remove the container.
Examples of Docker rm
Given below are the examples of Docker rm:
Example #1
Remove one or more containers.
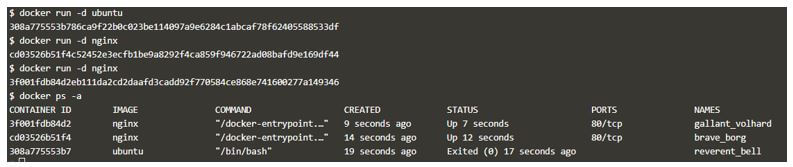
Step 1: Create three containers; one should be in the exited state, and the other two must be running as below:
Code:
docker run -d ubuntu

docker run -d nginx

docker run -d nginx
Output:
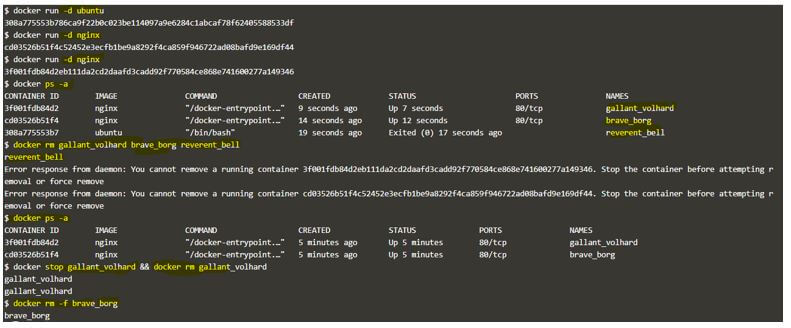
Step 2: Let’s try to delete all the containers at once, as below.
Code:
docker rm gallant_volhard brave_borg reverent_bell
Output:

Explanation:
- In the above snapshot, we can see that the only exited container got deleted. However, the other two running containers did not get deleted. Therefore, we can see that those containers are still running in the below snapshot.
Code:
docker ps -a
Output:

We now have two ways to remove these containers: stop the container first and then delete it or use the ‘-f’ flag to remove the container forcefully.
Step 3: Let’s stop the ‘gallant_volhard’ container and delete it as below:
Code:
docker stop gallant_volhard && docker rm gallant_volhard
Output:

We got the container name two times because we used two commands at the same, the one was to stop the container, and the second one was to remove it.
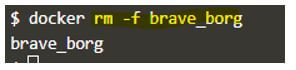
Step 4: Let’s forcefully remove the container using the ‘-f’ flag as below:
Code:
docker rm -f brave_borg
Output:
Example #2
Remove linked containers and links.
Step 1: Let’s create a linked container using below the commands:
Code:
docker run -d --name my-db mysql sleep 3600

docker run -d -P --name my-web --link my-db:db nginx
Output:

Step 2: Delete the containers running under link /my-web and /my-db as shown below:
Code:
docker rm -f /my-web

docker rm -f /my-db
Output:

Explanation:
- In the above snapshot, we can see that we have to the ‘-f’ flag as it will remove the container, and if we don’t use that flag, then it will throw an error that the running container cannot be removed.
Step 3: We can only delete the link between the containers as well using the below command:
Code:
docker rm -l /my-web/db
Output:
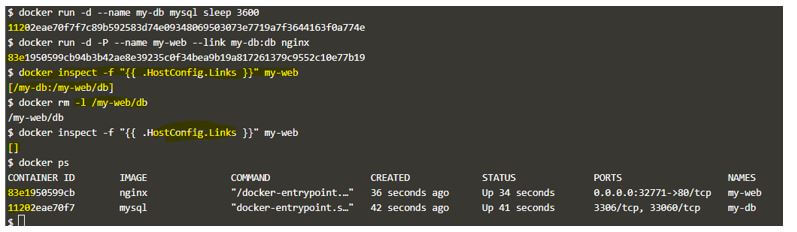
Explanation:
- In the above snapshot, we recreated the linked containers and checked that link using the ‘inspect’ command. After that, we removed the link using the ‘-l’ flag, and we can see no link available now; however, containers created earlier are still running.
Example #3
Delete the attached anonymous volume while deleting the container.
Step 1: First, we must create a container with an anonymous volume attached to it to accomplish this scenario. Here is the command to create a container with an anonymous volume:
Code:
docker run -d -v /root --name test-cont alpine
Step 2: Now, we can use the ‘-v’ option to delete the container as well as associated anonymous volume to the container, as shown below:
Code:
docker rm -v test-cont
Output:
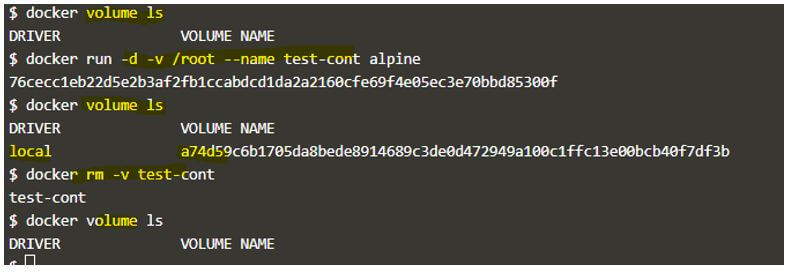
Explanation:
- In the above example, we can see that there was no volume before creating the container and a volume created after container creation.
- That volume is anonymous volume, so we have used the ‘-v’ flag to remove the anonymous volume along with the container.
Example #4
Delete all containers that are in the exited state.
We can use the ‘docker ps’ command to query the exited containers first, and then we can pass it to the ‘docker rm’ command as below:
Code:
docker ps -a
Output:

Code:
docker rm $(docker ps -a -q)
Output:

Explanation:
- In the above snapshot, we have a few stopped containers and one running container, and when we ran the command, it deleted all the stopped containers but not the running one; however, if we use the ‘-f’ option, then it will delete all the containers exits on the host.
Advantages of Docker rm
Given below are the advantages mentioned:
- It is an easy and quick way to remove containers compared to the ‘docker container rm’ command.
- We do not have to clean up the anonymous volumes as it removes those volumes along with the container; using the ‘-v’ option is cool.
Rules and Regulations for Using an rm
Given below are the rules and regulations mentioned:
- First, it only removes stopped containers by default.
- Second, it only removes anonymous volumes attached to the container using the ‘-v’ flag, not the named volumes.
- Finally, it removes the link using the ‘-l’ option, not the containers.
Conclusion
We have two commands to remove the containers in Docker, and the other one is the ‘docker container rm,’ and there is no difference between them; however, we can see that the ‘docker rm’ command is a little faster to work with.
Recommended Articles
We hope that this EDUCBA information on “Docker rm” was beneficial to you. You can view EDUCBA’s recommended articles for more information.

