Updated May 9, 2023
Data Validation in Excel
Data validation is a feature in MS Excel used to control what a user can enter in a cell of an Excel sheet. For restricts the entries in a sheet, such as a date range or whole numbers only. We can even create dropdowns, which save unnecessary space and shows the values in a single cell. Also, we can create a customized message which will appear user inserts any incorrect value or an incorrect format.
For example, A user can specify a meeting between 9:00 AM and 6:00 PM.
We can use data validation in Excel to ensure a value is a positive number, a date between 15 and 30, a date that occurs in the next 30 days, a text entry is less than 25 characters, etc.
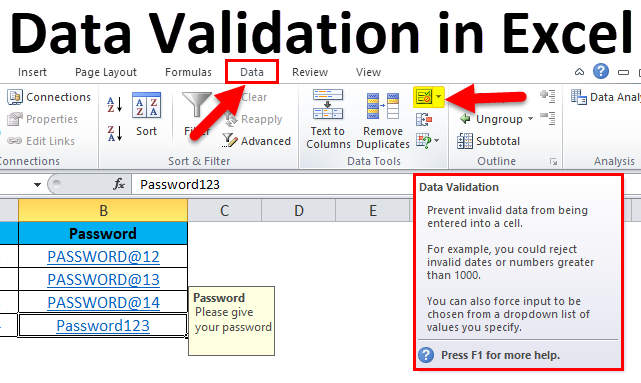
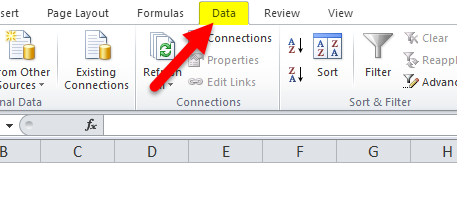
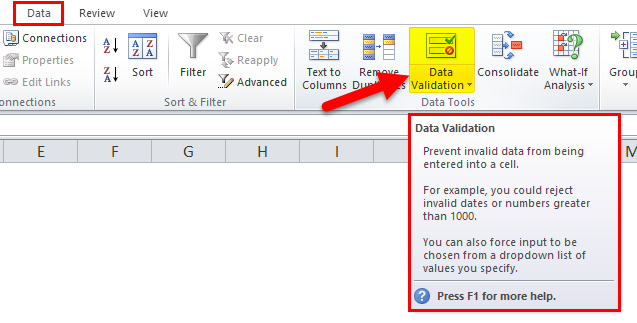
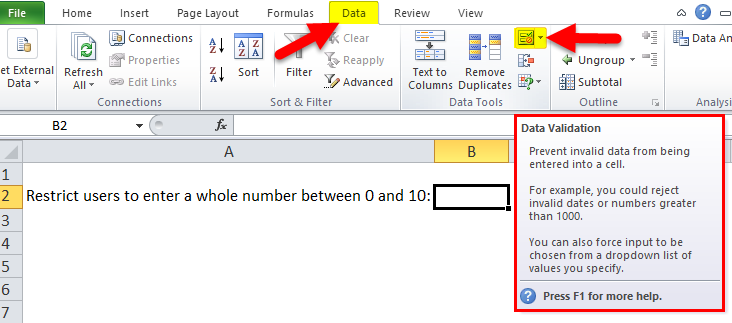
Locate in MS Excel
- Click on Data Tab in the Menu bar.
- Select Data Validation from the toolbar under the Data Tab:
How to Create Data Validation Rule in Excel?
Let us understand the working of Data validation in Excel with some examples.
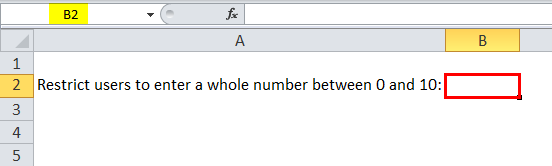
Example #1
We can restrict a user to enter a whole number between 0 and 10.
Execute the Below mentioned steps for the creation of the data validation rule in Excel:
Step 1: Select B2 Cell.
Step 2: Go to the Data tab, and click on Data Validation from Data in the toolbar.
Step 3: A data validation Pop-Up will open:
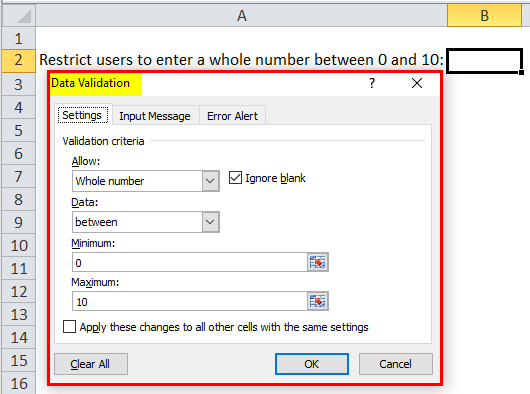
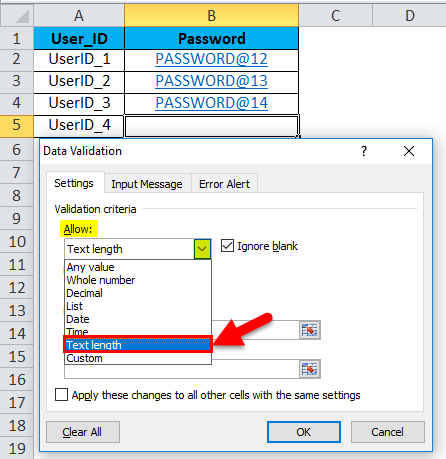
Step 3.1: On the Settings tab, Click on Allow drop-down under validation Criteria.
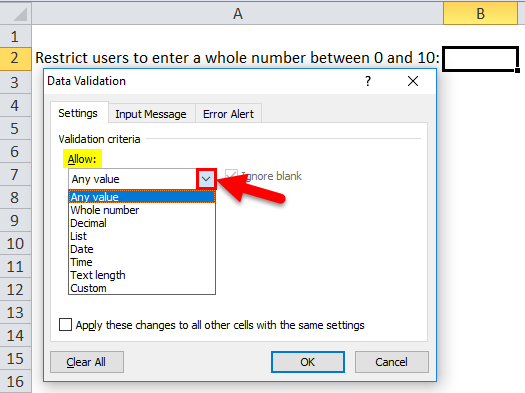
Step 3.2: Select the Whole number, then Some more required options will be enabled.
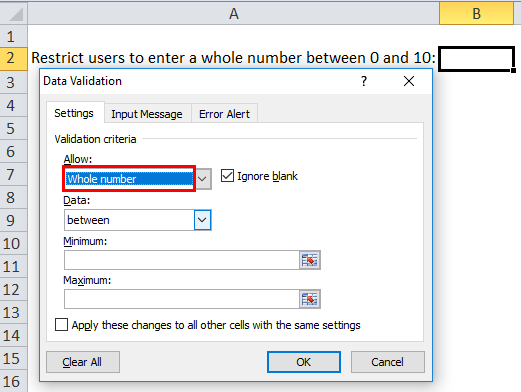
Step 3.3: Select between from the drop-down of the Data list; enter the Minimum and Maximum number for restriction. And click ok.
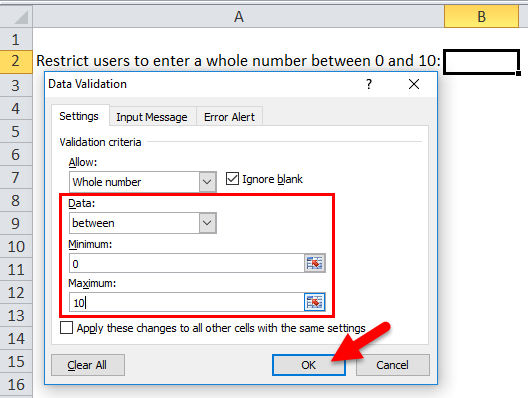
Step 3.4: All settings will apply to the selected cell.
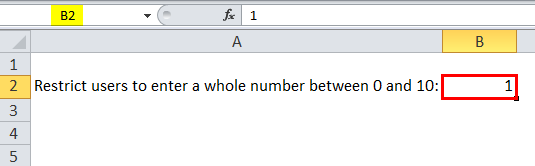
Now Enter 1 in cell B2- It will allow users to enter any whole number from 0 to 10.
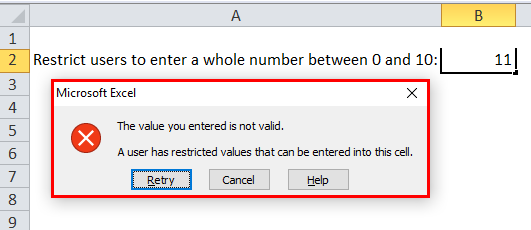
Now Enter 11 in cell B2- It will throw by default error.
Example #2 – Set Input Message and Error Alert
We can restrict a user to enter a limited text.
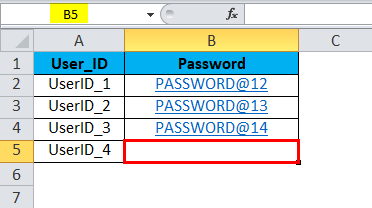
Step 1: Select B5 Cell from Example 2 Sheet.
Step 2: Click on the data validation tool from the Data Menu Bar and select Text Length in Allow drop-down.
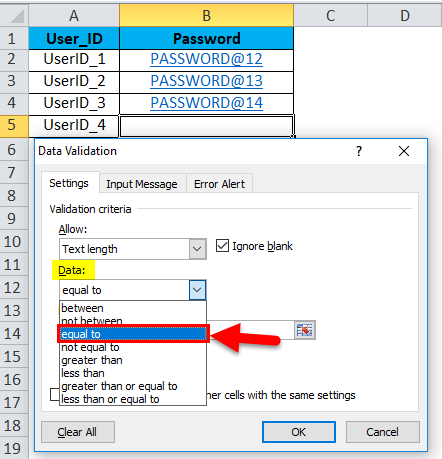
Step 3: Select equal to from the data list drop-down.
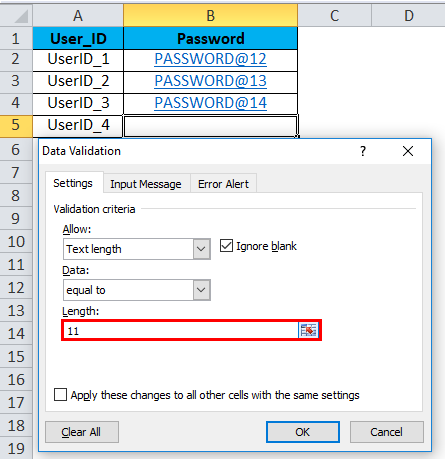
Step 4: Enter your desired password length (as an example 11).
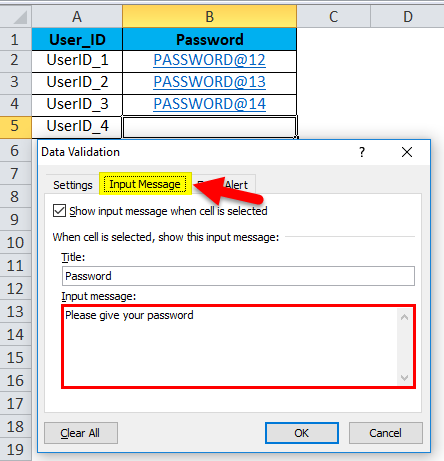
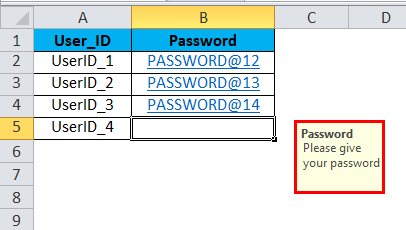
Step 5: Click on the Input Message tab and provide a message displayed on the cell selection.
Step 6: Click on the Error Alert tab to provide a Title and the Error message, which will be displayed if a user enters an invalid length password.
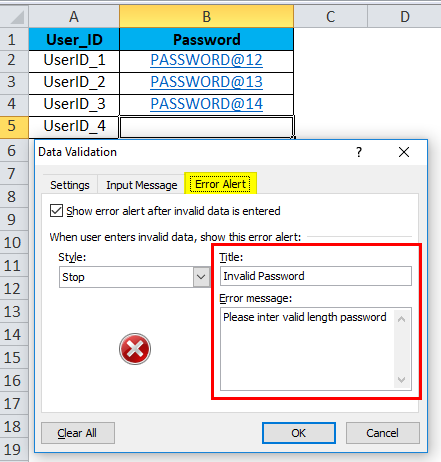
Step 7: The setting will be set to the chosen cell after you click the Ok button.
On the Selection of Cell, an Input message will be displayed.
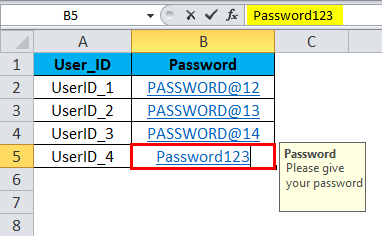
Enter a text which has a text length of 11. It will be selected successfully.
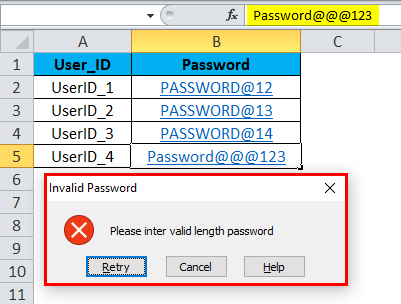
Now enter an invalid password. It will throw the described error message.
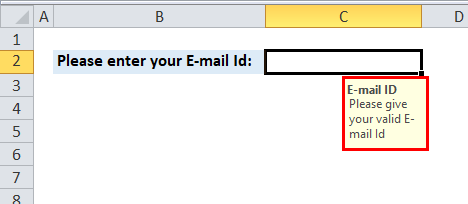
Example #3 – Custom option for e-mail address validation
Step 1: Select the C2 cell, Go to Data Tab, and click on Validation data in the toolbar.

Step 2: Select Custom in Allow drop-down.
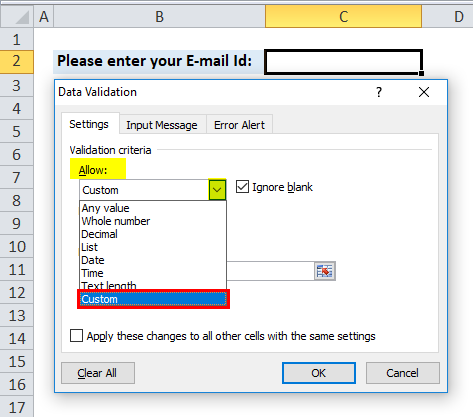
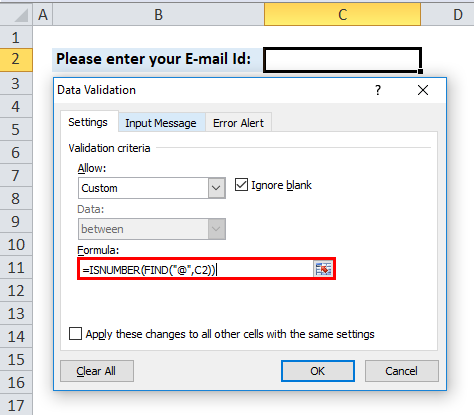
Step 3: Write a formula for selecting only value if it has ‘@‘.
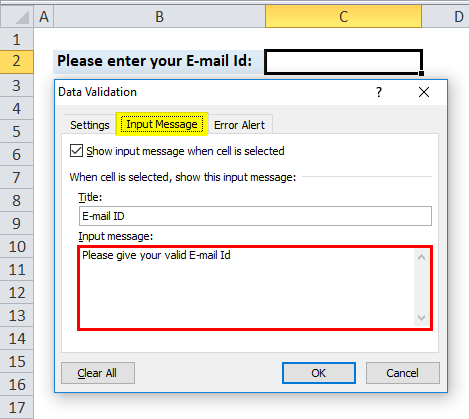
Step 4: Click on the Input Message tab, and provide the message, which will be displayed on selecting a cell.
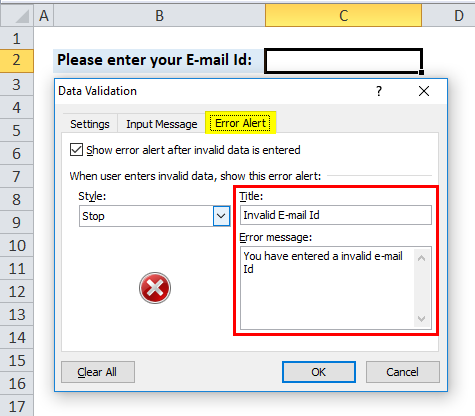
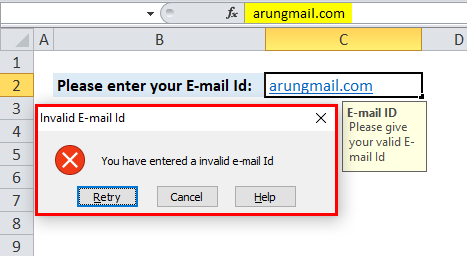
Step 5: Click the Error Alert tab to provide the Title and an Error message displayed if a user enters an invalid length E-mail Id.
Step 6: After clicking the Ok button, the setting will be applied to the selected cell.
On the Selection of Cell, the Input message will display.
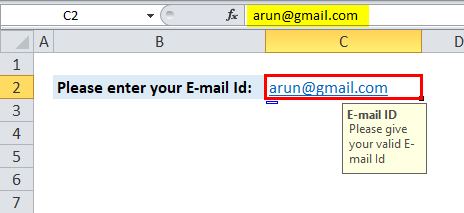
Enter a valid e-mail id – It will be selected successfully.
Now enter any invalid e-mail Id- It will throw a described error Message.
Valuation criteria of Excel data validation Settings
- Any Value – To provide any data.
- Whole Number – Enter only real numbers.
- Decimal – Enter only decimal numbers.
- List – Pick data from the drop-down list.
- Date – Accept the only date.
- Time – Enter only time.
- Text Length – Fixed the length of the text.
- Custom – Enter a custom formula.
Conditions in the data list in the Valuation criteria settings
Between, not between, equal to, not equal to, greater than, less than, greater than, or equal to, less than, or equal to.
Some more conditions of Excel data validation Settings
- If a user wants to ignore the blank, there is a checkbox called Ignore.
- W a user selects between, then a user needs to select the Minimum and Maximum values for the cell(s).
- If a user wants to apply these changes to all other cells with the same setting, then there is a checkbox that needs to mark, and it will apply to the remaining cells in the sheet.
When to Use Data Validation in Excel?
- This is the best option when a user wishes to share a sheet with another user and needs the data entered to be correct and consistent.
- Restrict entries to predefined items in a list.
- Restrict numbers outside a specified range.
- It Restricts dates outside a certain time frame.
- Restrict times outside a certain time frame.
- Limit the number of text characters.
- Validation of the data, which is available on other sheets or workbooks.
- Choose to be displayed an Input Message when a user clicks on a cell as a user’s guide.
- A user can customize the error alert; it can be anything user-defined.
Things to Remember About Data Validation in Excel
- If a user wants to create a data validation rule in the workbook for Excel web apps or Excel services, then he needs to make an Excel data validation rule on the desktop first.
- If one user sender a workbook to another, then first, a user needs to make sure that the workbook is unlocking; otherwise, second, a user is never able to access the workbook cells to fill value.
- Always remember that there is no error in a formula like #REF! or #DIV/0!
- Anyone who can create a data validation rule in the filled cell MS Excel will not detect it.
How to Remove the Excel Data Validation Rule?
A user can remove Excel data validation from a cell, select the cell, click Data Validation, and then click Clear All.
Users can only modify or delete the Excel data validation rule if the inherited sheet is unprotected. If it is password protected, contact the owner of the workbook. Only he can help to unprotect the workbook as there is no way to recover or lose the password option in MS Excel.
Recommended Articles
This has been a guide to Data Validation in Excel. Here we discuss how to create Data Validation in Excel, along with Excel examples and a downloadable Excel template. You may also look at these useful functions in Excel –
