Updated June 17, 2023
Introduction to CSS padding
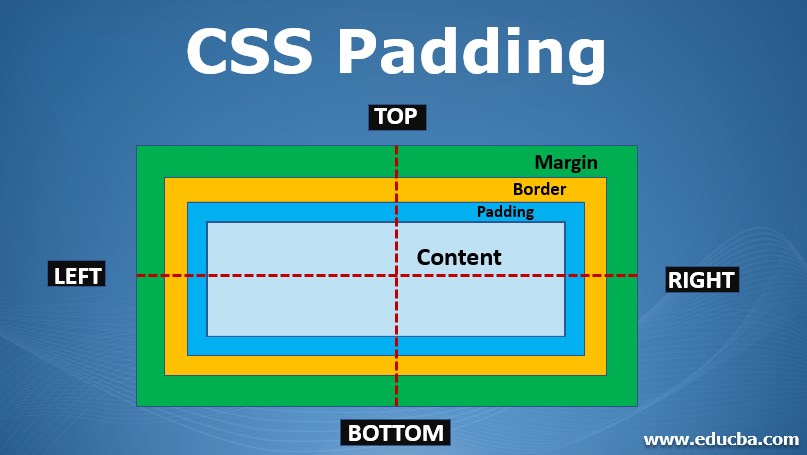
CSS Padding specifies a space between the outside content area and inside the border area. In other words, it helps in introducing extra few spaces. Throughout this article, we shall learn padding, its behavior, and how they have implicitly been implemented in CSS techniques. To figure out the best result. The background color of the specified box model easily reflects the Padding. When you specify a box, the padding has four different sides of an element: the padding-right, padding-left, and padding-bottom. Padding follows the Shorthand property and is helpful while setting the values differently. The default value is assigned ‘0’. And the scheme individually likes the margin element and works well with border property. In the box- model padding includes in the third section below the border area.
Syntax
Here is the general syntax:
body
{
padding: size in px or percentage; // or padding: length||percentage||inherit;
}
Padding Assignment Rule
1. If one value per property is set, then it is assumed in the following way:
padding: top, right, bottom, left.
So that all the type is assumed to have the same value on all the sides. For instance, if the value is 32px, this sets all padding values to the properties:
padding-top: 32px;
padding-right :32px;
padding-bottom:32px;
padding-left :32px;
2. If it has two values:
padding 5px 7px;then top and bottom are 5px and left, right is 7px.
3. If it has three values:
padding 3px,6px,4px;Then it is assumed as top 3px; 6px for left and right and 4px is for the bottom.
The difference between the margin and padding element is with the border area, and they differ by background as the margin neither requires background nor border. Browser compatibility: It supports all browsers like Chrome, Android, Opera, Firefox, and CSS versions 1padding-top, 2, 3.
Properties
The values in the padding padding-right are specified as percentages and lengths. The length value is assigned as em, rem, px, etc., in units, and the percentage value equals the element’s width. The value padding left an extra space around the box on all sides. If the value is not declared padding-bottom, then the default value is ‘0’, and no negative values are assigned in the padding. Only positive values are specified. The padding properties are given below:
| Padding |
| Padding-bottom |
| Padding-top |
| Padding- right |
| Padding- left |
Property 1: Padding-top: This sets the padding at the top of an element in a box, and the value is specified in terms of px and percentage. The value is set for <p> element in the HTML
Property- 2: Padding- Left: This sets padding at the left of an element in a box.
Property- 3: Padding- Right: This sets padding at the right of an element in a box.
Property- 4: Padding-Bottom: This sets padding at the bottom of an element in a box.
Examples of implementing CSS padding
Here are the following examples mentioned below.
Example #1
Below is an example With Padding single value
Code:
<!DOCTYPE html>
<title>Example on Padding</title>
<style>
div {
background: green;
padding: 10px;
}
div>p {
background: pink;
}
</style>
<div>
<p>
Padding done on all sides.
</p>
</div>
Output:

Example #2
The demo below has padding right, and the script does the corresponding output.
Code:
<!DOCTYPE html>
<html>
<head>
<h1> CSS Right-Padding </h1>
<script type="text/javascript" src="scripts.js"></script>
<link rel="stylesheet" href="styles.css">
</head>
<body>
<style>
p {
padding-right: 30px;
background-color: yellowgreen;
border: 3px semi solid #009900;
text-align: right;
}
</style>
<div><p> <i>Here we go with right padding!</i></div>
</body>
</html>
Output:

Example #3
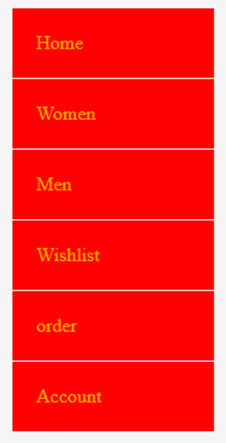
Example demo using padding-left
Code:
<!DOCTYPE html>
<html>
<head>
<style>
.samp ul {
width: 170px;
list-style-type: none;
}
.samp ul li a {
padding: 20px;
margin: 1px;
text-decoration: wavy;
color: #ffA500;
background-color: red;
display: block;
border-bottom: solid black 2px #000;
}
</style>
</head>
<body>
<div class="samp">
<ul>
<li><a href="#">Home</a></li>
<li><a href="#">Women</a></li>
<li><a href="#">Men</a></li>
<li><a href="#">Wishlist</a></li>
<li><a href="#">order</a></li>
<li><a href="#">Account</a></li>
</ul>
</div>
</body>
</html>
Output:
Example #4
Padding using a table with the output
Code:
<!DOCTYPE html>
<html>
<head>
<style>
.table_pad {
width: 30%;
font-family: cursive;
font-size: 14px;
color: #fff;
text-align: center;
}
.table_pad th {
border: solid 2px #fff000;
background: linear-gradient(to right, #000000,  #4169E1,  #FFB6C1);
color: #F0FFF0;
line-height: 40px;
}
.table_pad td {
padding: 25px;
border: dashed 1px #FFA07A;
background: #00FF00;
color: #000;
}
</style>
</head>
<body>
<table class="table_pad">
<tr>
<th> EmpName</th>
<th>Eid</th>
<th>Salary</th>
</tr>
<tr>
<td>Harry</td>
<td>E135</td>
<td>$8000.00</td>
</tr>
<tr>
<td>George</td>
<td>E224</td>
<td>$7500.00</td>
</tr>
<tr>
<td>Adam Hur</td>
<td>E131</td>
<td>$4000.00</td>
</tr>
<tr>
<td>Cliffter</td>
<td>E331</td>
<td>$4500.00</td>
</tr>
<tr>
<td>Adams</td>
<td>31</td>
<td>$4000.00</td>
</tr>
</table>
</body>
</html>
Output:

Even padding is applied to the elements like forms, text boxes, and buttons by allowing space between the respective elements. The below example lets us design a form using padding.
Example #5
Form implementation using Padding for the text boxes.
Code:
<!DOCTYPE html>
<html>
<head>
<style>
input {
padding: 12px;
border: solid 2px #FA8072;
outline: 0;
width: 150px;
background: -webkit-gradient(linear, left top, left 30, from(#FF0000), color-stop(4%, #CDDBE4), to(#FFD700));
background: -moz-linear-gradient(top, #FFD700, #CDDBE4 2px, #FFD700 30px);
box-shadow: rgba(0, 0.1, 0, 0) 0px 0px 6px;
-moz-box-shadow: rgba(0, 0.1, 0, 0) 0px 0px 6px;
-webkit-box-shadow: rgba(0, 0.1, 0, 0) 0px 0px 6px;
}
.frm input {
width: auto;
padding: 8px 12px;
background: #FFFFE0;
border: 2px;
font-size: 12px;
color:  #006400;
-moz-border-radius: 4px;
-webkit-border-radius: 6px;
}
</style>
</head>
<body>
<p>
<input type="text"/>
</p>
<p>
<input type="text"/>
</p>
<p>
<input type="text"/>
</p>
<p>
</p>
<p class="frm">
<input type="submit" value="Login" />
</p>
</body>
</html>
Output:

In padding, we have to consider some points that the padding covers by adding to the total width of a model. For instance, if the element value is 50 pixels and the left-right padding of 5px, you finally have 60 pixels together. Means, 50 px(content) +5px (left) +5px (right). Therefore, the total width is 60px.
Conclusion
To conclude, all know that CSS plays a standard space in building websites, and most Web developers are into learning CSS fundamentals. Padding is one of the core concepts in Box-Model, which occupies the inner space. Therefore, we have seen how its properties work well in CSS.
Recommended Articles
We hope that this EDUCBA information on “CSS Padding” was beneficial to you. You can view EDUCBA’s recommended articles for more information.

