EDUCBA

EDUCBA

MENUMENU
  • Free Tutorials
  • Free Courses
  • Certification Courses
  • 280+ Courses All in One Bundle
  • Login
Home Design Design Tutorials Photoshop Tutorial Clipping Mask in Photoshop
Secondary Sidebar
Photoshop Tutorial
  • Basics and Advanced
    • What is Photoshop?
    • Install Adobe Photoshop
    • Introduction to Photoshop
    • Career in Photoshop
    • Uses of Photoshop
    • Adobe Photoshop Commands
    • Is Photoshop Free?
    • Website Layout in Photoshop
    • Adobe Photoshop
    • Top Features in Adobe Photoshop
    • Adobe Photoshop Elements tools
    • Free UI Kits For Photoshop Download
    • Layers Panel in Photoshop
    • Photoshop Moon Brushes
    • Ripple Effect Photoshop
    • Action in Photoshop
    • Photoshop Color Match
    • Photoshop color picker
    • Photoshop split toning
    • Photoshop GIF
    • Photoshop Extend Background
    • Photoshop template flyer
    • Photoshop content aware fill
    • Photoshop Overlays
    • Photoshop vignette
    • Photoshop Textures
    • Photoshop liquify
    • Photoshop automate
    • Photoshop presets
    • Layer effects in Photoshop
    • Photoshop hologram effect
    • Vintage Effect Photoshop
    • Vaporwave Photoshop
    • Photoshop Polaroid
    • Pixel Effect Photoshop
    • Photoshop Creative
    • MP4 to GIF Photoshop
    • Templates in Photoshop
    • Night Effect in Photoshop
    • Photoshop Sun Effect
    • Photoshop Gold Gradient
    • Perspective Correction in Photoshop
    • VHS Effect Photoshop
    • Halftone in Photoshop
    • Puppet Warp in Photoshop
    • Photoshop Cheat Sheet
    • Resize Object in Photoshop
    • Distortion Effect Photoshop
    • Clone Stamp Tool in Photoshop
    • Fisheye Effect in Photoshop
    • Vanishing Point in Photoshop
    • Fix Perspective in Photoshop
    • Warp Image Photoshop
    • Transform Tool Photoshop
    • Photoshop Straighten Image
    • Glitch Effect in Photoshop
    • Photoshop Cinemagraph
    • Stamp Effect in Photoshop
    • Typography in Photoshop
    • Photoshop Distort Effect
    • How to Print in Photoshop?
    • Morphing in Photoshop
    • Glow Effects in Photoshop
    • Tree Brush Photoshop
    • 3D Text Effect in Photoshop
    • Shiny Effect Photoshop
    • Photoshop Font Effects
    • Metallic Effect Photoshop
    • Ice Effect in Photoshop
    • Dispersion Effect in Photoshop
    • Healing Brush Tool in Photoshop
    • Crop Tool in Photoshop
    • Artboard in Photoshop
    • Fire Effect in Photoshop
    • Photoshop Versions
    • Portrait Effect in Photoshop
    • Quick Selection Tool in Photoshop
    • How to Highlight Text in Photoshop?
    • How to Change Text Color in Photoshop?
    • Change Color in Photoshop
    • Filters in Photoshop
    • Change Hair Color in Photoshop
    • How to Change Shirt Color in Photoshop?
    • Watercolor Brushes in Photoshop
    • How to Blend Images in Photoshop?
    • Plastic Effect in Photoshop
    • Ruler Tool in Photoshop
    • How to Fill Color in Photoshop?
    • How to Delete Background in Photoshop?
    • Plugins in Photoshop
    • Photoshop Mixer Brush Tool
    • Color Replacement Tool in Photoshop
    • Eraser Tool in Photoshop
    • Motion Effect in Photoshop
    • How to Make Logo in Photoshop?
    • Lasso Tool in Photoshop
    • Reflection Effect in Photoshop
    • Metal Text Effect in Photoshop
    • Gold Text Effect in Photoshop
    • Smart Objects in Photoshop
    • Text Effects in Photoshop
    • Layers in Photoshop
    • 3D Text in Photoshop
    • Selection Tool in Photoshop
    • Patch Tool in Photoshop
    • Eyedropper Tool in Photoshop
    • Rectangle Tool in Photoshop
    • Background Eraser Tool in Photoshop
    • Rain Effect in Photoshop
    • Oil Paint Filter in Photoshop
    • Clipping Mask in Photoshop
    • Burn Tool in Photoshop
    • Paint Bucket Tool in Photoshop
    • Snow Effect in Photoshop
    • Mirror Effect in Photoshop
    • Adobe Photoshop Alternatives
    • Transparent Text in Photoshop
    • Sharpen Tool in Photoshop
    • Custom Shape Tool in Photoshop
    • Adobe Photoshop Tools
    • Red Eye Tool in Photoshop
    • Adobe Photoshop Shortcut Keys
    • Pencil Tool in Photoshop
    • Blur Tool in Photoshop
    • Smudge tool in Photoshop
    • Sponge Tool in Photoshop
    • Magic Wand Tool in Photoshop
    • Move Tool in Photoshop
    • Line Tool in Photoshop
    • Photoshop Interview Questions

Related Courses

Photoshop Training Course

Adobe Premiere Pro Training Course

Design Training Course

Clipping Mask in Photoshop

Clipping Mask in Photoshop

Introduction to Clipping Mask in Photoshop

Clipping masks in Photoshop is an incredible option to control the visibility of a layer; a clipping screen is secured with a mask, assume, for instance, that you have a layer shape, a layered picture above, and a top layer content, the opacity for the base layer likewise applies when the photo and message just happen in the base layer through the structure sketch – the design piece is cut into the mask’s structure; however, a selection of at least two objects in a layer can be made into a clipping set.

How to Create a Clipping Mask in Photoshop?

To regulate the accessibility of a coating above, clipping frames use the contents and transparency of layers below. Let’s use our two parts to build a clipping screen and see.

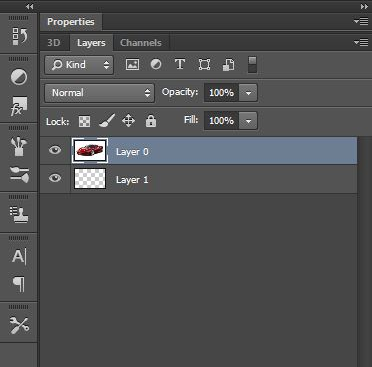
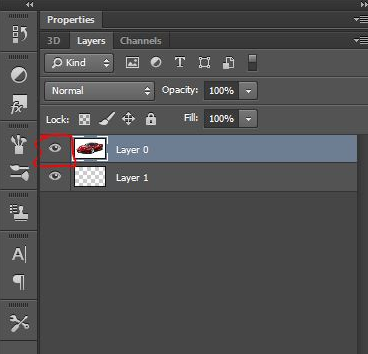
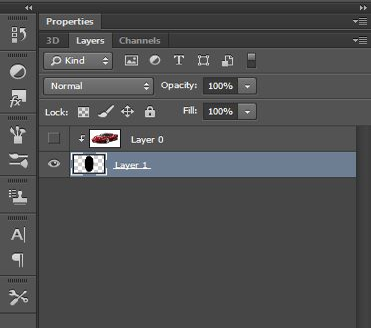
Step 1: When producing a clipping mask, the piece to be attached to the coating beneath must first be selected. The top part (the ‘ Layer 0 ‘) will then be cut into the lower one (the ‘ Layer 1 ‘) and ensure that the top stage is chosen.

Clipping Mask step 1

Start Your Free Design Course

3D animation, modelling, simulation, game development & others

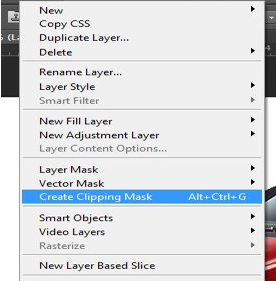
Step 2: To select “Create Clipping Mask”, go to the Layer folder in the Menu Bar and select Create Clip Mask to generate the clipping tag.

Clipping Mask step 2

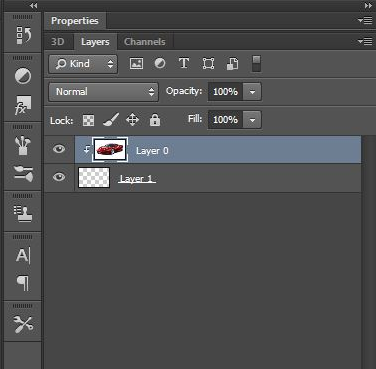
And there’s everything to it! The layer mask is created to show the top layer (“Layer 0”) to the right, and a little arrow to the “Layer 1” is below it. Thus Photoshop informs us that the bottom coating is now cut into the following coating.

Clipping Mask step 2.1

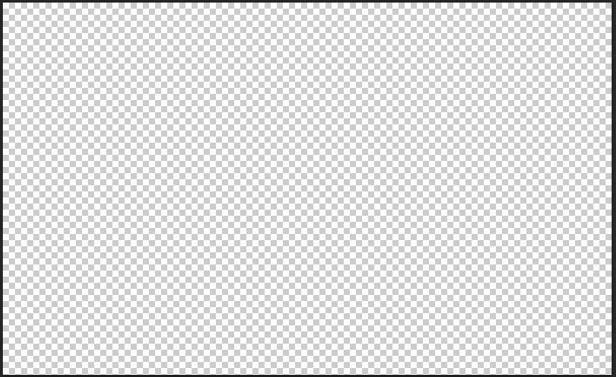
But it is because we have concealed the picture from the perspective, and that is because our screen sheet (“Layer 1”) includes no information. The issue, then, is that we have done so far with establishing a trimming mask. This is totally transparent. Any regions on the top surface that are immediately above transparent regions in the underlying fabric are covered with a clipping mask. Since there is nothing but transparency in the upper coating, there is no component of the image above.

Clipping Mask step 2.2

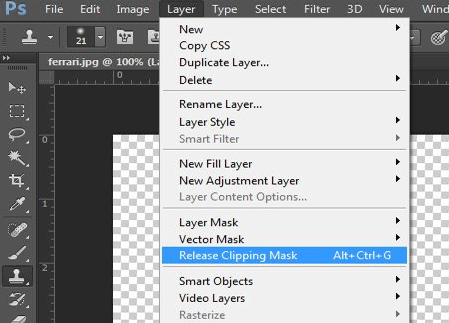
Step 3: That wasn’t very interesting, so release the clipping mask by going up to the Layer menu and choosing Release Clipping Mask.

Clipping Mask step 3

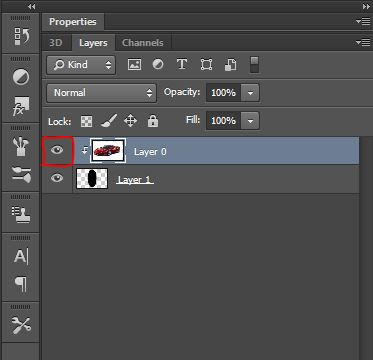
Step 4: Let’s attach some upper layer material to see what we are doing; click on the privacy icon of the upper layer to conceal the image.

Clipping Mask step 4

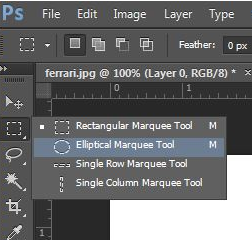
We will create an easy form to contribute information. To attach information, select the Elliptical Marquee Tool from the Win/Mac control-click toolbar and select the Elliptical Marquee Tools from the Win/Mac Control-click Tool from the Rectangular Marquee Toolbar.

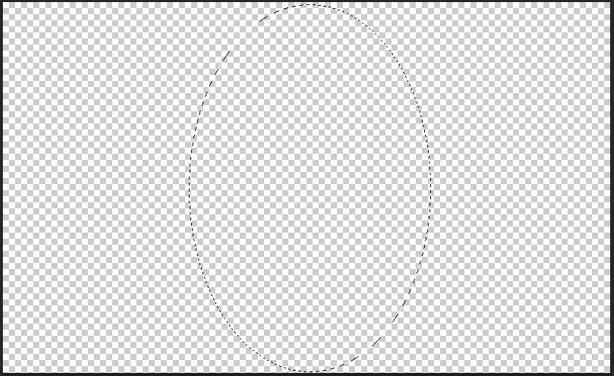
Step 5: In the middle of the paper, click and rotate an elliptical choice contour.

Clipping Mask step 5

Step 6: Apply the elliptical selection inside the document.

Step 6

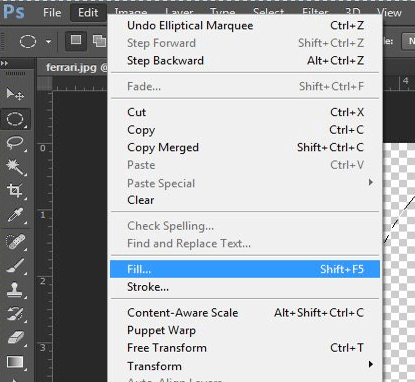
Step 7: Go up to the Edit menu in the Menu Bar and choose Fill.

Clipping Mask step 7

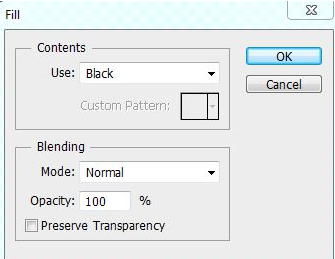
Step 8: Set the Contents choice to Black in the Fill dialog box and then press OK.

Clipping Mask step 8

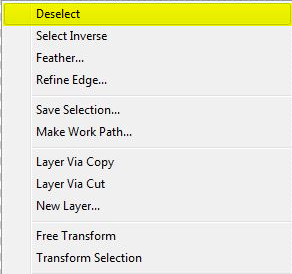
Step 9: Photoshop completes the black choice. To delete the form choice contour, go to the panel Select and click on Deselect.

Step 9

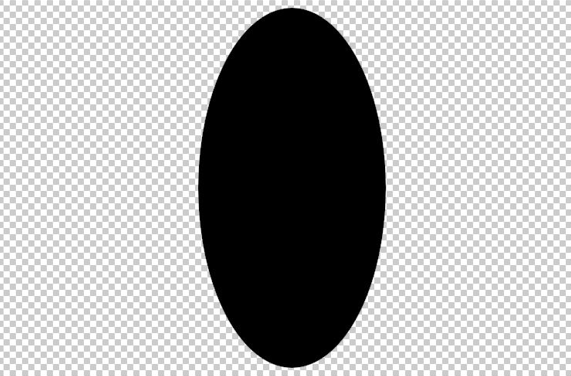
Step 10: Now, we have an environment with a certain material in the middle instead of a totally transparent coating. Note, however, the information region stays open.

Step 10

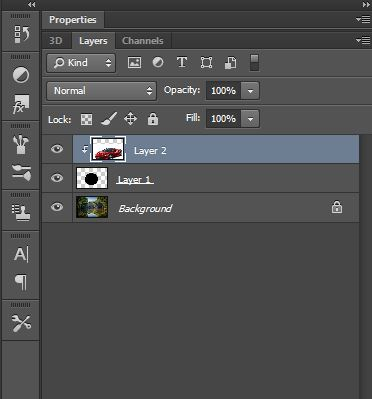
Step 11: The thumbnail for the lower coating in the Layers board now displays the blue form. What should be noted here is that when you compare the thumbnails for each layer, the image on the top layers (the shape) is located directly above the content at the bottom. And some of the photographs are on the underlying surface over the clear regions.

Step 11

Step 12: Now, we add some material to the upper coating, allow another clipping mask to be created. Again, the part that is cut into the below coating must be selected first, and so, to pick it, press on the bottom coating. Click on the accessibility icon of the upper coating to show the image on the surface.

Step 12

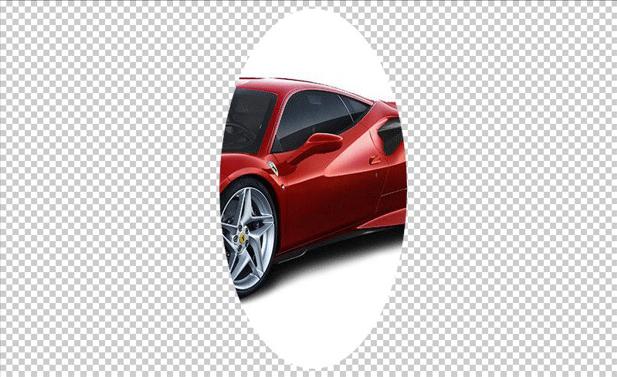
Step 13: But we see a very distinct outcome in the paper now. At this moment the part of the picture, which is immediately above the form, is still noticeable below. The regions containing the form are the only components of the image concealed since these sections are still above openness.

Step 13

Step 14: Obviously, if our topic was focused on the form, the outcome might appear easier. It’s simple to transfer contents and reposition them with cutting glasses. Just pick the toolbar to move.

Step 14

Step 15: Now, try to add background to layer 1, as shown below.

Clipping Mask step 15

While color designs are the best suited to mix images with seamless movements, Photoshop cutting lenses are ideal if your image wants to match in a clearly defined form. You can draw the form with a chosen instrument, as we saw. But you can also use the clipping mask to complete a vector form with an image or to put an image in writing.

Step 16: Then press on the image and pull it up. Only the region over the form on the underlying coating stays noticeable when you transfer the image. And that’s the fundamental elements of how clipping masks work.

Step 16

Conclusion

Clipping Mask is a strong instrument and renders your lives in Photoshop much easier. This is good for choice, slope, or when tiny items need to be hidden. You can regulate transparency and various levels more with the Clipping Mask instrument. Clipping Mask is an easy way to create some really innovative impacts for your images, especially social media messages. You can use this method with layers of bitmap, vector, text, group, and smart object.

Recommended Articles

This has been a guide to Clipping Mask in Photoshop. Here we discuss the concept and how to use the clipping mask in Photoshop. You can also go through our other suggested articles to learn more –

  1. Sponge Tool in Photoshop
  2. Adobe Photoshop Tools
  3. Magic Wand Tool in Photoshop
  4. Automation Testing Tools
Popular Course in this category
Photoshop Training (10 Courses, 12+ Projects)
  10 Online Courses |  12 Hands-on Projects |  80+ Hours |  Verifiable Certificate of Completion
4.9
Price

View Course

Related Courses

All in One Design Bundle(280+ Courses, 100+ projects)
AutoCADHoudiniAdobe Premiere ProPhotoshop
SolidworksVFX Visual EffectsCorelDrawUnreal Engine
Price
View Courses
280+ Online Courses | 100+ projects | 2000+ Hours | Verifiable Certificates | Lifetime Access
4.6 (65,012 ratings)
Adobe Premiere Pro Tutorial (4 Courses, 7+ Projects)4.9
All in One Design Bundle (280+ Courses, 100+ projects)4.8
0 Shares
Share
Tweet
Share
Primary Sidebar
Footer
About Us
  • Blog
  • Who is EDUCBA?
  • Sign Up
  • Live Classes
  • Corporate Training
  • Certificate from Top Institutions
  • Contact Us
  • Verifiable Certificate
  • Reviews
  • Terms and Conditions
  • Privacy Policy
  •  
Apps
  • iPhone & iPad
  • Android
Resources
  • Free Courses
  • Photoshop Tutorial
  • 3ds Max Tutorial
  • All Tutorials
Certification Courses
  • All Courses
  • Design Course - All in One Bundle
  • Photoshop Course
  • Maya Course
  • Unreal Engine Course
  • Unity Course
  • DaVinci Resolve Course
  • Pro Tools Course

ISO 10004:2018 & ISO 9001:2015 Certified

© 2022 - EDUCBA. ALL RIGHTS RESERVED. THE CERTIFICATION NAMES ARE THE TRADEMARKS OF THEIR RESPECTIVE OWNERS.

EDUCBA
Free Design Course

Banner Creation, Object Selection, Sky Replacement, Advance Filters & others

*Please provide your correct email id. Login details for this Free course will be emailed to you

By signing up, you agree to our Terms of Use and Privacy Policy.

EDUCBA Login

Forgot Password?

By signing up, you agree to our Terms of Use and Privacy Policy.

EDUCBA
Free Design Course

3D animation, modelling, simulation, game development & others

*Please provide your correct email id. Login details for this Free course will be emailed to you

By signing up, you agree to our Terms of Use and Privacy Policy.

EDUCBA

*Please provide your correct email id. Login details for this Free course will be emailed to you

By signing up, you agree to our Terms of Use and Privacy Policy.

Let’s Get Started

By signing up, you agree to our Terms of Use and Privacy Policy.

This website or its third-party tools use cookies, which are necessary to its functioning and required to achieve the purposes illustrated in the cookie policy. By closing this banner, scrolling this page, clicking a link or continuing to browse otherwise, you agree to our Privacy Policy

Loading . . .
Quiz
Question:

Answer:

Quiz Result
Total QuestionsCorrect AnswersWrong AnswersPercentage

Explore 1000+ varieties of Mock tests View more