Updated April 17, 2023

Introduction to CentOS unzip
The following article provides an outline for CentOS unzip. In the Linux environment, we are supporting the multi-user login. Hence, it will generate a huge amount of log information, application information, job level information, etc. Here, we can consider information as nothing but a log. It is very difficult to share or manage a very small file, so we are compressing it into the zip format. It will be very easy to move or transfer the number of files into a single file, i.e., zip format. But when the zip file sends to its destination, we need to extract it. Here, unzip concepts comes into the picture. The unzip is nothing but a process to extract the zip file content. As per the requirement, we need to choose the compression technique.
Syntax of CentOS unzip:
- unzip: The unzip is the keyword that can be used as a command for the unzipping process. It will help to extract the zip files in the CentOS Environment. We can use the unzip keyword in the syntax or command. It will accept arguments like OPTIONS, file name, etc. The unzip command will help to decompress the zip file.
- OPTIONS: We can provide the different flags as the option that is compatible with the unzip command.
- File Name: We need to provide the zip file name to unzip the command.
How CentOS unzip Works?
In the CentOS environment, the unzip command or utility is not present. Therefore, we need to install the unzip packages in the working environment. We can use the rpm or yum utility to install it. While unzipping the file, it will decompress all the data which is available in the zip file.
Below are the lists of option that are compatible with the “unzip” command.
- –Z: If we are using the “-Z” option with the unzip command, then the remaining options in the unzip command will take to be zipinfo(1L) options. For more information about it. We need to see the correct manual page for a description of these options.
- –A: For the DLL’s programming interface (known as the API), we are using the -A option for OS/2, Unix DLL. It will print the extended help for the API’s.
- –c: We can use the “-c” option for the extract files to stdout or screen (“CRT”). We can also say that the “-c” option is similar to the -p option. But here, the except that the name of every file is printed as it is extracted from the unzip command. The “-c” option is not listed in the unzip usage.
- –f: The “-f” option will be used for freshening existing files, i.e. it will only extract those files that already exist on disk only. It will be newer than the disk copies. By default, the unzip queries will run before overwriting, but if we use the -o option, it may suppress the queries. Note, in the many operating systems, the time zone (TZ) environment variable must be set correctly if we need to use the -f and -u option correctly. To work properly (under UNIX, the variable is usually set automatically). The reasons for this are the differences between DOS-format file times and Unix-format times. The DOS format file will always use the local time, and the UNIX or the Linux operating system will always use the in GMT/UTC format.
- –l: If we are using the “-l” option, then it will print the information in the short format. It will list out the archive files. It will print the different options like the modification dates, times of the specified file, the names, uncompressed file sizes, etc. It will also print the total number of files specified in it. In the OS2_EAS, under this, if the Unzip was compiled. The -l option will also print the list columns in terms of sizes. In addition, we can also see the zip file comment and individual file comments.
- –p: With the help of the “-p” option, we can extract files with the help of pipe utility, i.e. the stdout. Here, it is nothing, but the file data is sent to the stdout. Thus, the files will always be extracted in the form at of binary. As similar they are stored, i.e. there are no conversions.
- –t: This option will help to test the archive files. If we use this option, it will extract each provided input file in memory and then compare the cyclic redundancy check, i.e. the CRC. It will also enhance the checksum also.
- –T: In most of the time, it will set the timestamp on the archive(s). It will also correspond to the zip. The go option except that it can use for the wildcard zip files. This option is much faster than the normal one.
- –u: It will help to update the existing files. If needed, it will also create new ones. As per the “-f” option, the “-u” option will also perform the same function as the -f option. It will extract the files that are newer than the same on the disk. In addition, it will extract the files that do not exist on the disk. We need to set the time zone properly.
Examples of CentOS unzip.
Below are the example of CentOS unzip:
Example #1
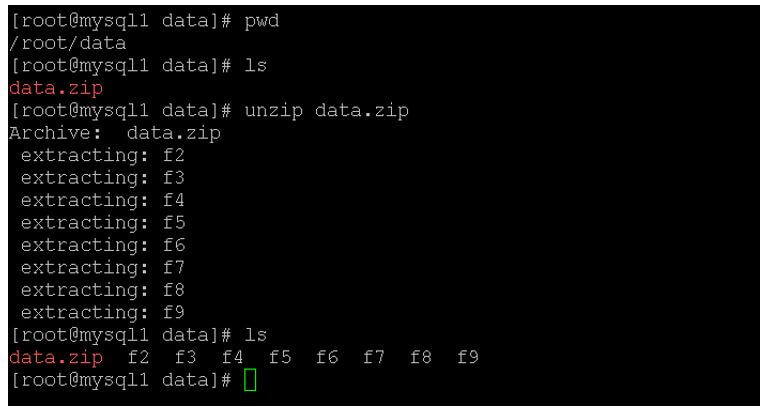
CentOS unzip: Unzip File.
In the CentOS environment, we are able to unzip the file.
Code:
unzip data.zip
Explanation:
- As per the above command, we are unzipping the “data.zip” file.
Output:
Example #2
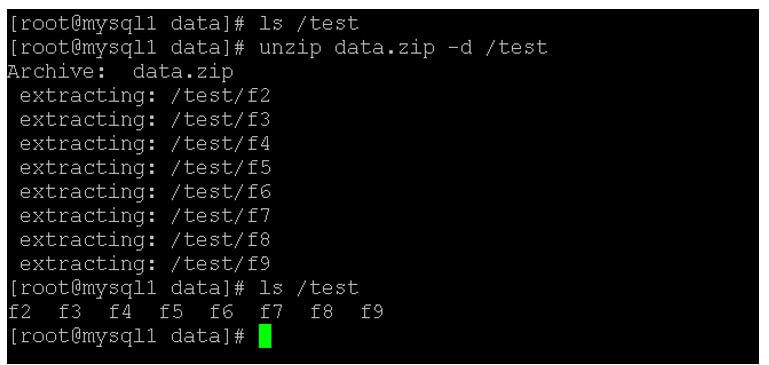
CentOS unzip: Unzip File in Specific Directory.
With the unzip command, we are able to unzip the file in the specific directory path.
Code:
unzip data.zip -d /test
Explanation:
- As per the above command, we are unzipping the files on the specific location, i.e. /test directory.
Output:
Conclusion
We have seen the uncut concept of the “CentOS unzip” with the proper example, explanation and command with different outputs. By default, the unzip package is not available in the minimal CentOS installation. Therefore, we need to install it manually. As per the requirement, we can use the different option with unzip command.
Recommended Articles
This is a guide to CentOS unzip. Here we discuss the introduction, how CentOS unzip works? And examples for better understanding. You may also have a look at the following articles to learn more –
