Updated September 12, 2023

Introduction to AutoCAD Units
Auto cad is 2d and 3d computer-aided designing software, which Autodesk developed as its engineering designing software. When you start making any drawing or layout in this software, you have to set units so that you can enter the value of your drawing in specific units. So for managing the format of these units, we have to analyze the Unit command of this software. We will understand the all-important term of the unit setup of auto cad software in this article and understand how to handle unit setups of auto cad software. So let us start our discussion.
How to Set Units in AutoCAD?
We can set units in auto cad in few simple steps according to our requirement and draw good efficiency. But before starting our learning about this topic, we have to understand the working screen of this software so that there will be no problem happens during our learning of this topic throughout this article.
Step 1: At the top of the working screen there is a ribbon which has a different type of tabs for managing different type of commands in this software such as Home tab, Insert tab, Annotation tab and some other, below this ribbon we have a working window in which we can see our current work, below this working window we have some navigation button for managing our work during making our drawing in this software.

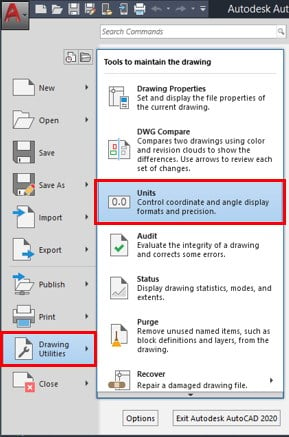
Step 2: Now, let us discuss the Units of this software. For the opening, the unit box goes to the icon of Auto Cad, which is at the top of the left corner of this software and click on the drop-down arrow of it. Once you click on the drop-down arrow of this icon, a drop-down list will be open. There is a number of options for this software; go to the Drawing utility option and move the mouse cursor to the arrow button of this option. A new list will be open; click on the Units option of this new list.
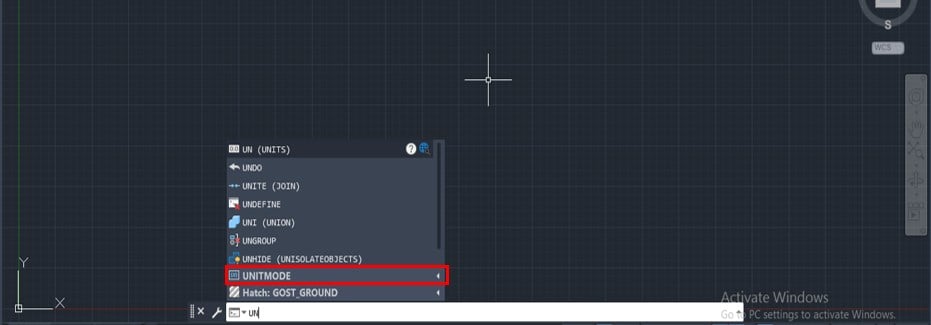
Step 3: Or you can use a short cut key for opening the Unit setup box. For a short cut of units, type UN from keyboard buttons and press enters the keyboard button.
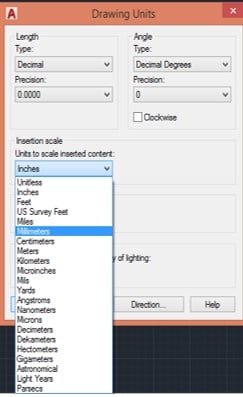
Step 4: When you press these buttons Drawing Units box will be open like this. You can open it by anyone of the above two options. In this drawing unit box, we have the number of parameters for settings units for a particular drawing in auto cad.
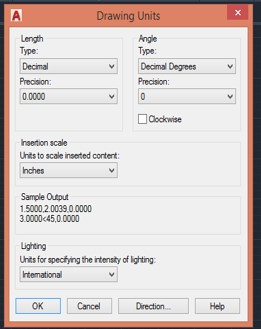
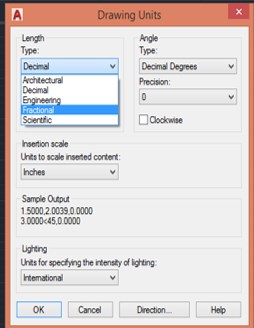
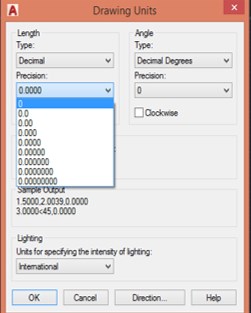
Step 5: Let us analyze each one by one. The first option is Length; in this option, we can take a different type of units from this list according to the parameters of our drawing. If your drawing is in meters, centimeters, millimeters, or kilometers, choose Decimal or if your drawing is in feet & inches, choose the Architecturally or Engineering option from this list, or if your drawing has a very large unit, then you choose Scientific unit. So you can choose any one of these lists according to your drawing.
Step 6: The next option of the length tab is Precision. This option specifies the accuracy of your drawing up to which digit place you want to measure the dimensions of your drawing. So you can choose the place of digit after the point in the dimension of your drawing.
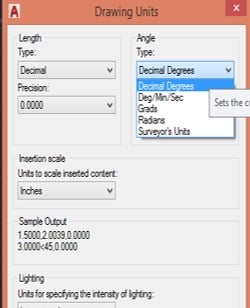
Step 7: Now, the next option is Angle; in the angle option, you can choose the format of the angle of your drawing according to your requirement from this list.
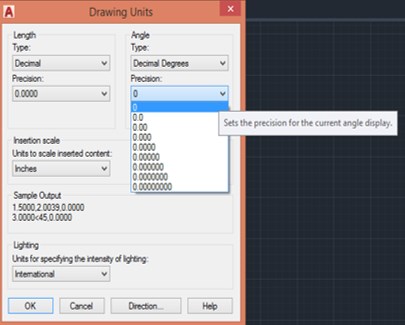
Step 8: This option of the angle tab is similar to the precision option of the length tab. It also specifies the accuracy of the angle of your drawing.
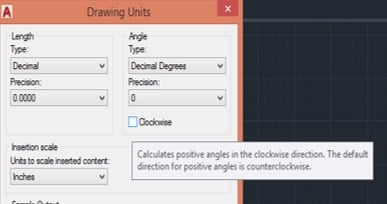
Step 9: This option of the angle tab helps you in deciding from which direction you want to start counting your angle. In general, auto, cad starts counting our angle in a counter-clockwise direction. You can enable this box, and auto cad starts counting angle in the clockwise direction.
Step 10: The next option is the Insertion Scale. In this option, you should choose the smallest unit of the chosen unit in the Length option. These units will write with your drawing for showing dimensions on your drawing. So take the value of your drawing during making it in the smallest unit of the particular measuring unit.
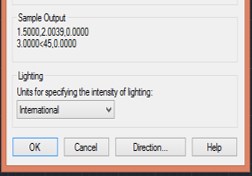
Step 11: In the Sample Output section of this dialog box, you can see the format of your chosen unit.
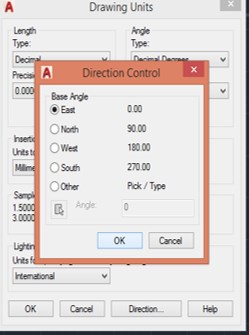
Step 12: Now, there is one more tab at the bottom end of this dialog box: Direction. Click on this tab; when you click on this tab, a dialog box for choosing the direction of base angle will be open. You can choose the direction of base angle from this box, such as if you choose ‘East’, then the base angle will start from 0 degrees, or if you choose ‘North’, then the base angle will start from 90 degrees. So you can choose anyone according to your drawing requirement from this list, then press the Ok button of this box.
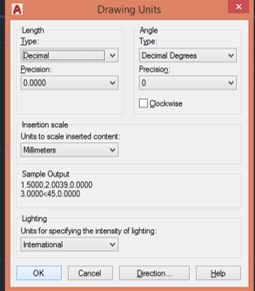
Step 13: Now press the Ok button of the Drawing units box for applying your desired settings of this box.
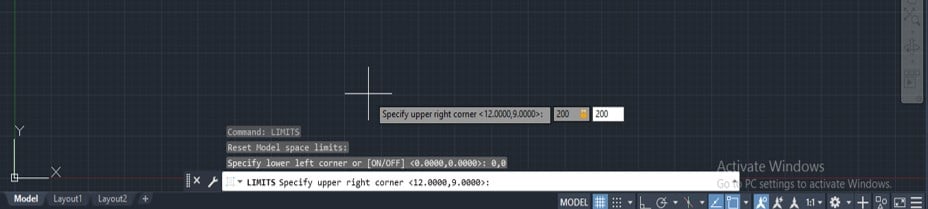
Step 14: Now, you have to set the limit for your drawing for making your drawing. We set a limit for specifying our drawing area. So take the value of limit more than the dimensions of your drawing because rather than drawing, we have to mention some other points in one drawing sheet in auto cad. To specify a limit, type Limit from the keyboard, then press enter button of the keyboard.

Step 15: Take the lower right corner value as (0,0) because it works as the origin point in our drawing sheet, then press the enter key on the keyboard.

Step 16: Now specify the upper right corner of our drawing sheet I will take it as (200,200). That means length and breadth of the drawing area, then press enter button of the keyboard.
Step 17: Now, for applying these limit, press Z then entering the button.

Step 18: Then press A and press the enter button from the keyboard.
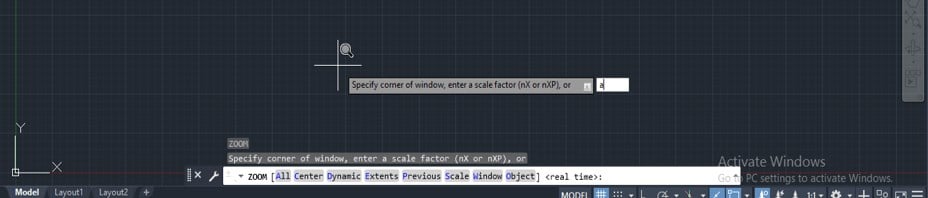
Step 19: And your screen will set at your specified limit according to you.
In this way, you can set the unit in auto cad software and handle the parameters of the Units setup box in this software.
Conclusion
Now, after this article, you have what AutoCAD units are and why setting units in auto cad is necessary for your drawing and how you can set parameters of units according to the requirement of your drawing dimensions. By setting units, you can add efficiency to your project work in auto cad software.
Recommended Articles
This is a guide to AutoCAD Units. Here we discuss the Introduction, how to set AutoCAD Units in the step by step manner. You can also go through our other related articles to learn more –
