Updated July 7, 2023
Introduction to ASP.NET Label
Label control is used to display the text on the web page. This Label control is used along with other controls like textboxes. It’s widespread where the label is used with a textbox. Labels usually help the user to provide the data in the text boxes by the written indications. Labels are server-side controls. We can display the text in label control by setting the text through the text property. We can change the label control style or look and feel by changing its label control properties. So we can customize it as per our requirements.
Syntax
< asp:Label ID="Label1" runat="server" Text="Label" ></asp:Label>How does ASP.NET Label work?
Let us see how exactly the ASP.NET label works.
- Open a visual studio and create a new empty web application.
- Now add a new web form, which is there in the solution explorer.
- Select the label control from the toolbox to drag and drop it on the web form.
- Set its Text and ID property from the label control.
- We must assign the text in label control to use its text property. To display the text on the label control, simply assign the desired text value to the label’s text property.
- We can programmatically change the label’s text using its text property via writing code in the asp.cs page.
- Text= “EduCba”;
Default.aspx.cs Code
Using System;
Using System.Collections.Generic;
Using System.Linq;
Using System.web;
Using System.Web.UI;
Using System.Web.UI.WebControls;
Public partial class _Default : System.Web.UI.Page
{
Protected void page_Load(object sender, EventArgs e)
{
Label1.Test=" Welcome to EduCba";
}
}
Properties
Label Control has its properties, which will be used to make it more enhanced.
- AccessKey: To create a keyboard shortcut for a label, you can use Accesskey.
- TabIndex: It determines the index of tab control for the webserver.
- BackColor: We can use this property to help change the label’s background color to enhance the look and make it different colors.
- BorderColor: If we want to set the color for the label border, we can use this property.
- BorderWidth: This property will allow us to set a particular width for the label border.
- Font: We need to set the font for the label’s text then we can use this property.
- Forecolor: It is used to set the color for the label text.
- Text: Text, which needs to be displayed for the label, is used by this property.
- ToolTip: It provides the text displayed when we try to put the mouse over a label.
- Visible: It will allow us to set the visibility of the control on the web form.
- Height: It provides us to set the height of the label control.
- AutoSize: If we need to resize the label control automatically, it will allow us to set its value.
- BorderStyle: We can design the border of the label control as per the application requirement.
- FlatStyle: It deals with the flat style appearance for label control.
- Font: It will determine the font for the text of label control. It will set the value for it.
- TabStop: This property determines its value if the user can use the tab to the label control.
- TextAlign: It will align the text in the label control.
Example of ASP.NET Label
Below are the examples of ASP.NET Label:
Code:
<%@ Page Language="C#" AutoEventWireup="true" CodeBehind="WebControls.aspx.cs"
Inherits="WebFormsControlls.WebControls" %>
<!DOCTYPE html>
<html xmlns="http://www.w3.org/1999/xhtml">
<head runat="server">
<title></title>
<style type="text/css">
.auto-style1 {
width: 150%;
}
.auto-style2 {
margin-left: 0px;
}
.auto-style3 {
width: 102px;
}
</style>
</head>
<body>
<form id="form1" runat="server">
<div>
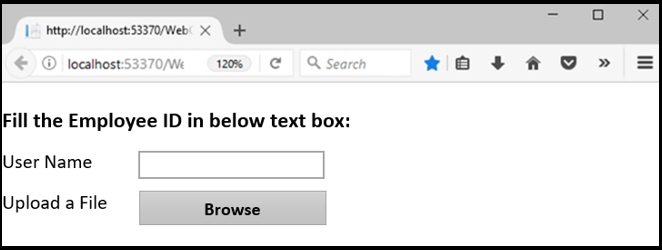
<h4>Fill the Employee ID in below text box:</h4>
<table class="auto-style1">
<tr>
<td class="auto-style3">
<asp:Label ID="Label1" runat="server" Text="Employee ID"></asp:Label></td>
<td>
<asp:TextBox ID="TextBox1" runat="server" CssClass="auto-style2"></asp:TextBox></td>
</tr>
<tr>
<td class="auto-style3">
<asp:Label ID="Label2" runat="server" Text="Upload a File"></asp:Label></td>
<td>
<asp:FileUpload ID="FileUpload1" runat="server" /></td>
</tr>
</table>
</div>
</form>
</body>
</html>Explanation of the above code: We can see in the above code that asp gives its tag to use as a label.<asp:Label ID =Label1> determines its id. Run at is always set to be “Server” as this is server-side control. We added 2 labels here with the text as Employee ID and uploaded a file. We can use this Label Control Method.
- GetPreferredSize: It retrieves the rectangular area’s size into which a control can be fitted.
- Refresh: It will immediately redraw itself and any dependent control, if any. Also, force to control to invalidate its client area.
- Select: It activates the control.
- Show: It will display the control to the user.
- ToString: It will return the string, which has the name of the control.
There is some Label control given below:
- AutoSizeChanged: When the value of AutoSize Property changes, this occurs.
- Click: Click the Label Control to use it.
- DoublClick: If you double-click the label control, something will occur.
- GotFocus: When label control receives focus, this happens.
- Leave: When input controls leave, the focus of the control label comes under the picture.
Output:
As such, you have witnessed how label control operates to exhibit the textual material on a webpage. You can easily change the styling of elements such as color, font, size, and more. JQuery and JavaScript easily access label control. Label control is by default present as an HTML <span> tag that the text is present inside the enclosed HTML tag. If we used the AssociatrControlID property, the content will be enclosed in <label> tag.
Conclusion
We have learned how exactly the labels work in the asp.net framework. An example can clarify how to use it to display text in the boxes. In addition, we explore how Labels can be improved through various properties.
Recommended Articles
We hope that this EDUCBA information on “ASP.NET Label” was beneficial to you. You can view EDUCBA’s recommended articles for more information.

