Updated April 5, 2023

Introduction to PyTorch max
Pytorch provides different types of functionality to implement deep learning efficiently; the max is also one of the functionalities that Pytorch provides. By using max functionality, we can return the maximum value of an element from the input tensor. Furthermore, by using the max() function, we can generate the deterministic gradients for the max input. In other words, we can say that it returns the maximum element from two different tensors as per requirement. The main advantage of the max() function is that it is used to increase the performance of modules, and we can easily implement the deep learning concept without any complexity.
What is PyTorch max?
Basically, the Pytorch max() function is used to return the maximum element from the tensor input. Neural networks at their center are simply one more instrument in the arrangement of AI calculations. The neural network comprises of a lot of “neurons,” which are values that get going as your feedback information, and afterward get increased by loads, added together, and afterward went through an actuation capacity to create new qualities, and this interaction then, at that point, rehashes over anyway many “layers” your neural network needs to then deliver a yield. Returns the greatest worth of all components in the info tensor, Returns an element (values, records) where esteems is the most extreme worth of each line of the information tensor in the given aspect. Furthermore, records are the file area of every most extreme worth found (max); if there are numerous maximal qualities in a decreased column, then the files of the primary maximal worth are returned., Input (Tensor) – the information tensor.
How to use PyTorch max?
Now let’s see how we can use the max() function in Pytorch as follows.
Syntax
torch.max(specified input)
Explanation
By using the above syntax, we can implement the max() function into deep learning; in this syntax, we use a torch with max function as shown here; we only pass the specified input that we want. Then, finally, we get the max element from the tensor.
Now let’s see a different example of the max() function, so we will get more details as follows.
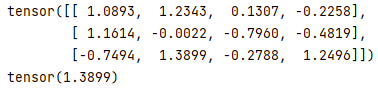
First, we need to import the torch, as shown below.
import torchNow we need to create the tensor by using the following statement as follows.
input = torch.randn([3, 4])
print(input)
max_e = torch.max(input)
print(max_e)
Explanation
In the above example, we first import the torch; after that, we created a tensor by using the randn function as shown. After that, we pass the input value to the max() function and print the result. We illustrated the final output of the above program by using the following screenshot as follows.
PyTorch max over multiple dimensions
Now let’s see how we can use the max() function with multiple dimensions in Pytorch as follows.
Sometimes we need to get the maximum dimension as tensor instead of single; at that time, we can also use the max() function. We need to specify the dimension in multiple dimensions either by using an axis or dim variable. After execution, it returns the max element as well as max indices of the tensor.
Syntax
max_ele, max_indice = torch.max(specified input tensor, dim)
Explanation
In the above syntax, we use max() with two parameters such as max_ele and max_indices, as shown in the above syntax.
Now let’s see the different examples of multiple dimensions for more details as follows.
Example #1
Code:
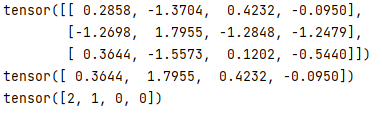
import torch
input = torch.randn([3, 4])
print(input)
max_ele, max_indic = torch.max(input, dim=0)
print(max_ele)
print(max_indic)
Explanation
By using the above example, we try to implement the multiple dimension with max() function; in this example, we first import the torch as shown; after that, we create a tensor by using the randn function as shown. After that, we pass the input value to the max() function and print the result. In this example, we assign the maximum dimension that is dim = 0 as shown. Finally, we just print the max element and max indices. We illustrated the final output of the above program by using the following screenshot as follows.
Now let’s same example of max() function with dimension value is 1 as follows.
Example #2
Code:
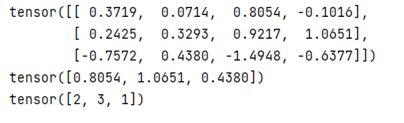
import torch
input = torch.randn([3, 4])
print(input)
max_ele, max_indic = torch.max(input, dim=1)
print(max_ele)
print(max_indic)
Explanation
By using the above example, we try to implement the multiple dimension with max() function; in this example, we first import the torch as shown; after that, we create a tensor by using the randn function as shown. After that, we pass the input value to the max() function and print the result. In this example, we assign the maximum dimension that is dim = 1, as shown. Finally, we just print the max element and max indices. We illustrated the final output of the above program by using the following screenshot as follows.
Suppose we need to compare the two different tensors with the max element at that time; we can also use the max() function as follows.
Let’s consider we have two tensors, such P and Q, and they have the same dimension, and we need to compare this tensor and get the max element.
Now let’s see the example for better understanding as follows.
Example #3
Code:
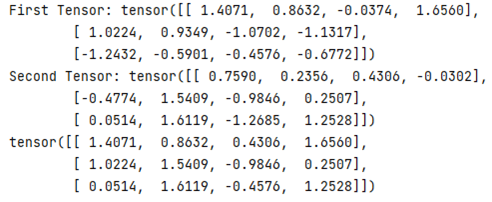
import torch
i_tensor1 = torch.randn([3, 4])
i_tensor2 = torch.randn([3, 4])
print("First Tensor:", i_tensor1)
print("Second Tensor:", i_tensor2)
max_ele = torch.max(i_tensor1, i_tensor2)
print(max_ele)
Explanation
In the above program, first, we define the two tensors that are tensor1 and tensor2 as shown; here, the difference is only in the max() function; here, we need to send two tensors to the max() function. Then, we illustrated the final output of the above program by using the following screenshot as follows.
PyTorch max performance
Now let’s see the performance of the max() function as follows.
Using the max() function can speed up the operation because we can easily, or we can say that efficiently find out the max element from the input tensor as per requirement. Using the max() function, we can increase deep learning performance, or we can say that machine learning is as per our requirement.
Conclusion
We hope from this article you learn more about the Pytorch max. From the above article, we have taken in the essential idea of the Pytorch max, and we also see the representation and example of Pytorch max. From this article, we learned how and when we use the Pytorch max.
Recommended Articles
We hope that this EDUCBA information on “PyTorch max” was beneficial to you. You can view EDUCBA’s recommended articles for more information.
