Excel VBA Workbook Open
The most common operations in day to day life is to open an excel Workbooks when you are working with Excel. You cannot work in Excel without opening the Excel Workbooks or Excel file. So in this article, we are going to cover how we can open an Excel Workbooks with the help of VBA.
Methods to Open Exel Workbooks in VBA
There are two methods to open excel Workbooks in VBA and we are going to cover both methods in this article.
Method #1 – Excel VBA Workbooks.open Method
The first method in the VBA is to use the inbuilt function Workbooks.open. There are 15 optional arguments in the “Workbooks.open” function and to cover all the 15 arguments will take a lot of time. So we will just try to understand some basics of Workbooks.open and see how we can use this function in VBA to open the Workbooks.
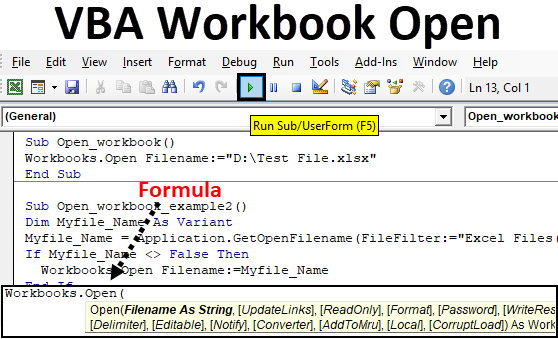
So the first step in this method is you should know the file name of the Excel Workbooks. Below is the statement to open the Workbooks.”Workbooks.open “File_Name”
Or
Workbooks.Open Filename: =”File_Name”
The “File_Name” is the name of the Workbooks that you want to open. But you need to be careful here because you need to provide the full path where the file is saved and name of the file with the extension of the files (.XLS, .XLSX, .xlsm, etc). We can take the example of below macro to understand this function.
Example
Suppose you want to open an excel file with the name “Test File” which is saved in the D Drive of the computer. Create a Macro in an Excel macro-enabled workbook. Follow the below steps to use Excel VBA Workbooks.open method.
Step 1: Click on File.

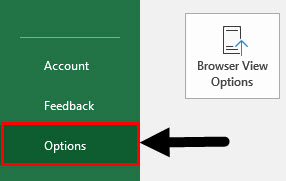
Step 2: Click on Options.
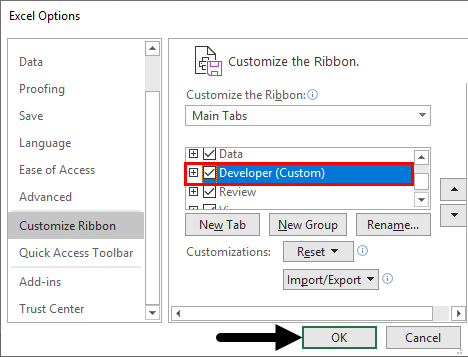
Step 3: Click on Customize Ribbon.

Step 4: Make sure the Developer field is marked as below and click ok.
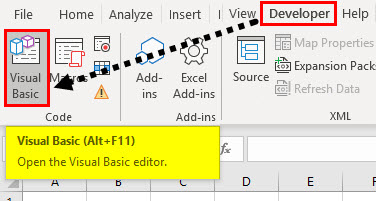
Step 5: Once you have the developer tab, click on Visual basic as shown in the below screenshot.

After you click on the Visual Basics, you need to start coding for your macro.
Step 6: Enter the below code in the VBA Module.
Code:
Sub Open_workbook()

End Sub
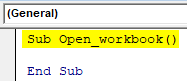
This code provides the name for your workbook.
Step 7: Enter the code which can open the workbook saved in the D drive of the computer.
Code:
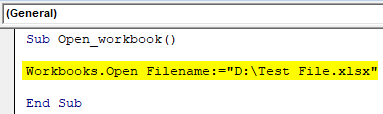
Sub Open_workbook()

Workbooks.Open Filename:="D:\Test File.xlsx"

End Sub
Step 8: Run the code by pressing the F5 key or by clicking on Play Button. After running the macro, you will find the excel file is automatically opened. As you can see in the above code, the macro will open the Excel file with the name “Test File.xlsx” which is saved in the D drive of the computer. The path mentioned above is quite simple because there are no folders and subfolders to get the Workbooks.
This becomes challenging because many people don’t remember the path and if the Path of the file where it is saved changes a bit, the macro will not work. The macro will not work even if the Name of the file changes by a single letter. So if the Path/Name of the file changes you need to change the VBA code of the Macro. This makes the Job tedious and it is not error-free as well. So to make sure your macro runs perfectly without giving you an error, we will use the second method which is easy to handle and will not give you an error even when you don’t remember the pathname or even when the name of the file changes.
Method #2 – Get Open Filename
As you know the challenges we face in the First method of the change in path and the File name, this method avoids both of the challenges. This method gives the option to browse in your computer to the location where your file is saved and opens that particular Workbooks which you want to open.
This method actually works in two parts.
The first part of this method is Application.GetOpenFileName. This Part allows you to browse through your computer and select the path where your file is saved. The first part does not open the file which you want to open.
The second part is to open the file for which you still need to be dependent on the First Method (VBA Workbooks.open Method). There are 5 arguments in the Application.GetOpenFileName but will only look at the basics like we did it in the first method. Now let us try to understand this method with the help of an example.
Example
Suppose you want to open the “Test File” saved in the D drive of the computer then you just need to follow the below steps.
Step 1: Follow step 1 mentioned in the first example for opening the Visual Basic Editor or Open Visual Basic Editor from Developer Tab.
Step 2: Enter the below code which provides the name for your macro.
Code:
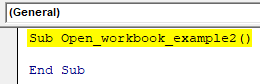
Sub Open_workbook_example2()

End Sub
Step 3: Enter the below code. This statement declares the Filename as Variable because here we are not specifying any path or file name because it can change from time to time.
Code:
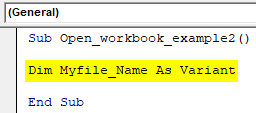
Sub Open_workbook_example2()

Dim Myfile_Name As Variant

End Sub
Step 4: Enter the below code. This statement opens the below dialog box and you can browse the folders to go to the path where the file is saved. Also, it will show the Excel file while browsing because we have put a filter for the Excel files.
Code:
Sub Open_workbook_example2()

Dim Myfile_Name As Variant
Myfile_Name = Application.GetOpenFilename(FileFilter:="Excel Files(*.xl*),*.xl*)")

End Sub

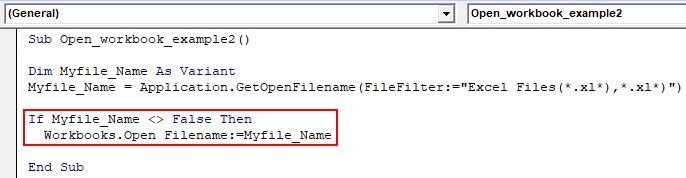
Step 5: Enter the below code. This statement is If Then statement which is used when the file .Name is not equal to false then open the selected Excel file.
Code:
Sub Open_workbook_example2()

Dim Myfile_Name As Variant
Myfile_Name = Application.GetOpenFilename(FileFilter:="Excel Files(*.xl*),*.xl*)")

If Myfile_Name <> False Then
  Workbooks.Open Filename:=Myfile_Name

End Sub
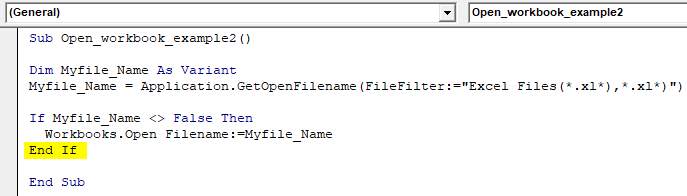
Step 6: Enter the below code. This statement closes the If then condition in the Macro.
Code:
Sub Open_workbook_example2()

Dim Myfile_Name As Variant
Myfile_Name = Application.GetOpenFilename(FileFilter:="Excel Files(*.xl*),*.xl*)")

If Myfile_Name <> False Then
  Workbooks.Open Filename:=Myfile_Name
End If

End Sub
Step 7: Now run the code by pressing the F5 key or by clicking on the Play Button. You will see the dialog box to browse the file will open. Browse to the desktop where your file is saved. Now you will be able to see the file in the D Drive. Select the file and click open.

Now as we just saw in our example, we don’t need to worry about the file name and the path name where the file is saved. We can easily navigate to the folder where our file is saved and select the file which we want to open. So we can easily conclude that this method is much more efficient compared to the first method.
Things to Remember
- Make sure the pathname & the file name is correct while using the first method. The macro will not work when there is a change by letter or space in path or File Name.
- Make sure the filters mentioned in the code in the 2nd method is correct. There are many formats of Excel which may not be visible because of a filter.
- Make sure the declaration and the code used in the VBA are right to avoid errors.
Recommended Articles
This is a guide to VBA Workbook Open. Here we discuss two different methods to open workbook using Excel VBA code along with practical examples and downloadable excel template. You may also look at the following articles to learn more –
