With Statement in Excel VBA
In this article, we will see an outline on Excel VBA With. With is a statement in programming languages. It is one of the most commonly used statement which is used with an END statement. The object which is referred to is mentioned after the with keyword and the whole process is ended with End With statement. A VBA With Statement cannot be without an end with a statement so it is mandatory to close the series of statements. The key feature of the with the statement is that we can access the properties of the object without referring to the object multiple times. The method to access the properties of the object lies in the dot keyword. When we put a dot keyword we can see a multiple number of options to access the properties of the object. Let us learn how to use With statement in some of the examples below.
How to Use With Statement in Excel VBA?
We will learn how to use the With Statement in Excel by using the VBA Code.
VBA With – Example #1
Let us first begin with a basic example in which we will use the With statement for accessing the range value of an object and then assign a custom value to it. For this, follow the steps below:
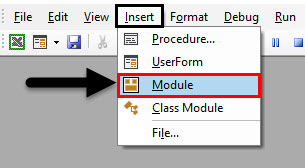
Step 1: Insert a new module inside Visual Basic Editor (VBE). Click on Insert tab > select Module.
Step 2: Define a new subprocedure within the inserted module that can hold your macro.
Code:
Sub Example1()

End Sub

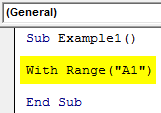
Step 3: Since we are beginning with the most basic with statement.
Code:
Sub Example1()

With Range("A1")

End Sub
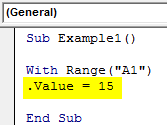
Step 4: When we type a dot (.) we can see a range of different functions associated with the object.
Code:
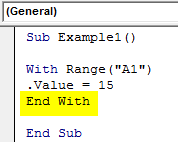
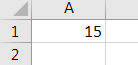
Sub Example1()

With Range("A1")
.Value = 15

End Sub
Step 5: Always remember to close the with statement with an End statement.
Code:
Sub Example1()

With Range("A1")
.Value = 15
End With

End Sub
Step 6: Now, run this code by hitting the Run button or F5.
VBA With – Example #2
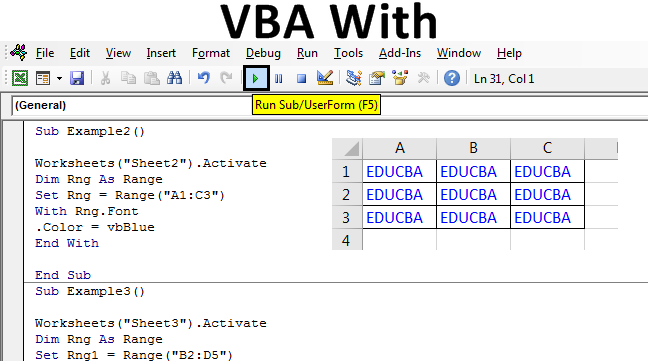
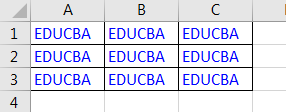
In this example, we will see how to change one of the fonts or the color of the property of the object. I have some data in Sheet 2 in the cells A1 to C3 in normal black color and I want to change the text font to blue using With Statement. First, let us see the current data in sheet 2 as follows. For this, follow the steps below:
Step 1: Now in the same module declare another subprocedure as follows.
Code:
Sub Example2()

End Sub
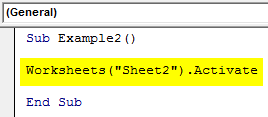
Step 2: Also we have now more than one sheet in this workbook so let us activate sheet 2 with the following code.
Code:
Sub Example2()

Worksheets("Sheet2").Activate

End Sub
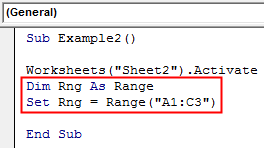
Step 3: Now declare a variable as Range data type which will store the range for our data as shown below and set the range to the range which has our data in sheet 2.
Code:
Sub Example2()

Worksheets("Sheet2").Activate
Dim Rng As Range
Set Rng = Range("A1:C3")

End Sub
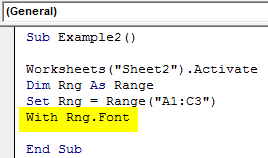
Step 4: Access the Font property of the Rng variable using the with statement with the following code shown below.
Code:
Sub Example2()

Worksheets("Sheet2").Activate
Dim Rng As Range
Set Rng = Range("A1:C3")
With Rng.Font

End Sub
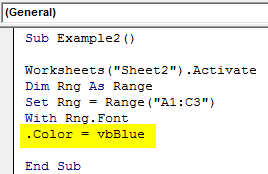
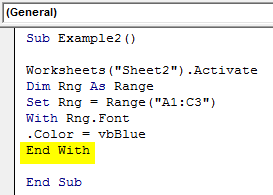
Step 5: Now we can use the dot (.) operator to change the color of the range using the following code and change the color of the text in the cell range.
Code:
Sub Example2()

Worksheets("Sheet2").Activate
Dim Rng As Range
Set Rng = Range("A1:C3")
With Rng.Font
.Color = vbBlue

End Sub
Step 6: Now let us end the with statement with the END WITH statement as follows.
Code:
Sub Example2()

Worksheets("Sheet2").Activate
Dim Rng As Range
Set Rng = Range("A1:C3")
With Rng.Font
.Color = vbBlue
End With

End Sub
Step 7: When we execute the code we get the following result in sheet 2.
VBA With – Example #3
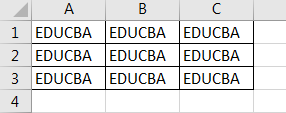
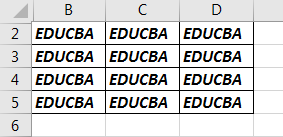
In this very basic example, we will see another font feature to manipulate using the With statement. For this example, we have similar text in cells B2 to D5 and they are in normal fonts. We want to change the font to Bold and Italic using the With statement. First, let us look at the data in sheet 3 as follows. For this, follow the steps below:
Step 1: Now in the same module declare another subprocedure as follows.
Code:
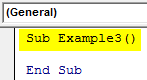
Sub Example3()

End Sub
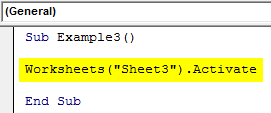
Step 2: Also we have now more than one sheet in this workbook so let us activate sheet 3 with the following code.
Code:
Sub Example3()

Worksheets("Sheet3").Activate

End Sub
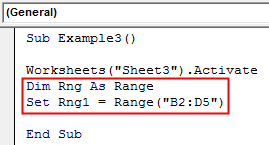
Step 3: Now declare a variable as Range data type which will store the range for our data as shown below and set the range to the range which has our data in sheet 3.
Code:
Sub Example3()

Worksheets("Sheet3").Activate
Dim Rng As Range
Set Rng1 = Range("B2:D5")

End Sub
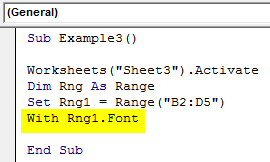
Step 4: Access the Font property of the Rng variable using the with statement.
Code:
Sub Example3()

Worksheets("Sheet3").Activate
Dim Rng As Range
Set Rng1 = Range("B2:D5")
With Rng1.Font

End Sub
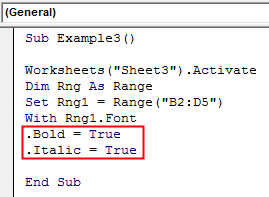
Step 5: Now again we use the dot (.) operator in the code to change the font to Bold and Italic.
Code:
Sub Example3()

Worksheets("Sheet3").Activate
Dim Rng As Range
Set Rng1 = Range("B2:D5")
With Rng1.Font
.Bold = True
.Italic = True

End Sub
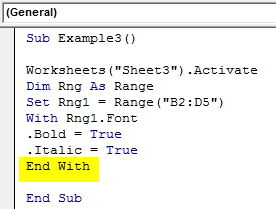
Step 6: Let us end the Statements using the End statement as shown below.
Code:
Sub Example3()

Worksheets("Sheet3").Activate
Dim Rng As Range
Set Rng1 = Range("B2:D5")
With Rng1.Font
.Bold = True
.Italic = True
End With

End Sub
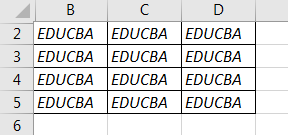
Step 7: When we execute the above code we can see the result in sheet 3 as follows.
As with the above examples, we can see how important with statement is in our day to day coding. Also, it removes the repetitive steps involved when we are trying to access the properties of an object. We can also use Loop statements in the With statements to define the criteria which we want to access for the object.
How to Use VBA With (Real Example)?
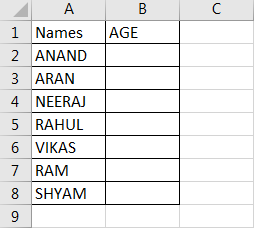
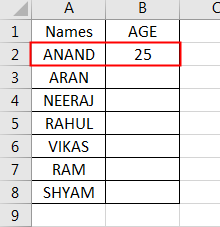
We have seen the basic uses of With statement in the above examples. Now let us use With statement for a real-life problem. We will make a code that will ask for a Name from user and Age, the code will then check the name in the list and paste the value of age beside the corresponding name. The data is in sheet 4 as follows.
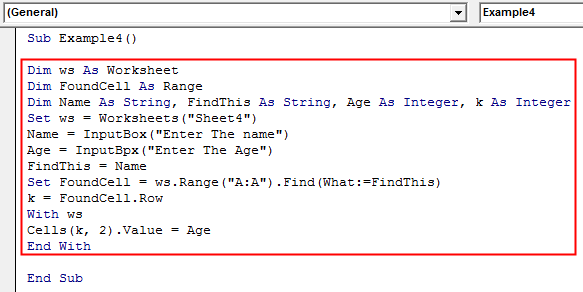
So the code we will be using for this as shown below and we will execute it and then understand it step by step.
Code:
Sub Example4()

Dim ws As Worksheet
Dim FoundCell As Range
Dim Name As String, FindThis As String, Age As Integer, k As Integer
Set ws = Worksheets("Sheet4")
Name = InputBox("Enter The name")
Age = InputBox("Enter The Age")
FindThis = Name
Set FoundCell = ws.Range("A:A").Find(What:=FindThis)
k = FoundCell.Row
With ws
Cells(k, 2).Value = Age
End With

End Sub
When we execute the code we get the following two pop-ups:
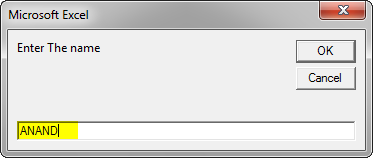
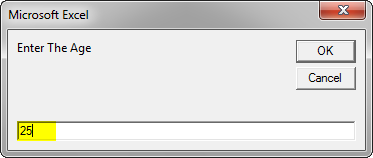
When we press OK for Age we can see the result displayed in Sheet 4 as follows.
Now let us understand the code step by step:
- When we ask the user to input the name the code finds it in column A.
- When the value provided by the user is found the row for the value is stored in a variable.
- Now in the With statement, we use the Cells Properties to change the values adjacent to the cells found with the values with the age provided by the user.
Things to Remember
There are few things which we need to remember about With statement in VBA:
- With Statement starts with referencing the Object property.
- With Statements are always ended with End With Statement.
- The properties of the object are accessed by the dot (.) keyword.
With Statements can also be used with the Loop statements.
Recommended Articles
This is a guide to VBA With. Here we discuss How to Use the With Statement in Excel VBA along with practical examples and downloadable excel template. You can also go through our other suggested articles –
