EDUCBA

EDUCBA

MENUMENU
  • Free Tutorials
  • Free Courses
  • Certification Courses
  • 280+ Courses All in One Bundle
  • Login
Home Design Design Tutorials Photoshop Tutorial Morphing in Photoshop
Secondary Sidebar
Photoshop Tutorial
  • Basics and Advanced
    • What is Photoshop?
    • Install Adobe Photoshop
    • Introduction to Photoshop
    • Career in Photoshop
    • Uses of Photoshop
    • Adobe Photoshop Commands
    • Is Photoshop Free?
    • Website Layout in Photoshop
    • Adobe Photoshop
    • Top Features in Adobe Photoshop
    • Adobe Photoshop Elements tools
    • Free UI Kits For Photoshop Download
    • Layers Panel in Photoshop
    • Photoshop Moon Brushes
    • Ripple Effect Photoshop
    • Action in Photoshop
    • Photoshop Color Match
    • Photoshop color picker
    • Photoshop split toning
    • Photoshop GIF
    • Photoshop Extend Background
    • Photoshop template flyer
    • Photoshop content aware fill
    • Photoshop Overlays
    • Photoshop vignette
    • Photoshop Textures
    • Photoshop liquify
    • Photoshop automate
    • Photoshop presets
    • Layer effects in Photoshop
    • Photoshop hologram effect
    • Vintage Effect Photoshop
    • Vaporwave Photoshop
    • Photoshop Polaroid
    • Pixel Effect Photoshop
    • Photoshop Creative
    • MP4 to GIF Photoshop
    • Templates in Photoshop
    • Night Effect in Photoshop
    • Photoshop Sun Effect
    • Photoshop Gold Gradient
    • Perspective Correction in Photoshop
    • VHS Effect Photoshop
    • Halftone in Photoshop
    • Puppet Warp in Photoshop
    • Photoshop Cheat Sheet
    • Resize Object in Photoshop
    • Distortion Effect Photoshop
    • Clone Stamp Tool in Photoshop
    • Fisheye Effect in Photoshop
    • Vanishing Point in Photoshop
    • Fix Perspective in Photoshop
    • Warp Image Photoshop
    • Transform Tool Photoshop
    • Photoshop Straighten Image
    • Glitch Effect in Photoshop
    • Photoshop Cinemagraph
    • Stamp Effect in Photoshop
    • Typography in Photoshop
    • Photoshop Distort Effect
    • How to Print in Photoshop?
    • Morphing in Photoshop
    • Glow Effects in Photoshop
    • Tree Brush Photoshop
    • 3D Text Effect in Photoshop
    • Shiny Effect Photoshop
    • Photoshop Font Effects
    • Metallic Effect Photoshop
    • Ice Effect in Photoshop
    • Dispersion Effect in Photoshop
    • Healing Brush Tool in Photoshop
    • Crop Tool in Photoshop
    • Artboard in Photoshop
    • Fire Effect in Photoshop
    • Photoshop Versions
    • Portrait Effect in Photoshop
    • Quick Selection Tool in Photoshop
    • How to Highlight Text in Photoshop?
    • How to Change Text Color in Photoshop?
    • Change Color in Photoshop
    • Filters in Photoshop
    • Change Hair Color in Photoshop
    • How to Change Shirt Color in Photoshop?
    • Watercolor Brushes in Photoshop
    • How to Blend Images in Photoshop?
    • Plastic Effect in Photoshop
    • Ruler Tool in Photoshop
    • How to Fill Color in Photoshop?
    • How to Delete Background in Photoshop?
    • Plugins in Photoshop
    • Photoshop Mixer Brush Tool
    • Color Replacement Tool in Photoshop
    • Eraser Tool in Photoshop
    • Motion Effect in Photoshop
    • How to Make Logo in Photoshop?
    • Lasso Tool in Photoshop
    • Reflection Effect in Photoshop
    • Metal Text Effect in Photoshop
    • Gold Text Effect in Photoshop
    • Smart Objects in Photoshop
    • Text Effects in Photoshop
    • Layers in Photoshop
    • 3D Text in Photoshop
    • Selection Tool in Photoshop
    • Patch Tool in Photoshop
    • Eyedropper Tool in Photoshop
    • Rectangle Tool in Photoshop
    • Background Eraser Tool in Photoshop
    • Rain Effect in Photoshop
    • Oil Paint Filter in Photoshop
    • Clipping Mask in Photoshop
    • Burn Tool in Photoshop
    • Paint Bucket Tool in Photoshop
    • Snow Effect in Photoshop
    • Mirror Effect in Photoshop
    • Adobe Photoshop Alternatives
    • Transparent Text in Photoshop
    • Sharpen Tool in Photoshop
    • Custom Shape Tool in Photoshop
    • Adobe Photoshop Tools
    • Red Eye Tool in Photoshop
    • Adobe Photoshop Shortcut Keys
    • Pencil Tool in Photoshop
    • Blur Tool in Photoshop
    • Smudge tool in Photoshop
    • Sponge Tool in Photoshop
    • Magic Wand Tool in Photoshop
    • Move Tool in Photoshop
    • Line Tool in Photoshop
    • Photoshop Interview Questions

Related Courses

Photoshop Training Course

Adobe Premiere Pro Training Course

Design Training Course

Morphing in Photoshop

Morphing in Photoshop

Introduction to Morphing in Photoshop

Morphing is a feature in Photoshop that can be utilized in animations and motion pictures to change or morph a single picture or form into another by adopting a flawless transition. This feature permits you to contort the objects on the image, or the whole image itself, to any form or shape you need. Morphing also has a huge demand in the printing industry like newspapers, magazines, movie banner, poster, etc., whether it is moral or not. Morphing can be done for the digital images to produce amusing, scaring or cartoon-like images with the use of Adobe Photoshop. This technique can be utilized to produce one of a kind expressions or disguised profile pictures.

How to Morph Pictures in Photoshop?

Below are the steps to create morphing in photoshop:

Start Your Free Design Course

3D animation, modelling, simulation, game development & others

All in One Design Bundle(280+ Courses, 100+ projects)
AutoCADHoudiniAdobe Premiere ProPhotoshop
SolidworksVFX Visual EffectsCorelDrawUnreal Engine
Price
View Courses
280+ Online Courses | 100+ projects | 2000+ Hours | Verifiable Certificates | Lifetime Access
4.6 (64,654 ratings)

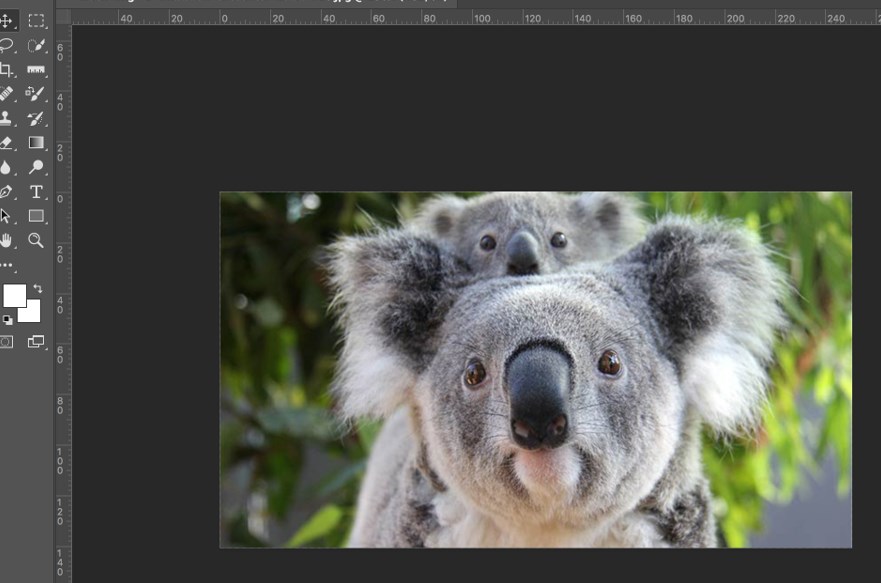
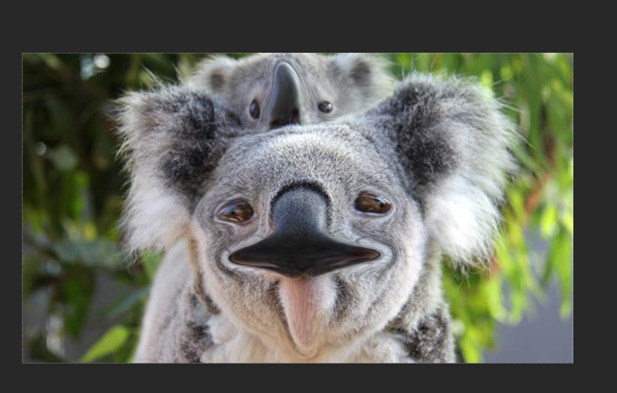
Step 1: Open your Adobe Photoshop. Select an image to work with. Here we will use the koala bear image.

Morphing in Photoshop - 1

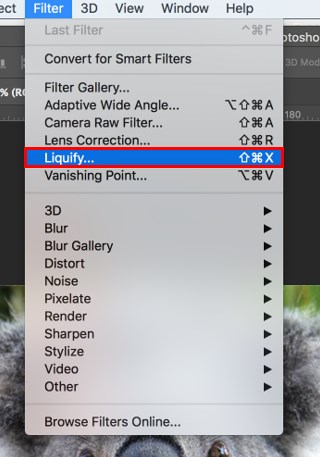
Step 2: The next step is to select the liquify tool from the menu bar. Click on Filter, then Liquify.

liquify tool

Step 3: Once you click on Liquify, you will get a liquify window, as shown below.

liquify window

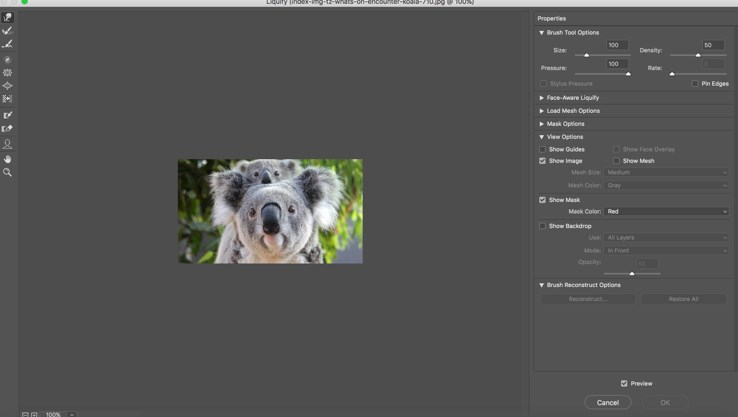
Step 4: Once you get the liquify window, left-click (now a circle cursor) on the areas you want to morph, the cursor can also be dragged across the image to morph the regions of the photo where the cursor goes through. Click on OK after you are done with morphing. The size of the circle cursor is adjustable. You can do it by hitting the left bracket ( [ ) to reduce the size and the right bracket ( ] ) to increase it.

Morphing in Photoshop - 4

How to Apply Face Morphing?

Face Morphing is popular nowadays in the entertainment industry. Face Morphing can signify blending and stitching some of the pixels of both the faces. So here we will use two images of football stars Wayne Rooney and Paul Scholes. Now to morph or swap faces in Photoshop, make sure both the faces are facing a similar direction and have a similar head tilt. Try to get the angles of both the faces as matching as possible so that it does not look fake.

Morphing in Photoshop - 5

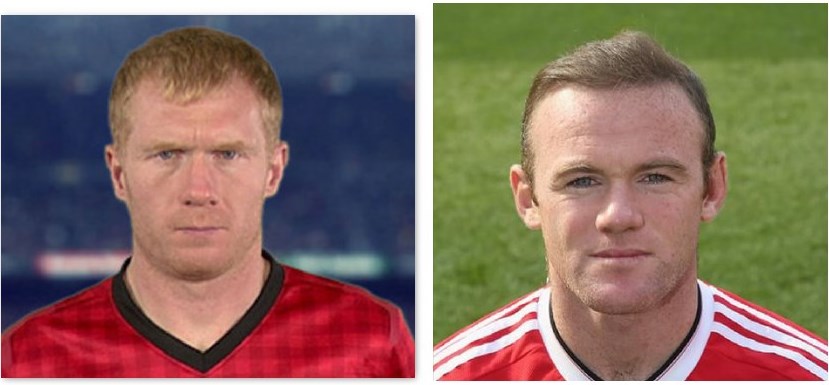
Here we will be putting Wayne Rooney’s face on Paul Scholes’s. Below are the steps to morph faces in Photoshop:

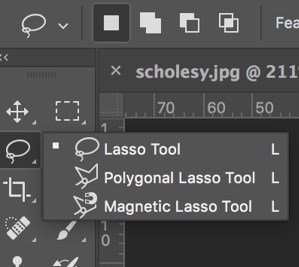
Step 1: The first thing that we will do is select the lasso tool to make a selection around Wayne Rooney’s face. You can select the lasso tool by pressing L on the keyboard or by navigating to the toolbar.

lasso tool

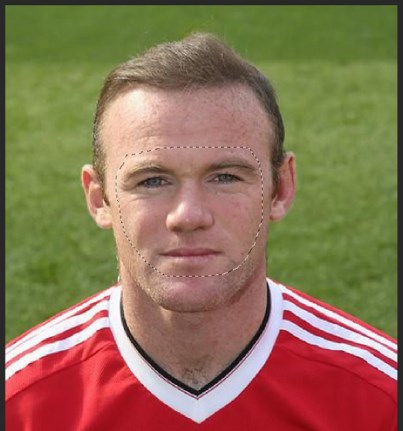
Step 2: Make a selection of the face after you select the lasso tool.

selection of the face

Step 3: After the selection, press Ctrl + J for Windows and Command + J for Mac to duplicate the layer. Now we just have the face, and we will name it Face.

Morphing in Photoshop - 8

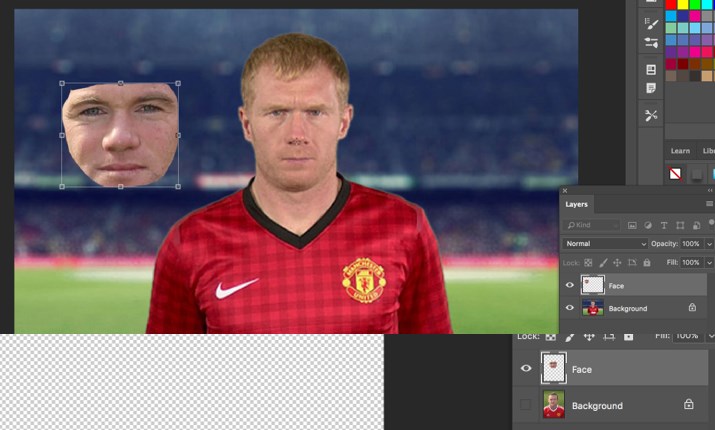
  • Then click on V on the keyboard to select the move tool. Click and drag on the face and drag it over to the other tab where you have Paul Scholes’s image and release the layer there.
  • It is a good idea to always work with a face that is larger than the face you are trying to swap out. You will have the advantage of distorting and scaling pixels and not have any pixelation.

Step 4: The next step is to match the size of both faces. To do that, press Ctrl + T (Transform) for Windows and Command + T for Mac. We will bring the opacity to 50%, which is present on the layers panel and then bring it over Paul Scholes’s face, as shown below.

opacity to 50%

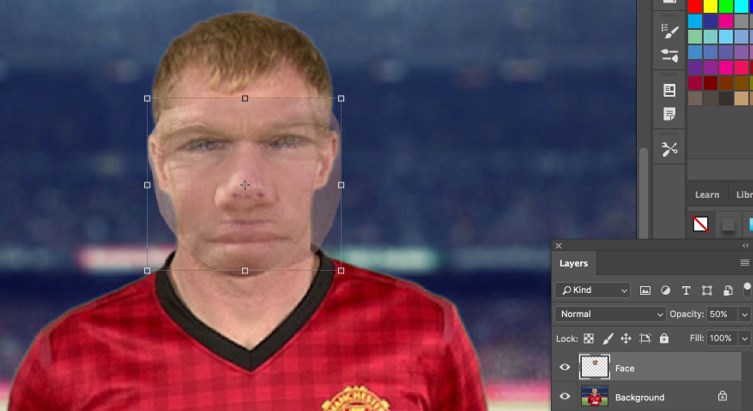
Step 5: Use the eyes to match the face. Match the corner of the eye with the face and use it as the scaling position. Hold Alt and then click the corner of the eye to make a new pivot point and then scale it to match the face by holding Shift + Alt + click.

Match eye

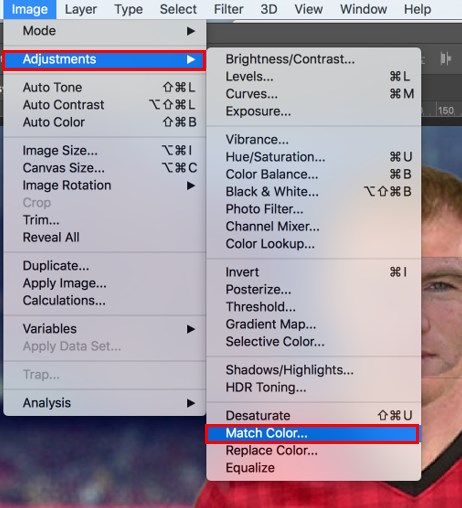
Step 6: If you are doing face morphing, it is always a good idea for both faces to have similar skin tone, color, etc., so when you merge the layers, it looks better. To do that, select the face, then click on Image, then Adjustments and Match Color. Select the Paul Scholes image as the source and layer as the background.

Match Color

Morphing in Photoshop - 12

Morphing in Photoshop - 13

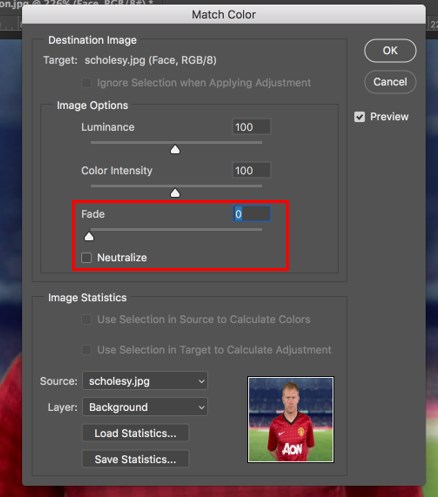
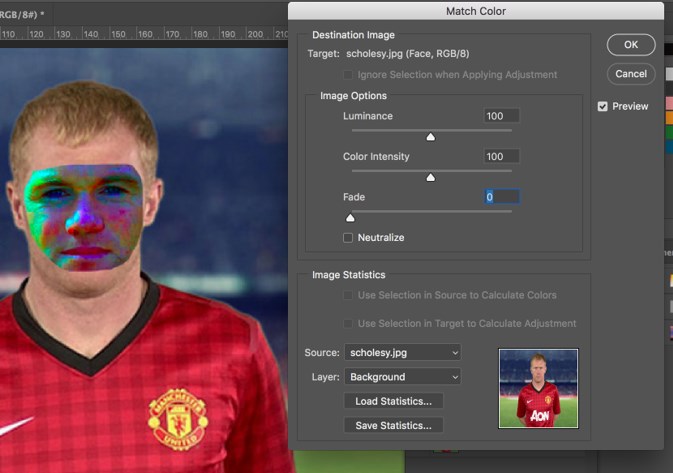
Step 7: This does not look good because the background has black, red, and green color that we don’t need; you only want the color that is on the face. So to select just the face hold Ctrl + Command and click on the face thumbnail in the layer section and select the pixels.

Morphing in Photoshop - 14

  • Once the selection is done, repeat the same steps by clicking on Image > Adjustments > Match Color and selecting the source and layer as before and adding some fade to it. Add a little gaussian blur to match the skin tone.

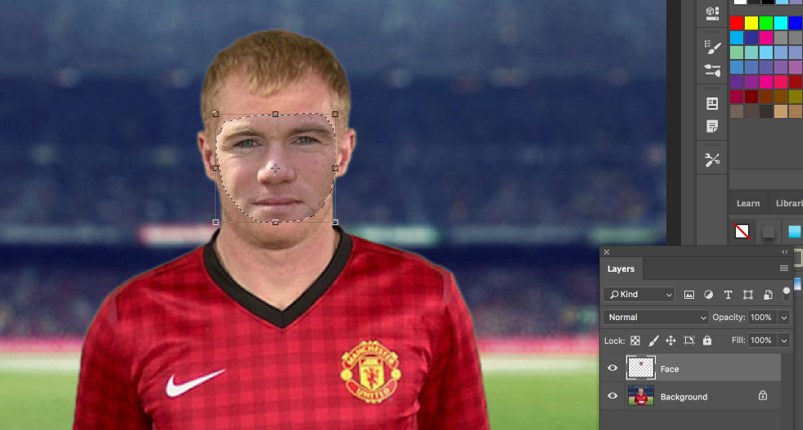
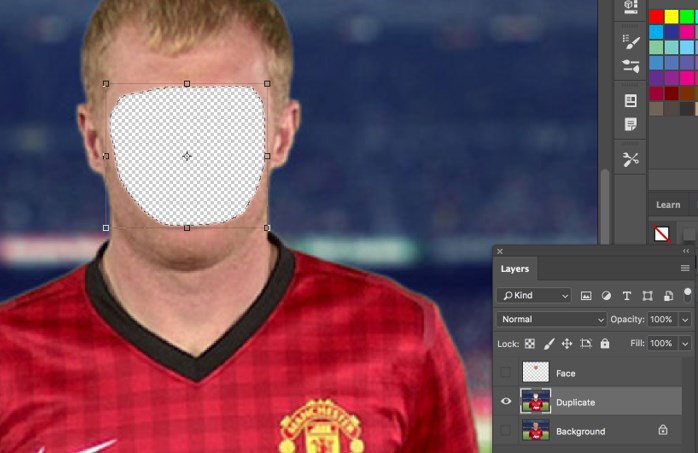
Step 8: Now press Ctrl + Command and click on the face layer thumbnail to make the selection. Also, create a duplicate layer of the background and name it as duplicate.

Morphing in Photoshop - 15

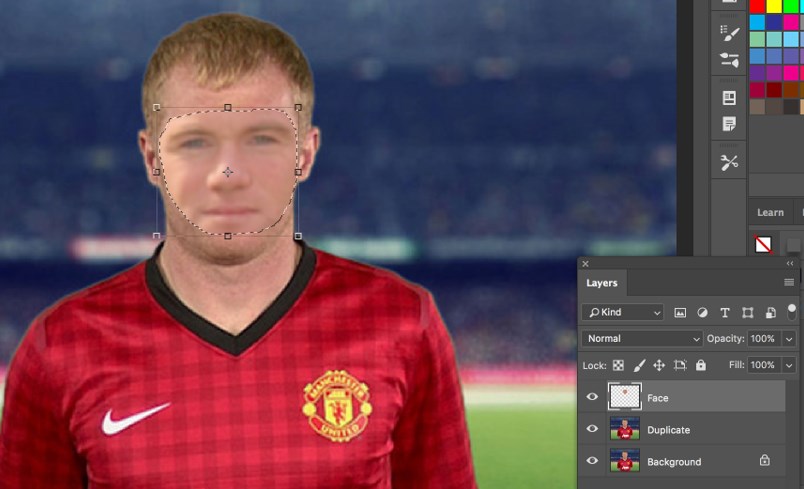
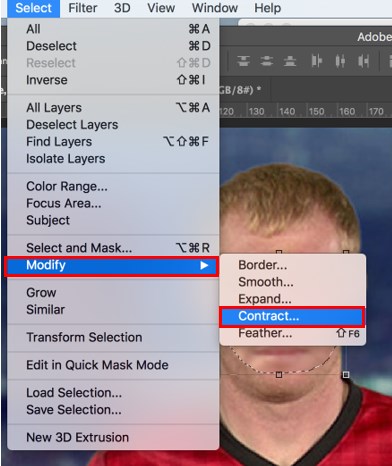
Step 9: Now select the duplicate layer, click on Select, then Modify and Contract and select 5 pixels.

Morphing in Photoshop - 16

Step 10: Then select the duplicate layer and hide the other layers, and press delete.

select the duplicate layer

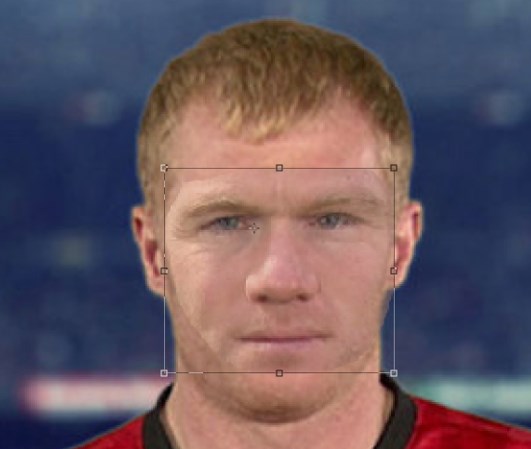
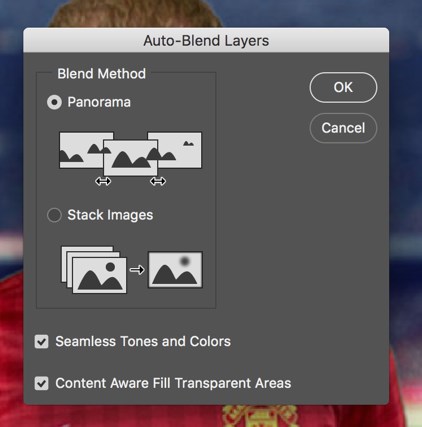
Step 11: Now unhide the face layer, hold shift and select both face and duplicate. Then go to Edit and Auto-Blend Layers, select the blend mode to be panorama and check both Seamless Tones and Colors and Content-Aware Fill Transparent Areas. By doing this, Photoshop automatically blends the tones and the colors, as shown below.

Morphing in Photoshop - 18

Step 12: Final Image.

Morphing in Photoshop - 19

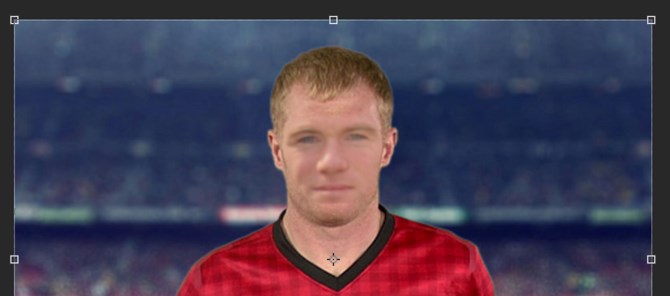
In this way, you can morph two faces in Adobe Photoshop.

Conclusion

Morphing can find itself to be useful in blending two or more pictures into a new picture. It is substantially utilized in appending special effects in animation and motion pictures. It is also extensively utilized in interactive user interface designing and games. Morphing effects have become better from the days of their early utilization and are more propelled towards producing less apparent effects that seem to be more pragmatic.

Recommended Articles

This is a guide to Morphing in Photoshop. Here we discuss an Introduction, Liquify the image, and morph two faces in Adobe Photoshop, respectively. You can also go through our other related articles to learn more –

  1. Creating Shiny Effects in Photoshop
  2. Quick Selection Tool in Photoshop
  3. How to Highlight Text in Photoshop?
  4. Portrait Effect in Photoshop
Popular Course in this category
Photoshop Training (10 Courses, 12+ Projects)
  10 Online Courses |  12 Hands-on Projects |  80+ Hours |  Verifiable Certificate of Completion
4.9
Price

View Course

Related Courses

Adobe Premiere Pro Tutorial (4 Courses, 7+ Projects)4.9
All in One Design Bundle (280+ Courses, 100+ projects)4.8
0 Shares
Share
Tweet
Share
Primary Sidebar
Footer
About Us
  • Blog
  • Who is EDUCBA?
  • Sign Up
  • Live Classes
  • Corporate Training
  • Certificate from Top Institutions
  • Contact Us
  • Verifiable Certificate
  • Reviews
  • Terms and Conditions
  • Privacy Policy
  •  
Apps
  • iPhone & iPad
  • Android
Resources
  • Free Courses
  • Photoshop Tutorial
  • 3ds Max Tutorial
  • All Tutorials
Certification Courses
  • All Courses
  • Design Course - All in One Bundle
  • Photoshop Course
  • Maya Course
  • Unreal Engine Course
  • Unity Course
  • DaVinci Resolve Course
  • Pro Tools Course

ISO 10004:2018 & ISO 9001:2015 Certified

© 2022 - EDUCBA. ALL RIGHTS RESERVED. THE CERTIFICATION NAMES ARE THE TRADEMARKS OF THEIR RESPECTIVE OWNERS.

EDUCBA
Free Design Course

Banner Creation, Object Selection, Sky Replacement, Advance Filters & others

*Please provide your correct email id. Login details for this Free course will be emailed to you

By signing up, you agree to our Terms of Use and Privacy Policy.

EDUCBA Login

Forgot Password?

By signing up, you agree to our Terms of Use and Privacy Policy.

EDUCBA
Free Design Course

3D animation, modelling, simulation, game development & others

*Please provide your correct email id. Login details for this Free course will be emailed to you

By signing up, you agree to our Terms of Use and Privacy Policy.

EDUCBA

*Please provide your correct email id. Login details for this Free course will be emailed to you

By signing up, you agree to our Terms of Use and Privacy Policy.

Let’s Get Started

By signing up, you agree to our Terms of Use and Privacy Policy.

This website or its third-party tools use cookies, which are necessary to its functioning and required to achieve the purposes illustrated in the cookie policy. By closing this banner, scrolling this page, clicking a link or continuing to browse otherwise, you agree to our Privacy Policy

Loading . . .
Quiz
Question:

Answer:

Quiz Result
Total QuestionsCorrect AnswersWrong AnswersPercentage

Explore 1000+ varieties of Mock tests View more