Updated February 21, 2023

Introduction to SVG Creator
SVG creator is a free, open-source online tool that is compatible with all types of browsers, or we can say that we can run SVG smoothly. It is used to edit the graphics images within a specified web browser area as per our requirement without third-party tools or software. In SVG creator, we can create or display two-dimensional images and different types of charts on websites. We can also display the vector files that are helpful to scale the image without harming any resolution of images; this is one of the advantages of SVG creator.
SVG Creator overviews
Versatile Vector Graphics (SVG) is an XML-based vector picture design for two-layered illustrations with the help of intelligence and activity. The SVG creator is an open-source, free tool that 3W builds.
SVG pictures are characterized in a vector design and put away in XML text documents. SVG pictures can, in this manner, be scaled in size without loss of value, and SVG records can be looked at, filed, prearranged, and compacted. Furthermore, the XML text documents can be made and altered with word processors or vector illustration editors and are delivered by the most-utilized internet browsers.
Svg Creator Attributes
Now let’s see the different attributes of SVG creator as follows.
SVG circle: This is an attribute of SVG and is used to draw the circle with a given point and radius.
Syntax
<circle
cx ="It is used to specify the value of X axis coordinate"
cy="It is used to specify the value of Y axis coordinate"
cr="It is used to specify the length if radius">
</circle>
Explanation
In the above syntax, we use three different attributes as shown here circleX, and circleY are used to specify the X and Y coordinates of the circle, which means point; the cr is used to define the circle’s radius.
Example
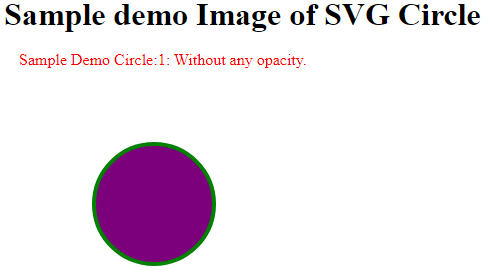
Now let’s see an example of a circle element so we will get the idea about the attribute as follows.
<html>
<title>Welcome in SVG Circle Element</title>
<body>
<h1>Sample demo Image of SVG Circle</h1>
<SVG width="700" height="700">
<g>
<text x="15" y="11" fill="red" >Sample Demo Circle:1: Without any opacity.</text>
<circle cx="150" cy="150" r="60" stroke="green"
stroke-width="4" fill="rgb(124,0,124)"></circle>
</g>
</SVG>
</body>
</html>
Explanation
In the above example, we try to implement the SVG circle element as shown; here, we use the three attributes, cx, cy, and r, that we already discussed. Furthermore, in this example, we try to draw the circle without any opacity. Finally, we illustrated the final output of the above implementation by using the following screenshot.
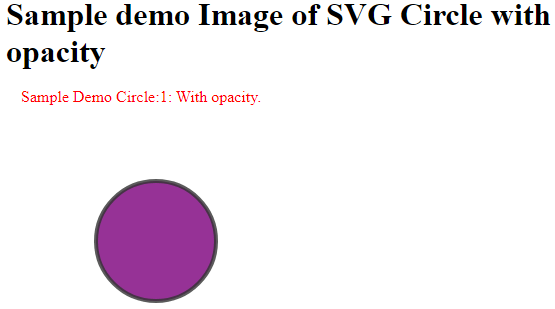
Now let’s see the same example with opacity as follows.
<html>
<title>Welcome in SVG Circle Element </title>
<body>
<h1>Sample demo Image of SVG Circle with opacity</h1>
<SVG width="700" height="700">
<g>
<text x="15" y="11" fill="red" >Sample Demo Circle:1: With opacity.</text>
<circle cx="150" cy="150" r="60" stroke="green"
style="fill:rgb(124,0,124);stroke-width:4;
stroke:rgb(0,0,0);stroke-opacity:0.8;opacity:0.8"></circle>
</g>
</SVG>
</body>
</html>
Explanation
In the above example, we try to draw the circle with opacity; here, we add one more attribute, stroke-opacity with value, as shown in the above code. Finally, we illustrated the final output of the above implementation by using the following screenshot.
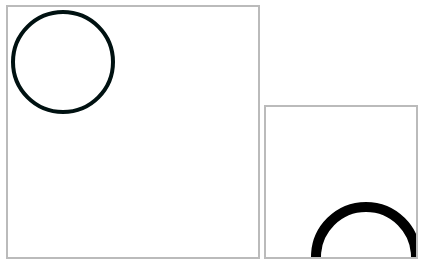
Now let’s see the SVG view box attribute example as follows.
One more method for clarifying it is that the two first organizations in the viewBox quality characterize the client directions of the upper left corner of the <SVG> component, and the two last facilitates characterize the client directions of the lower right corner. The space inside the <SVG> is deciphered as spreading over from the upper passed directions to the lower right facilitates the view box.
<!DOCTYPE html>
<html>
<head>
<title>SVG With ViewBox</title>
<style type="text/css">
SVG {
border: 2px solid #bbb;
}
</style>
</head>
<body>
<!-- Code for without viewBox -->
<SVG width="250" height="250">
<circle cx="55" cy="55" r="50"
stroke="#011" stroke-width="4"
fill="none"/>
</SVG>
<!-- Code for with viewBox -->
<SVG width="150" height="150" viewBox="0 0 30 30">
<circle cx="20" cy="30" r="10" stroke="#000"
stroke-width="2" fill="none"/>
</SVG>
</body>
</html>
Explanation
In this example, the square box shows the outline of SVG with viewbox and without viewbox attribute. The output above both codes is the same, but the only difference is in scale or dimension. In this example, we use four attributes shown in the above code, such as X and Y coordinate with width and Height. We illustrated the final result of the above implementation using the following screenshot.
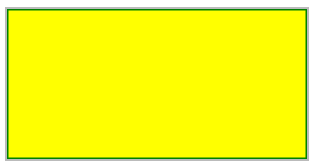
Now let’s see the SVG rectangle example as follows.
Example
<!DOCTYPE html>
<html>
<head>
<title>Welcome in SVG Rectangle</title>
<style type="text/css">
SVG {
border: 2px solid #bbb;
}
</style>
</head>
<body>
<SVG width="300" height="150">
<rect width="300" height="150" stroke="green" stroke-width="3" fill="yellow" />
</SVG>
</body>
</html>
Explanation
In the above example, we try to draw the rectangle; here, we use two attributes, width, and height, to draw the rectangle. In this example, we define the width as 300 and the height as 150. We illustrated the final result of the above implementation using the following screenshot.
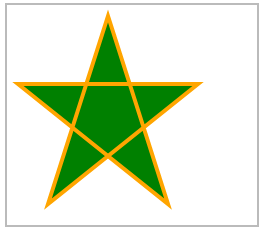
Now let’s see an example of the polygon as follows.
Example
<!DOCTYPE html>
<html>
<head>
<title>Welcome in SVG Polygon</title>
<style type="text/css">
SVG {
border: 2px solid #bbb;
}
</style>
</head>
<body>
<SVG height="220" width="250">
<polygon points="101, 11 41,199 191,79 11,79 161,199"
style="fill:green; stroke: orange; stroke-width:4;fill-rule:zero;" />
</SVG>
</body>
</html>
Explanation
In the above example, we try to implement the polygon; in this example, we define the different attributes to draw the polygon as shown in the above code. We illustrated the final result of the above implementation using the following screenshot.
So in this way, we can create SVG by using different elements and attributes per our requirement.
Conclusion
We hope from this article you learn more about the SVG creator. From the above article, we have taken in the essential idea of the SVG creator, and we also see the representation and example of the SVG creator. Furthermore, this article taught us how and when to use the SVG creator.
Recommended Articles
This is a guide to SVG Creator. Here we discuss the essential idea of the SVG creator, and we also see the representation and example. You may also look at the following articles to learn more –
