Updated April 1, 2023
Introduction to Spring boot file upload
In Spring boot, we can upload files to the server by making our HTTP request multipart. This type of request is used to send the binary files and text files to the server; hence we need to use multipart requests for this. In spring boot, we have to make necessary changes and configurations in order to make this work. This requires a bit of configuration in our application; the request parsing method will be a bit different from others we have seen so far. Sometimes we may require to upload some files to the server because we can use large data inside it to store; also, we can upload videos by the use of this type of request; they are basically designed to handle such requests in the web application. In the coming section of the tutorial, we will see how we can upload files in the spring boot application and also the implementation in detail for beginners. In this topic, we are going to learn about Spring boot file upload.
Syntax
As we know, file upload is a mechanism to store text files or any other type of file to the server; in order to handle server should be ready to handle such requests. Let’s take a look at the syntax for the implementation of file upload in spring boot to see below;
@PostMapping("/your_rurl")
public retutn_type method_name(@RequestParam("name") MultipartFile obj) {
// logic goes here ..//
}
As you can see in the above syntax, we are using the MultipartFile object to handle the file upload in the spring boot application; inside this, we can define the logic for our method, and this object will contain the file we have uploaded from the client-side. Let’s take a look at the practice syntax for file upload; for better ideas, see below;
Example:
@PostMapping("/upload")
public void upload(@RequestParam("fileobj") MultipartFile fileobj) {
// logic goes here ..//
}
As you can see, we can define the method to handle the file upload in the spring boot application; it should be inside the controller class and will be a post mapping. In the coming section, we will see the steps required to make it work in the application.
How does the file upload function work in Spring boot?
In spring boot, as we have already known, we have to use multipart requests to support the binary and text file handling at the server-side. For this, we have to make use of the Multipart class, which requires configuration in the application.properties also. We can also upload multiple files at the same time but just need to be careful while handling it at the controller. The Multipart object will contain the list of files for us, which we can process further in the application. In this section, we will first see the steps required to make this happen in the spring boot application; let’s get started to see below;
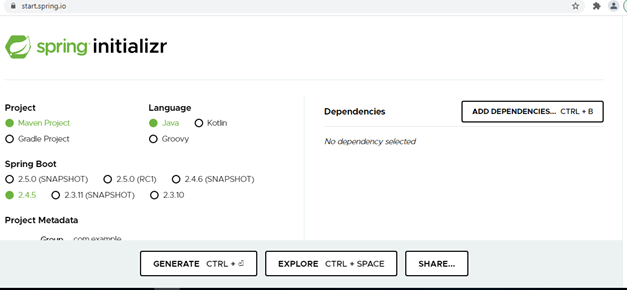
1) First, we will go to the spring initializer and set up the spring boot project by entering all the details into the information, and we will add the necessary dependency. Click on generate a project, and it will give you zip, extract and import it into the favourite editor.
URL:
https://start.spring.io/
Output:
2) Once you download the project, do not forget to add the web dependency inside it, else it will not work from the rest-client tool to test it. For reference, below find the required dependency for the web see below;
Example:
<dependency>
<groupId>org.springframework.boot</groupId>
<artifactId>spring-boot-starter-web</artifactId>
</dependency>
3) Now, we would require one more dependency, which is thymeleaf, add this dependency into your build file; for reference, please find the dependency below;
Example:
<dependency>
<groupId>org.springframework.boot</groupId>
<artifactId>spring-boot-starter-thymeleaf</artifactId>
<version>2.4.3</version>
</dependency>
4) After adding all these things, we can now create the methods inside the controller which will handle the file upload in our spring boot application; let’s take a look at the controller level what changes we have to do see below;
Example:
import org.apache.coyote.Response;
import org.springframework.http.HttpStatus;
import org.springframework.http.ResponseEntity;
import org.springframework.web.bind.annotation.*;
import org.springframework.web.multipart.MultipartFile;
import java.security.Principal;
@RestController
@RequestMapping("/demo")
public class DemoController {
@PostMapping("/uploadFile")
public String uploadFile(@RequestParam("file") MultipartFile file) {
String fileName  = file.getOriginalFilename();
int filelenth = file.getBytes().length;
return "File uploded successfully, " + "file name is :: "+ fileName + "and length is ::" + filelenth;
}
@GetMapping("/gettest/{test}")
public ResponseEntity<String> get(@PathVariable String test) {
return new ResponseEntity<>("I am get method " + test, HttpStatus.OK);
}
@PostMapping("/postMethod")
public ResponseEntity<String> post() {
return new ResponseEntity<>("I am post method " , HttpStatus.OK);
}
@DeleteMapping("/deleteMethod")
public ResponseEntity<String> delete() {
return new ResponseEntity<>("I am deleteMethod method " , HttpStatus.OK);
}
}
As you can see in the above line of code, we have used the Multipart object from the spring web dependency. To make it available in the class, we have to import the required packages at the top of the controller; we would require the below package for multipart in the controller see below;
Example:
import org.springframework.web.multipart.MultipartFile;These packages should be in place; else, we will get the compile-time error in the controller, and to make it visible, we should have the web dependency in place, which we have discussed in step two.
Now we have to write some code at the service level, which will store the file in the server, creating one service class and writing the logic to save the file.
5) now, we have to make some changes to the application file where we will set the limit for the multipart data being uploaded and requested; we have a property defined in spring boot which we can use to set up this setting for reference; see below;
Example:
spring.servlet.multipart.max-file-size=500KB
spring.servlet.multipart.max-request-size=500KB
6) Now we should have our main class, which should be like below;
Example:
import org.springframework.boot.SpringApplication;
import org.springframework.boot.autoconfigure.SpringBootApplication;
import java.util.*;
@SpringBootApplication
public class TradersApplication {
public static void main(String[] args)
{
SpringApplication.run(TradersApplication.class, args);
System.out.println("Application running in the dev mode !!");
}
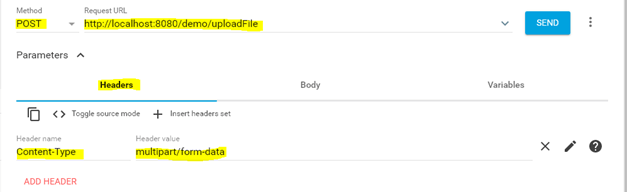
}6) Go to advance rest-client and try to hit the endpoint like below by making changes into content-type:
Output:
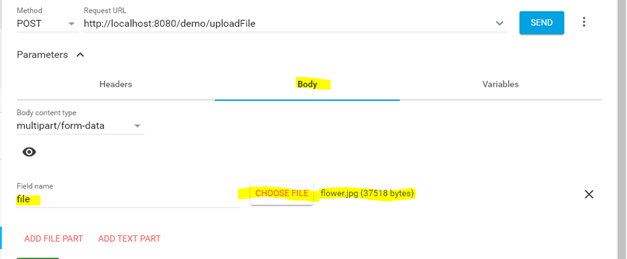
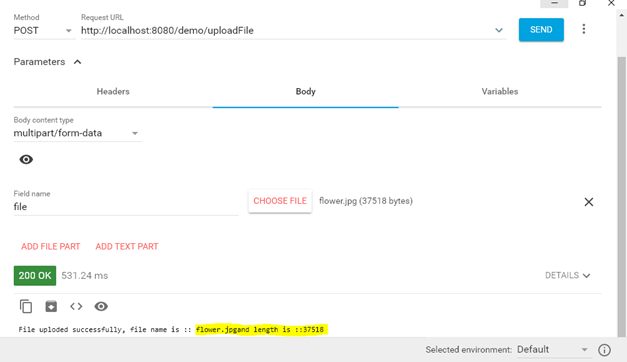
7) go to the body section and follow the below image, give the name of the variable and upload the file you want to upload like below;
Output:
8) after sending the request, you will get the following output in return;
Output:
Conclusion
To upload files in the spring boot application, we have to make use of multipart as we have discussed above, follow the above steps to make it work, and see the output. However, as we have seen, it is easy to use and also handle with a bit of o configuration is required.
Recommended Articles
This is a guide to Spring boot file upload. Here we discuss how we can upload files in the spring boot application and also the implementation in detail for beginners. You may also have a look at the following articles to learn more –
