Updated April 3, 2023
Introduction to Spring boot controller
Spring boot framework is used to make the enterprise application which can be based on Groovy, Java, and Kotlin. By the use of this, we can make a web application; in order to have communication between the front and the backend, we require controllers in our applications; these controllers are responsible for handling the request from the client and providing them with the response in return. In short, controllers are used for making or building a web controller. In spring boot, we have to add the required dependency by which we can use this inside the application; also, we have to use the spring boot framework’s annotation to make any class a controller. In the coming section, we will see all these in detail for better understanding and implementation in our application.
Syntax
As we make any controller in the spring boot framework, we have to use the below annotation on any class; let’s take a closer look at the syntax for this, which will help beginners to understand it better see below;
@RestController
public class Controller_name {
// logic goes here ..///
}
As you can see, we are using @RestController annotation above the class; this annotation will tell that it is a controller class. If we want, we can provide it mapping also. Let’s take a closer look at the practice syntax for this to get a better idea;
e.g. :
@RestController
public class DemoController {
// method comes here .. //
}
We can write the required endpoints here; this controller is now responsible for handling the request if matching the URL. In the coming section, we will see the other configuration and how we can test this locally without UI.
How does the Spring boot controller work?
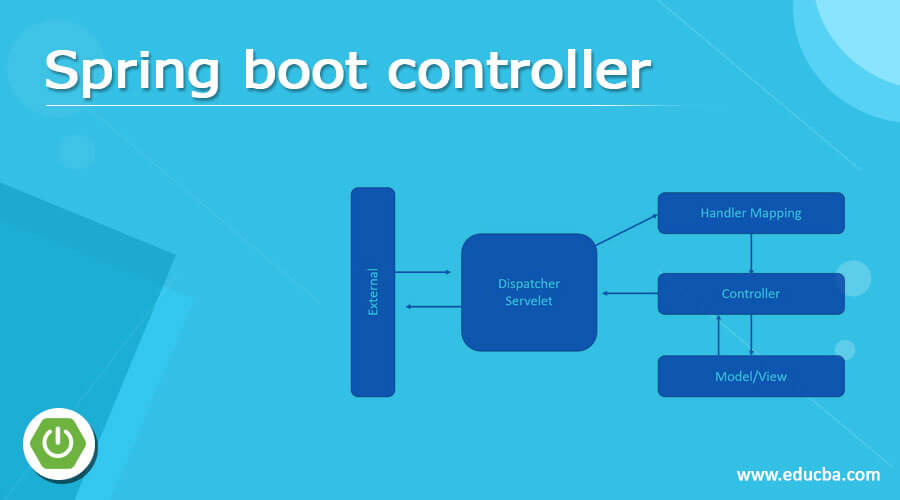
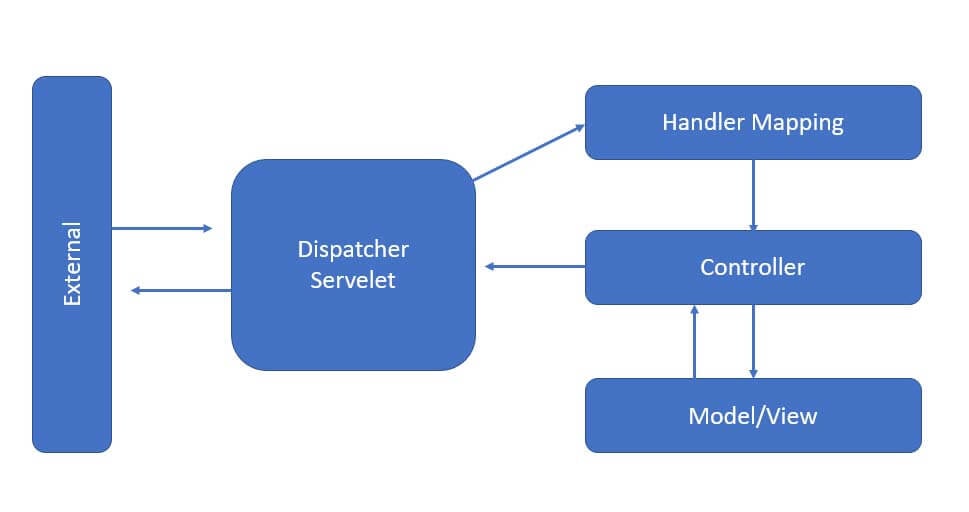
As of now, we already know that controller is very much required in the web application to handle the HTTP request from the client. To handle these requests, we use the controller in spring boot; the controller is nothing but just a normal class annotated using the @RestController. This annotation tells that it is a controller, and inside this, we can write so our different HTTP points which are required. First, in this section, we will see the internal working of the controller specifically in spring boot with one flow diagram see below;
1) In spring boot, first, we receive the HTTP request from the external source or client-side; first, it will go to the DispatchServlet.
2) In this step, now the Dispatch Servlet will try to find out the respective controller for this HTTP request with the help of Handler mapping; after knowing the controller name which can handle the request, the Dispatch Servlet will transfer that request to the respective controller.
3) Now, the controller will process the request based on the parameter and URL mapping in the HTTP request, and after performing the business logic, it will return the response as JSON/XML to the client.
4) This is how it works in general, but in Spring MVC, we have a view resolver, but here in spring boot, we do not have it because we do not render the view; in return, we just simply send the JSON/XML as the response to the client.
Below see the flow chart for the same;
Now we will see the steps to create the controller in the spring boot application,
1) First, we will create the spring boot project, which we can create by using the spring initializer online, where we have to select the required configuration for our application. Once we fill in all the details, we can now generate the zip and import it after extraction into our favorite editor.
URL: https://start.spring.io/
2) After this, we will add the required dependency for the web application; without spring web dependency, we will not be able to find the web-related annotations in our application, so please add the below dependency and start your project just for test purposes.
e.g. :
<dependency>
<groupId>org.springframework.boot</groupId>
<artifactId>spring-boot-starter-web</artifactId>
</dependency>
Add the above dependency into your build file and build the project.
3) Now, we are going to create the controller for our application; for this, we have to create a simple class that will annotate with the @RestController annotation and see the sample code for reference;
e.g.:
package com.test.Traders;
import org.apache.coyote.Response;
import org.springframework.http.HttpStatus;
import org.springframework.http.ResponseEntity;
import org.springframework.web.bind.annotation.*;
import java.security.Principal;
@RestController
@RequestMapping("demo")
public class DemoController {
@GetMapping("/gettest/{test}")
public ResponseEntity<String> get(@PathVariable String test) {
return new ResponseEntity<>("I am get method " + test, HttpStatus.OK);
}
@PostMapping("/postMethod")
public ResponseEntity<String> post() {
return new ResponseEntity<>("I am post method " , HttpStatus.OK);
}
@DeleteMapping("/deleteMethod")
public ResponseEntity<String> delete() {
return new ResponseEntity<>("I am deleteMethod method " , HttpStatus.OK);
}
}
As you can see, we have created one DemoController, and inside this, we have written the method which will handle the HTTP request from the client based on the URL created. We have now used the three get, post, and delete.
a) GET: this will be responsible for fetching the data based on the parameter passed.
b) POST: this will create a new object or new entry to the application
c) DELETE: this will delete the record based on the di or param passed in the URL.
Execute this method using any rest client;
- post call, you will get below as the output:
- for get you will get below output please pass the required param in the URL:
- for delete method you will get the below output from the rest-client don’t forget to select the proper method type In all the case otherwise you will get 405 as an error in return
Conclusion
We have seen a very easy controller to use and handle in spring boot because it does so many configurations for us automatically, so we just need to map our URL, no more extra configuration. This is basically to handle the web request; we have already seen some practical examples of how we can run it already in the tutorial.
Recommended Articles
This is a guide to Spring boot controller. Here we discuss How does the Spring boot controller work, along with some practical examples. You may also have a look at the following articles to learn more –
