Updated April 1, 2023

Introduction to Spring Boot Configuration
The following article provides an outline for Spring Boot Configuration. Spring Boot is a framework which is used to create the web application based on the Java, Groovy and Kotlin. We can make the spring bot application very easily by the use of web tools available, but we have to make so many configurations to run it and make it available for the different environments we have.
These environments can be different and vary from an application, but we always have a separate environment for each like, local, development, testing and production. Apart from this, we need to make less configuration in comparison to the spring MVC framework. Therefore, we also had one annotation called @Configuration, which helps us configure our files and classes, which initialize the beans and other configurations for us.
Spring Boot Configuration in Stepwise Manner
Given below shows spring boot configuration in a stepwise manner:
Here we will first see what different configurations are needed to make the spring boot application work; it is basically designed to make web applications.
1. First, we have to make the application from scratch. For this, we can make use of a spring initializer to create it fast and easily.
For this, we can follow the below link:
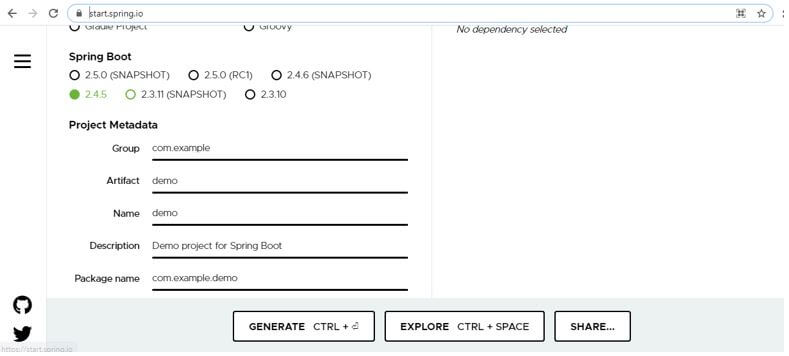
Here we have to select the build type mentioned as the project type. After that, we can mention the language in which we want to create the application. Also, the spring boot version, followed by the project meta data, will contain so many internal fields. At last, select the packaging and click on generate.
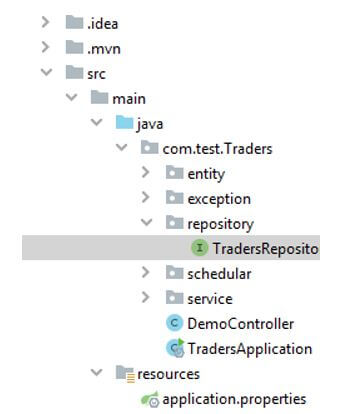
2. Now, extract the project into the editor and start going through the ProJet structure.
3. When you will extract the project and import it, you will see the below structure. For reference, we are attaching the screenshot.
4. First, go to the main application file that we have; it will contain one annotation responsible for initializing the spring boot application for us.
A detailed look at this annotation:
- @SpringBootApplication: This annotation contains so many annotations inside it, which we do not require to mention it separately.
- @Configuration: This annotation helps us to configure the beans into the application context.
- @EnableAutoConfiguration: This annotation is helped configure most of the things automatically.
- @ComponentScan: We do not need to mention the base package separately that we have to configure in the spring mvc, so easy to use and handle.
5. Once we have seen the main class, we can now configure the controller; it is also very easy to handle. First, we have to create a simple java class that will contain the endpoints to handle the HTTP request.
Configuration needs to make the controller in the spring boot application.
Example:
Code:
import org.apache.coyote.Response;
import org.springframework.http.HttpStatus;
import org.springframework.http.ResponseEntity;
import org.springframework.web.bind.annotation.*;
import org.springframework.web.multipart.MultipartFile;
import java.io.IOException;
import java.security.Principal;
@RestController
@RequestMapping("/demo")
public class DemoController {
@GetMapping("/gettest/{test}")
public ResponseEntity<String> get(@PathVariable String test) {
return new ResponseEntity<>("I am get method " + test, HttpStatus.OK);
}
@PostMapping("/postMethod")
public ResponseEntity<String> post() {
return new ResponseEntity<>("I am post method " , HttpStatus.OK);
}
@DeleteMapping("/deleteMethod")
public ResponseEntity<String> delete() {
return new ResponseEntity<>("I am deleteMethod method " , HttpStatus.OK);
}
}
Here we would require the @RestController to configure the controller in the spring boot. This will tell spring that if any request comes to the dispatch servlet, then the matching controller will be executed if matched.
6. @Service: Now, we can configure the service for our controller, which will contain the business logic for the application. This class should be annotated with the @Service annotation. This annotation will help us auto-wire the class object, and it will be managed by spring boot.
7. After this, we have to write the repository which is responsible for interacting with the database. For this to configure, we need @Repository annotation; our interface will be annotated with this annotation which will configure and tell spring boot that this class is responsible for handling the dao level and database related operations. This @Repository is the annotation of JPA, which will convert the SQL expectation into user understand format for us.
Example:
Code:
import org.springframework.data.jpa.repository.JpaRepository;
import org.springframework.data.jpa.repository.Modifying;
import org.springframework.data.jpa.repository.Query;
import org.springframework.data.repository.query.Param;
import org.springframework.stereotype.Repository;
@Repository
public interface DemoRepository extends JpaRepository<Demo, String> {
// your logic goes here ..//
}
8. We can mention the database property, port number and other integration-related information to the application file we have spring boot. For this, we can see a file created on the class path when we generate it from the spring initializer.
9. All these things that we have discussed are required to configure to make the application work. So, yes, it is very less than the Spring mvc framework.
Importance of @Configuration Annotation
Below are few points which need to be in mind:
- @Configuration is the spring MVC framework, which can also be used in the spring boot application, but is not required.
- @SpringBootApplication, this annotation internally contains the @Configuration annotation, so we are not required to mention the @Configuration annotation separately in the application.
- This @Configuration is used to configure the class, and it initializes the beans and configures the most of the things for us.
Conclusion
By the above steps, we can easily configure the spring boot application in order to make it work, and we can now easily produce and consume the endpoints from the web. All annotation must be on the mentioned class; otherwise, it will not work and create an error while running.
Recommended Articles
This is a guide to Spring Boot Configuration. Here we discuss the introduction and spring boot configuration in a stepwise manner. You may also have a look at the following articles to learn more –
