Updated June 2, 2023
Definition of Rust XML
XML is very different from JSON; if we look closely, it isn’t easy to handle. XML has a full form, which is an extensible markup language, its main purpose is to transfer data, store data, etc. To create an XML file, we have to follow some standard they define otherwise, it generates an error for us. In XML, we create tags to store a represent our data in the file. In Rust, we have so many different libraries to deal with XML, and there is no in built support for this, to use XML in our program, we have included the dependency in our configuration file to make it work. We will go through each library in detail, as well as how to use XML for beginners and implement it in the Rust programming language in the part that follows.
Syntax:
We know that Rust does not have any inbuilt library for XML, so we have to use an external library to make this work. We can read an XML file, also we can create XML content using this library, let’s take an example of how it looks for a better understanding see below;
1) To read :
let variable_name = EventReader::new(your_XMl_file);As you can see in the above lines of syntax, we are trying to read the XML content from the XML file, for this, we have to use EventReader from the crate library, which needs to be included in our configuration file. Let’s take a practice syntax for beginners to understand it better see below;
e.g. :
let demo = EventReader::new(demo.xml);In the coming section of the tutorial, we will discuss the XML in detail, how it works internally, and what steps we need to follow to configure this in Rust programming language.
How XML works in Rust?
We already know that XML is also used to store, represent and transfer data, just like Json, but XML’s are much more complicated than JSON. Inside XML files, we cannot store every type of data because, at some point, it cannot parse it. We have so many different libraries available to deal with XML in Rust. To further comprehend them, let’s talk about each one in depth below;
1) Crate XML data: This library provides support to handle XML data in rust, by the use of this we can parse our data, cerate XML data, and so on. To parse the XML data using this library, we have one advantage: it provides us with one generic interface, which will help us parse it. Users can define the parsing and serialization of their XML data.
2) Crate simple XML builder: We have one more library which is very easy to use and implement, this is calls as crate simple XML builder. Using this, we can easily create the XML file and add its attribute to it. To create XML tags, we have to use one class called XMLElement from the simple XML builder library. In this section, we will see its syntax and how to use this in rust programming for a better understanding, see below;
Follow below steps to create it:
1) First, we have to include the library inside the program to use it, otherwise, the program will not compile and run.
e.g. :
use std::fs::File;
use simple_xml_builder::XMLElement;
These two imports are necessary; the first one is used to handle the file operations, and the second one is from the simple_xml_builder library, which is responsible for dealingling with the XML in Rust.
2) In second step, we will create one file to store the XML data for us. To handle the file operation, we have read and included the File from Rust itself, so to create it, we have to follow the below lines of code see below;
e.g. :
let mut variable_name = File::create("youfile.xml")?;As you can see in the above lines of code, we are trying to create one file here, inside this, you can pass your file name with the .xml extension.
3) In this step, we can create the XMLElement representing our data in the XML file we have already created. For this, we will use XMLElement from the simple_xml_builder library, keep in mind you have imported this at the correct place to avoid error. Below see the lines of code to create it ;
e.g. :
let mut variabel_name = XMLElement::new("element_name");
practise example : let mut emp = XMLElement::new("employee");
As you can see in the above lines of code, we are trying to create an XML Element named as ’employee’ here. This will hold the data for employee objects. after this, we can add its value by using the attribute property of XMLElement.
4) After the return on of XMLElement, we can now add an attribute for it, XMLElement support various methods which can be used on XMLElement to add their respective values. Below see the lines of code for a better understanding ;
e.g.:
xmlelement.add_attribute("key", "value");
practise line of code :employee.add_attribute("roll", "001");
As you can see in the above lines of code, we are adding values to the employee element here, for this, we are using the add_attribute() method of XMLElement, inside this method, we can pass the value of our attribute in the form of key-value pair. In our case, we have created a roll for the employee element.
5) In this way, we can create several XMLElement and add each attribute. There is no restriction for this.
6) Finally, we will write our XMLElement content to the file we created in the first step of the lines of code. Below see the lines of code to do this;
e.g. :.
xmlelement.write(file_object)?;As you can see in the above lines of code, we are trying to write to the file object here. For this, we have to follow the syntax to write in the fie w will call the write() method, which is available in the XMLElement object, and inside this method, we can pass our file object in which we want to write, but remember this file should be of .xml extension, to avoid errors.
Examples
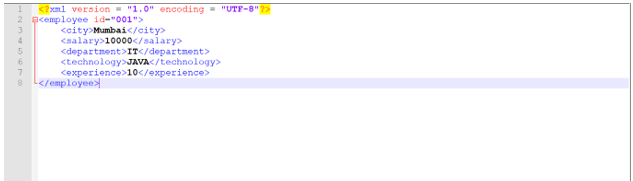
In this example, we create an XML file with some employee data. This example will create the file and write the XML content inside the specified location. I will attach the file and the output snippet for reference. Beginners can learn about its implementation by using this sample example.
Example:
Code:
use std::fs::File;
use simple_xml_builder::XMLElement;
let mut demoXMlFile = File::create("C:\project\article\demo.xml")?; // please mentioned your file path here ..
let mut employee = XMLElement::new("employee");
employee.add_attribute("roll", "001");
let mut city = XMLElement::new("city");
city.add_text("Mumbai");
employee.add_child(city);
let mut age = XMLElement::new("salary");
salary.add_text("10000");
employee.add_child(salary);
let department = XMLElement::new("department");
department.add_text("IT");
employee.add_child(department);
let technology = XMLElement::new("technology");
technology.add_text("JAVA");
employee.add_child(technology);
let experience = XMLElement::new("experience");
experience.add_text("10");
employee.add_child(experience);
employee.write(demoXMlFile)?;
Output:
Conclusion
To use and del with XML in Rust, we have to use an internal library for this, we have so many options available for this. XML is a bit more difficult than JSON, but we can easily handle this in our rust program by using this library. XML is more often used for the transfer and store of data.
Recommended Articles
We hope that this EDUCBA information on “Rust XML” was beneficial to you. You can view EDUCBA’s recommended articles for more information.

