Updated April 7, 2023

Introduction to PyTorch unsqueeze
Pytorch unsqueeze is a method used to change the dimensions of a tensor, such as tensor multiplication. PyTorch unsqueeze work is utilized to create another tensor as yield by adding another element of size one at the ideal position. Normally, unsqueeze has two parameters: input and dimension used to change the dimension of a tensor as per requirement. By using Pytorch unsqueeze, we can insert a new tensor at a specific location; the return result is the same as shared tensors. In other words, we can say that PyTorch unsqueeze() is used to increase the dimensions of tensors.
What is PyTorch unsqueeze?
- The unsqueeze is a technique to change the tensor measurements A, with the end goal that activities, for example, tensor augmentation, can be conceivable. This essentially adjusts the measurement to create a tensor with an alternate dimension; It demonstrates where to add the measurement. The torch.unsqueeze adds a different measurement to the tensor. The following about unsqueezed tensors have similar data; however, the files used to get to them are different; for the model, if you need to duplicate your tensor of size(5), with a tensor that has the size (5, N, N) then, at that point, you’ll get a mistake. In any case, utilizing the unsqueeze technique, you can change the tensor over to measure (5, 1, 1). Presently since this has an operand of size 1, you’ll have the option to increase both the tensors.
- On the off chance that you check out the state of the exhibit prior and then afterward, you see that before it was (5,) and after it is (1, 5) (when the second boundary is 0) and (5, 1) (when the second boundary is 1). So a 1 was embedded looking like the exhibit at pivot 0 or 1, contingent upon the worth of the subsequent boundary. However, in the event that you check out the state of the exhibit prior and then afterward, you see that before it was (5,) and after it is (1, 5) (when the second boundary is 0) and (5, 1) (when the second boundary is 1). So a 1 was embedded looking like the cluster at pivot 0 or 1, contingent upon the worth of the subsequent boundary.
- In the event that you check out the state of the cluster prior and then afterward, you see that before it was (5,) and after it is (1, 5) (when the second boundary is 0) and (5, 1) (when the second boundary is 1). So a 1 was embedded looking like the cluster at pivot 0 or 1, contingent upon the worth of the subsequent boundary.
PyTorch unsqueeze
Given below is the PyTorch unsqueeze:
- PyTorch’s unsqueeze work produces another tensor yield by adding another component of size one at the ideal position. The following code scraps show us how the PyTorch to unsqueeze work is utilized to add another singleton measurement of size 1 along measurement = 0 (for example, pivot = 0) in the first tensor.
- The subsequent yield tensor gets the new state of 1×5; the crushing work in PyTorch is utilized for controlling a tensor by dropping every one of its elements of data sources having size 1, now; in the underneath code piece, we are utilizing the press capacity of PyTorch. As it tends to be seen, the tensor whose data sources are having the element of size 1 is dropped.
Difference Between view() and unsqueeze()
Given below is the difference between the view() and unsqueeze() function:
| view() | unsqueeze() |
| Basically, view() is used to create different views with different dimensions. | In the unsqueeze() function, we can insert the specific dimension at a specific location. |
| The view() can only use a single argument. | In unsqueeze, we can use more than one argument during the operation. |
| It allows us to view the existing tensor as per requirement. | The unsqueeze allows us to add the dimension into the existing tensor. |
| The view() is used to avoid the explicit data of copy. | In unsqueeze, also avoid the use of explicit data. |
| By using view(), we can process the fast operation and efficient reshaping. | As compared to the view() function, it processes less operation. |
Examples of PyTorch unsqueeze
Different examples are mentioned below:
Code:
import torch
tensor_data = torch.tensor([
[[0, 2, 3],
[7, 5, 6],
[1, 4, 3], [1,8,5]]
])
print("Tensor Existing shape:", tensor_data.shape)
unsqueeze_data_info = tensor_data.unsqueeze(1)
print("Unsqueeze data of tensor:", unsqueeze_data_info)
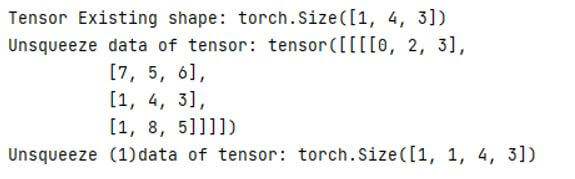
print("Unsqueeze (1)data of tensor:", unsqueeze_data_info.shape)Explanation:
- In the above example, we try to implement the PyTorch unsqueeze as shown here first; we need to import the torch. After that, we define the tensor data in an array.
- In this example, we set the unsqueeze function value at 1, as shown. Then, finally, we print the result. The final output of the above program we illustrate by using the following screenshot as follows.
Output:
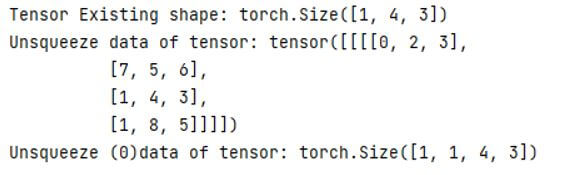
Let’s see what happens when we unsqueeze at 0 as follows. Here we use the same code; we just need to write the 0 instead of 1 remaining code is the same as follows.
Code:
unsqueeze_data_info = tensor_data.unsqueeze(0)Explanation:
- The final output of the above program we illustrate by using the following screenshot as follows.
Output:
Now let’s see another simple example of unsqueeze as follows.
Code:
import torch
A = torch.randn(17)
A = torch.unsqueeze(A, dim=1)
print(A.shape)
Explanation:
- In the above example, first, we import the torch; after that, we define the size of the tensor at 17 as shown; after that, we set the unsqueeze dimension at 1.
- The final output of the above program we illustrate by using the following screenshot as follows.
Output:
![]()
Now let’s see what happens when we unsqueeze at -1 as follows.
Code:
import torch
A = torch.randn(5,6,8)
A = torch.unsqueeze(A, dim=-1)
print(A.shape)
Explanation:
- In this example, we set unsqueeze at -1 instead of 1 as shown; here, we also set the different random tensor values.
- The final output of the above program we illustrate by using the following screenshot as follows.
Output:
![]()
Conclusion
From the above article, we have taken in the essential idea of the Pytorch unsqueeze, and we also see the representation and example of Pytorch unsqueeze. From this article, we have seen how and when we use the Pytorch unsqueeze.
Recommended Articles
We hope that this EDUCBA information on “PyTorch unsqueeze” was beneficial to you. You can view EDUCBA’s recommended articles for more information.
