Updated April 7, 2023

Introduction to PyTorch Normalize
PyTorch normalize is one of the functions that PyTorch provides; in the deep learning framework, sometimes we need to normalize the images as per requirement; at that time, we can use PyTorch normalize to normalize our images with the help of torchvision. Torchvision is a utility used to transform images, or in other words, we can say that preprocessing transformation of images. The normalization of the function that is used to subtract the channel value means it divides the channels into the n number of standard deviation forms as per the requirement.
What is PyTorch Normalize?
- At the point when you read a picture into memory, the pixels, for the most part, have 8-cycle numbers somewhere in the range of 0 and 255 for every one of the three channels.
- Be that as it may, relapse models (counting neural organizations) lean toward drifting point esteems inside a more modest reach.
- Frequently, you need esteems to have a mean of 0 and a standard deviation of 1 like the standard ordinary circulation. Working with this transformation, we call it normalizing your images.
How to Normalize PyTorch?
Given below shows how to normalize the images in Pytorch:
- We know that image transformation means a change in the original pixel that means we can set the new pixel as per our requirement. One kind of change that we do on images is to change a picture into a PyTorch tensor. At the point when a picture is changed into a PyTorch tensor, the pixel values are scaled somewhere in the range of 0.0 and 1.0. In PyTorch, this change should be possible utilizing torchvision.transforms.ToTensor().
- The normalization of images is an excellent practice when we work with profound neural organizations. Normalization of images generates the separate value of mean and std. To do this, first, the channel means is deducted from each info channel, and afterward, the outcome is separated by the channel standard deviation. With the help of normalization, we adjust the data or an image as per our requirement as well as it also helps us to process the fast data. The main advantage of normalization is that it is capable of handling the gradients problem.
Syntax:
torchvison.transforms.Normalize()Explanation:
In the above syntax, we use normalize () function with different parameters as follows:
- Specified mean: It is used to identify the sequence of each and every channel.
- Specified STD: It is also used to identify the sequence of standard deviation for each and every channel.
- Output: It is used to return the normalized image.
PyTorch Normalize Functional
Given below shows what is normalizing function:
Code:
torch.nn.functional.normalize(specified input, value_p = value,
specified_dimension=value, s_value=, result=None)
Explanation:
By using the above syntax, we can perform the normalization over the specified dimension as per our requirement. In the above syntax, we use normalize () function with different parameters as follows:
- specified input: It is used for a tensor, which means we can define any tensor shape.
- value_p: It is used to define the exponent value of norm formations, and 2 is the by default value.
- specified_dimension: An integer value reduces the dimension, and 1 is the by default value.
- s_value: s_value means the small value that is used to avoid the divide by zero problems.
- result: This is an optional part of this syntax, and it is used to store the output of the tensor.
Image Normalization in PyTorch
Given below shows how we can normalize the image in Pytorch:
We need to follow the different steps to normalize the images in Pytorch as follows:
- In the first step, we need to load and visualize the images and plot the graph as per requirement.
- In the second step, we need to transform the image to tensor by using torchvision.
- Now calculate the mean and standard deviation values.
- In the next step, normalize the image again by using torchvision. Transforms.Normalize () function.
- Again visualize the image.
- After visualization of the image, we need to calculate the mean and standard deviation values for verification purposes.
Examples of PyTorch Normalize
Different examples are mentioned below:
In this example, we use the following image as follows.

Code:
from PIL import Image
import matplotlib.pyplot as plte
import numpy as np
i_path = 'specified path of images’
imges = Image.open(i_path)
img_arr = np.array(imges)
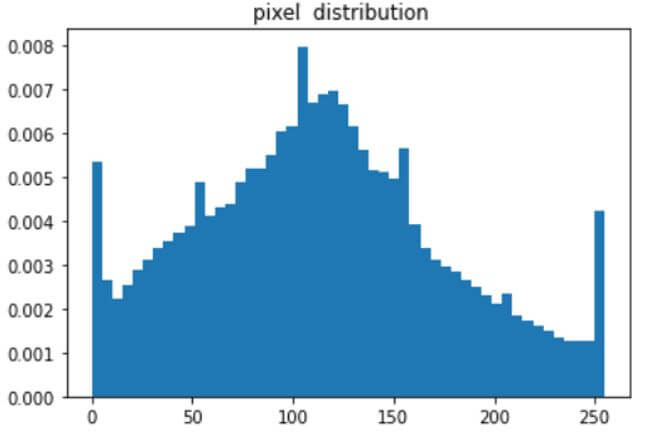
plte.hist(img_arr.ravel(), bins=60, density=True)
plte.xlabel("Values of Pixel")
plte.ylabel("Frequency for relative")
plte.title("pixel distribution")Explanation:
- In the above example, we try to implement image normalization. Here first, we need to impart the different types of libraries that we require, as shown. After that, we write the code to load the images with the specified path of that image.
- In the next line, we write the code for image conversion, that is, PIL image to NumPy array, and finally, we plot the graph with pixel values. The final output of the above program we illustrated by using the following screenshot as follows.
Output:
Now we need to calculate the mean and standard deviation of the image by using the following function as follows.
Code:
torchvision.transforms.Normalize()Explanation:
- To normalize images, here we utilize the above determining mean and standard deviation of images. We can likewise utilize the mean and standard deviation of images of the ImageNet dataset if the picture is like an ImageNet image. The mean and standard deviation of ImageNet then, at that point, show the mean and standard deviation esteems.
- On the off chance that the picture isn’t like ImageNet, similar to clinical images, it is constantly encouraged to work out the mean, and standard deviation of images of the dataset and use them to standardize the images. Then, we need to visualize the image and again calculate the mean and std value.
Conclusion
From the above article, we have taken in the essential idea of the PyTorch normalize, and we also saw the representation and example of PyTorch normalize. From this article, we saw how and when we normalize PyTorch.
Recommended Articles
We hope that this EDUCBA information on “PyTorch Normalize” was beneficial to you. You can view EDUCBA’s recommended articles for more information.
