Updated August 28, 2023
Introduction to Puppet Tool in After Effects
Are you tired of flat and lifeless animations? Do you want to add a touch of magic to your motion graphics? Look no further than the Puppet Tool in After Effects! This incredible feature transforms static images into dynamic masterpieces, making your characters and elements come alive. Whether you’re a seasoned animator or a curious beginner, the Puppet Tool is here to take your animation game to new heights!
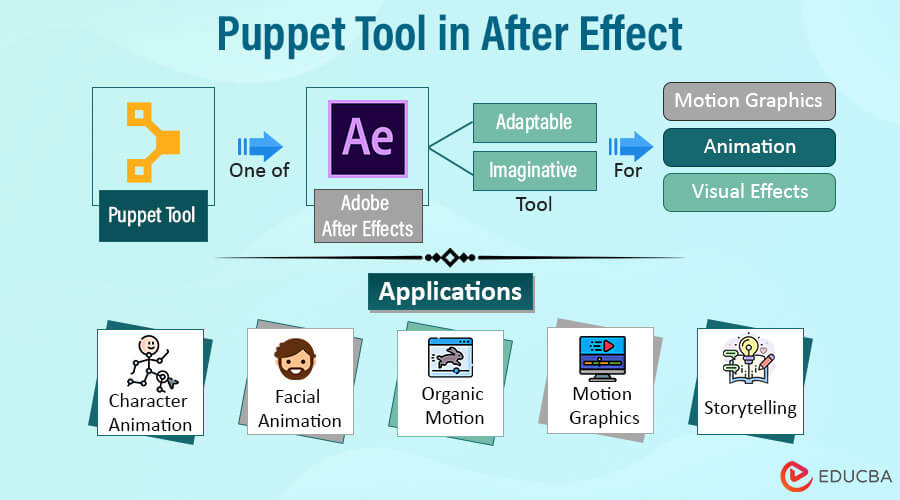
Table of Content
- Introduction to Puppet Tool in After Effects
- What is Puppet Tool?
- How does Puppet Tool work in After Effects?
- Understanding Puppet Tool’s Mechanics
- Types of Puppet Tools
- How to Use Puppet Tool in After Effects?
- How to Scale up the Picture of a Bird?
- Purpose and Functionality of Puppet Tool in After Effects
- Applications
- Tips and Tricks
- Avoiding Common Issues
What is Puppet Tool?
The puppet tool is one of Adobe After Effects’ most adaptable and imaginative tools, a well-liked program for motion graphics, animation, and visual effects. Without complicated 3D animation techniques, users can bring natural and dramatic movement to flat, 2D items like photos, graphics, characters, and objects. The Puppet Tool allows you to shape and edit motionless images to simulate natural motion, giving them life.
Key Takeaways
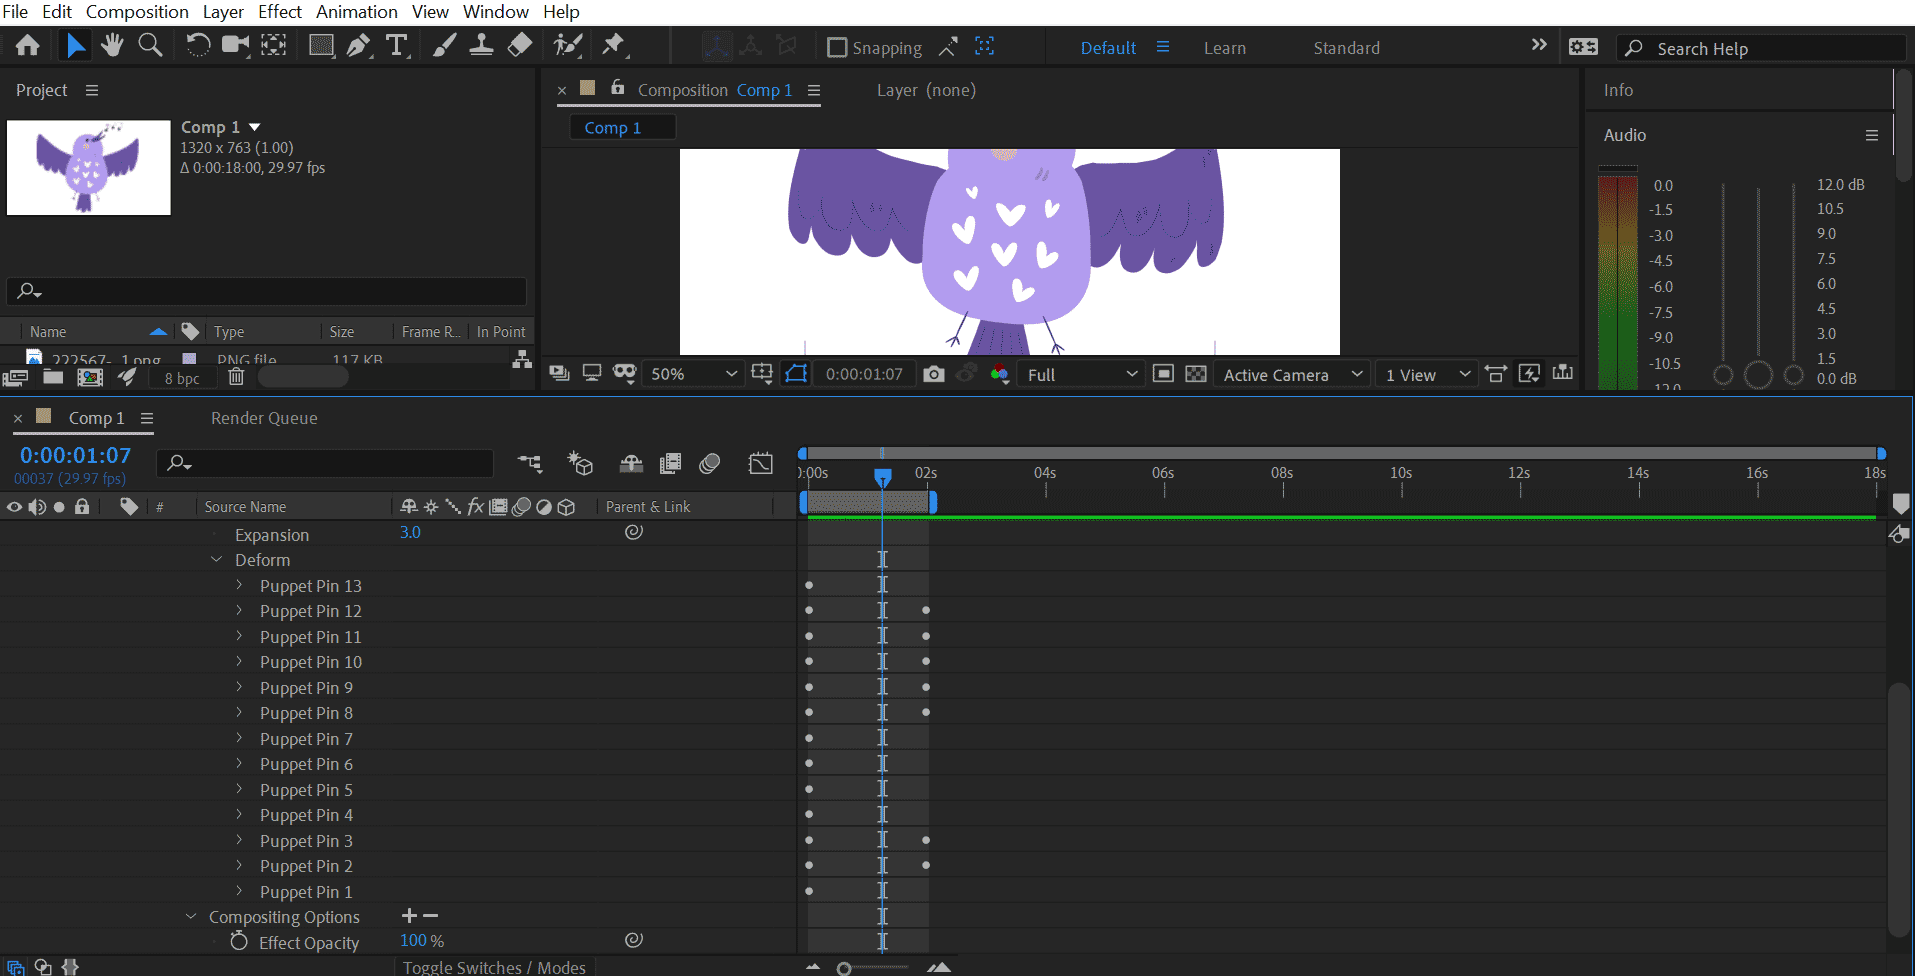
- With the help of the puppet tool, you may animate and deform a layer by modifying the control points created over it. It can be used for character animation, object deformation, and other purposes because it allows for organic and fluid animations.
- The Puppet Tool’s control points are called Puppet Pins. The parts of the layer you want to animate or deform can have them added to them. You can make animations and transformations by moving these pins over time and using keyframes.
- The “Expansion” and “Expansion Options” settings in the puppet tool let you modify the mesh’s size and behavior. These choices allow you to modify the mesh’s density and how it grows and shrinks during the animation.
How Does Puppet Tool Work in After Effects?
You may animate and deform layers using a mesh with the help of Adobe After Effects Puppet tool. Organic and fluid animations, such as character movement or object deformation, are frequently produced using this technique.
The Puppet tool’s work is described in detail below:
- Import and Prepare Layers:
-
- To animate your desired video or image, import it into After Effects.
- Create a new composition and drag your layer onto the timeline.
- Ensure that your layer has a clear alpha channel (transparent background) if you plan to animate characters or objects that need to move independently.
- Enable Puppet Pins:
- Select the layer you wish to animate and navigate to “Animation”> “Add”> “Puppet”> “Mesh.”
- After Effects will create a mesh over your layer with several puppet pin-style control points.
- Add Puppet Pins:
- In the Puppet effect controls panel, click the “Add” button to add Puppet Pins to the areas you want to animate or deform.
- Place the pins strategically to define the points where the animation will occur. For example, you can place pins on a character’s joints to simulate bending actions.
- Animate Puppet Pins:
- Once you’ve placed the pins in the desired locations, you can animate them over time.
- Set keyframes for the Puppet Pin positions at the frame where you want the animation to start.
- Move forward in time on the timeline and adjust the Puppet Pin positions to create the animation effect.
- Use the Puppet Starch Tool (Optional):
- Try using the Puppet Starch Tool to stabilize and reduce distortion in certain parts of a layer.
- Click on the regions you wish to “starch” to keep them relatively still during the animation.
- Advanced Puppet Pin Options:
- You can fine-tune the Puppet Tool’s behavior in the effect controls panel using additional parameters.
- For example, “Puppet Overlap” can help prevent unsightly gaps between pins, and “Expansion Options” can regulate how the mesh stretches or shrinks during the animation.
- Pre-compose if Necessary:
- Consider pre-composing the layer with the Puppet animation to keep your project organized, especially when adding more effects or animations to the composition.
- Render the Animation:
- Once satisfied with your Puppet animation, you can render the composition to produce the final output.
Understanding Puppet Tool’s Mechanics
- Placing and Moving Pins: The Puppet Tool works based on the placement and movement of puppet pins. These pins act as control points that define areas for animation and deformation. By manipulating the pins, you can bend, stretch, and rotate the surrounding parts of the image, bringing it to life.
- Pins Controlling the Image: The puppet pins are the key to controlling various aspects of the image. They determine which areas of the picture will move and which will remain solid during the animation. Moreover, in areas where components overlap, the pins assist in determining the sequence for rendering various sections of an image.
- Triangular Mesh Outline: When you apply the Puppet Tool to an image, it automatically generates a triangular mesh outline based on the initial placement of the puppet pins. This mesh serves as a guide for deformation and movement. The outline becomes visible after the Puppet Tool is applied, and the Puppet Tool pointer will be on the part where the outline lies.
- Mesh Connection to Pixels: The triangular mesh is connected to the pixels of the image. As you select the puppet pointer and move the pins, the pixels within the mesh area move accordingly, creating the illusion of animation.
Types of Puppet Tools
Below are the different types:
1. Puppet Pin Tool
Using the Puppet Pin tool, you can position the pins on the image to choose where the joints will be created. While trying to animate a character with hands and legs, it’s recommended to place the pins on areas such as elbows, knees, or any other body parts prone to motion; you can control this Prince and even record your animations using the timeline window.
2. Puppet Overlap Tool
While working with complex characters, you might encounter elements that can come in the way of the parts you are animating. With the Puppet Overlap tool, paint detailed information on your character and instruct Illustrator about the rendering order of the parts.
How to Use Puppet Tool in After Effects?
We will discuss how to use the Puppet tools in After Effects. Also, add animation effects to an image and enhance the design using the puppet tool after effect.
Based on the placing and movement of the pins, the Puppet tool changes the structure of the image. These pins control the aspects of the images and decide what area of the picture moves and what remains solid, and decide on the parts of the image in case of overlapping components. While creating the initial pin’s region within an outline is generated as a triangular mesh. The outline will be visible once the puppet tool has been applied. The Puppet tool pointer will be on the part the outline lies. The mesh will be connected to the pixels of the image. Therefore, the pixels move while you select the puppet pointer.
How to Scale up the Picture of a Bird?
The Puppet tool is effective when you want to add subtle animation effects to your image assets. Below is an example of how the image of a bird is animated to scale up.
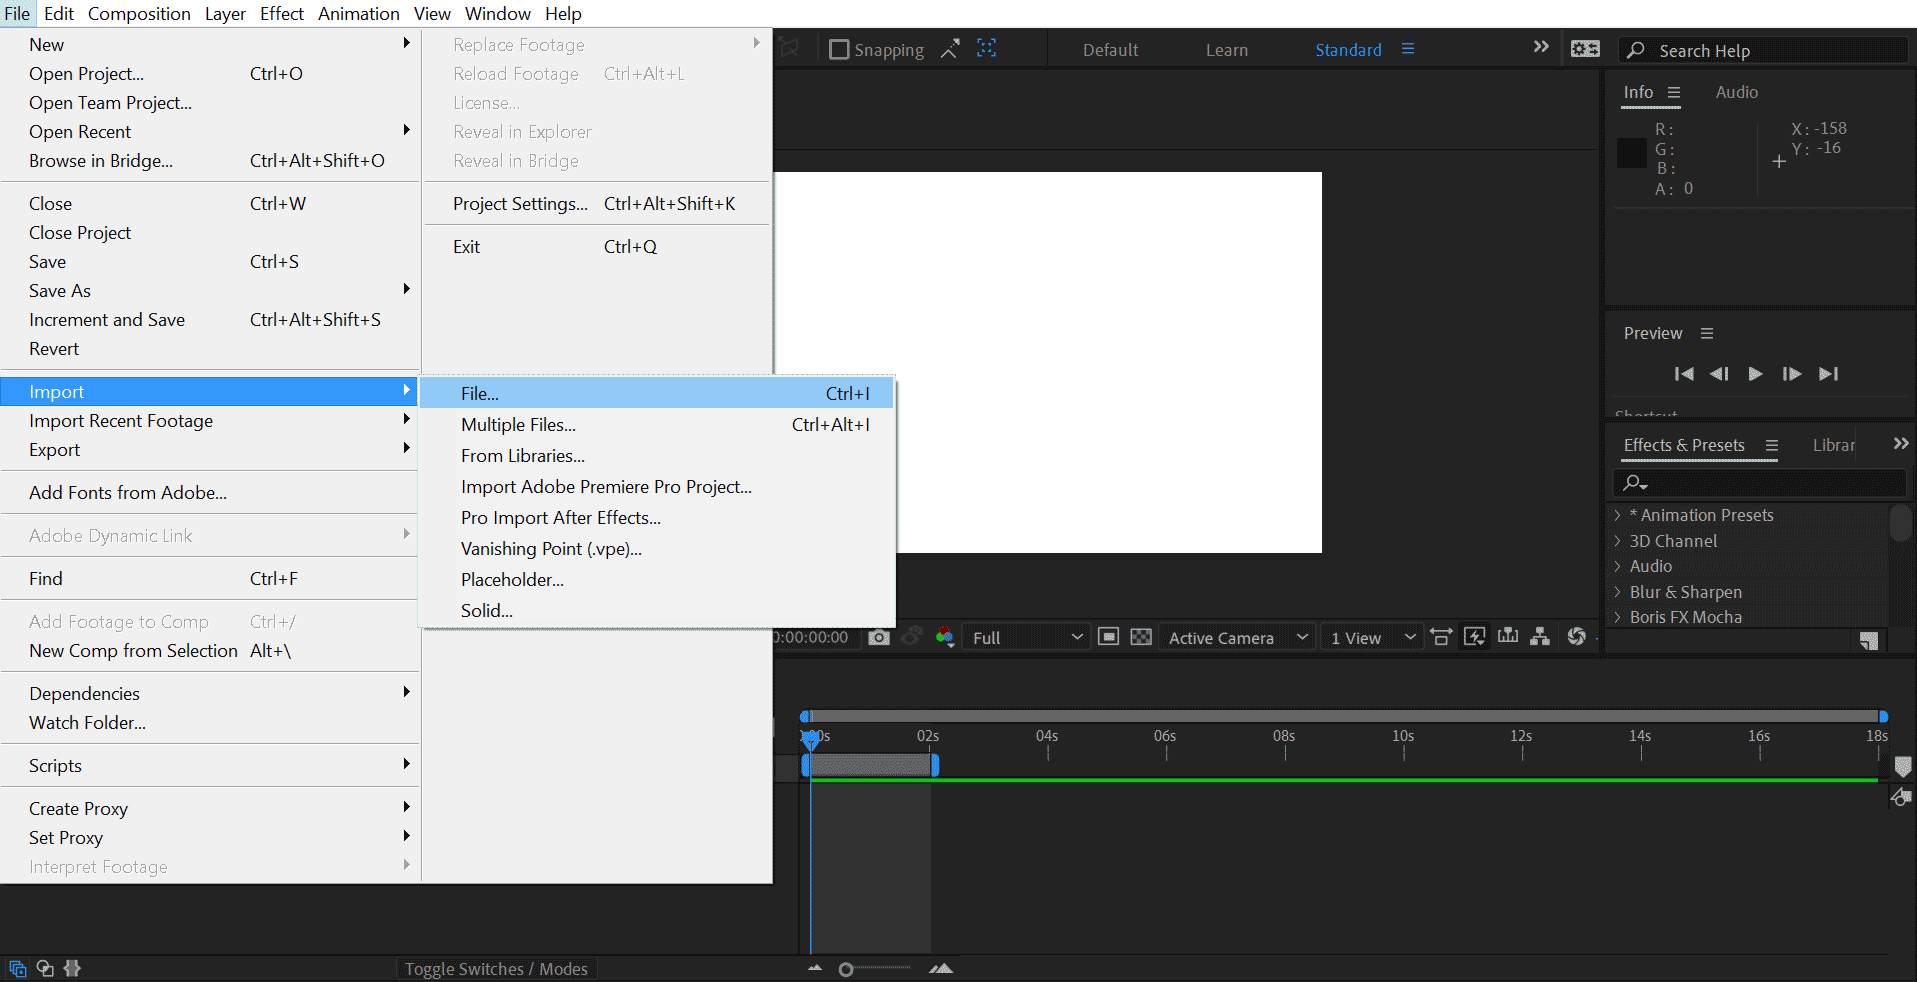
Step 1: Choose an image for adding a puppet tool in After Effects. For that, open After Effects and go to File > Import> Choose the folder containing the image you want to work on.
Step 2: The image will be visible in the source panel. Next, drag the image down in the After Effects timeline section.

Right now, the bird feels very static and lifeless. Using the Puppet tool, I will apply some motions to the image.
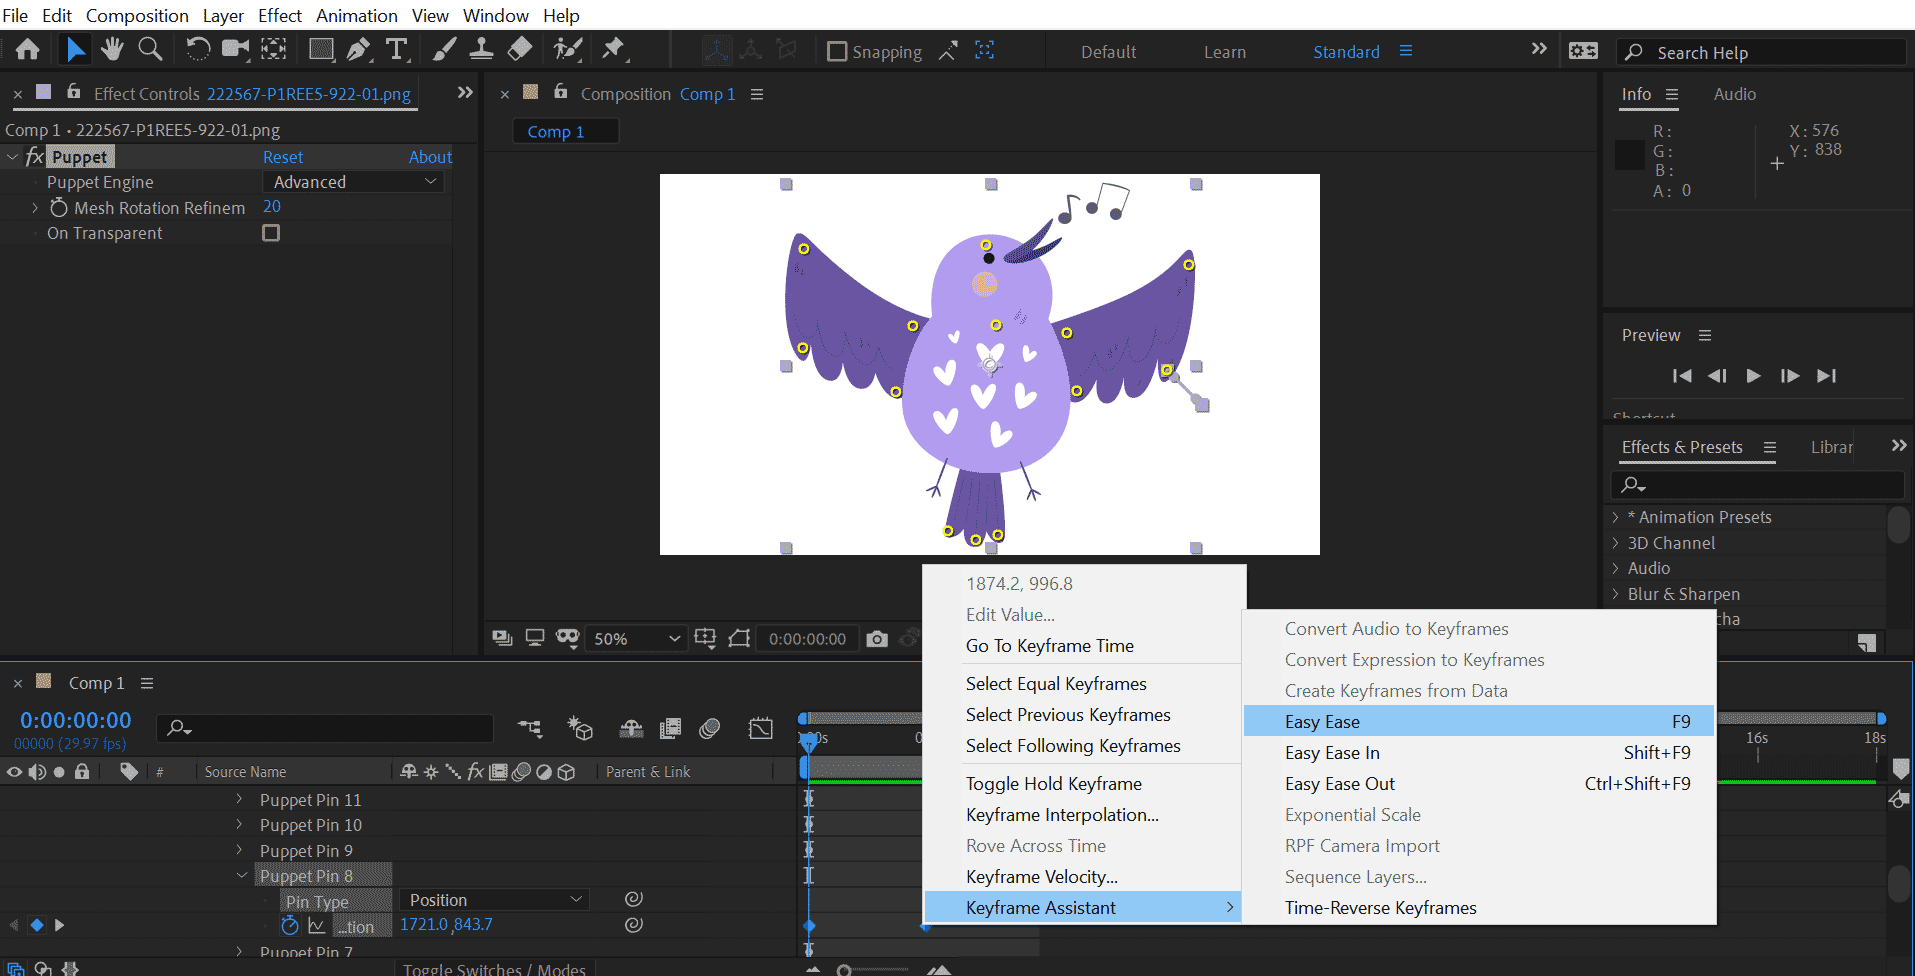
Step 3: Select the Puppet tool from the pushpin icon in the menu options. The first part comes where we have to add pins in the right place of the image. We can move and wrap the image using the pins applied. You must remember that a new pin is generated each time you click on the image, which can be used to add soft links. These soft joints are all links that can keep a part of an image from moving.
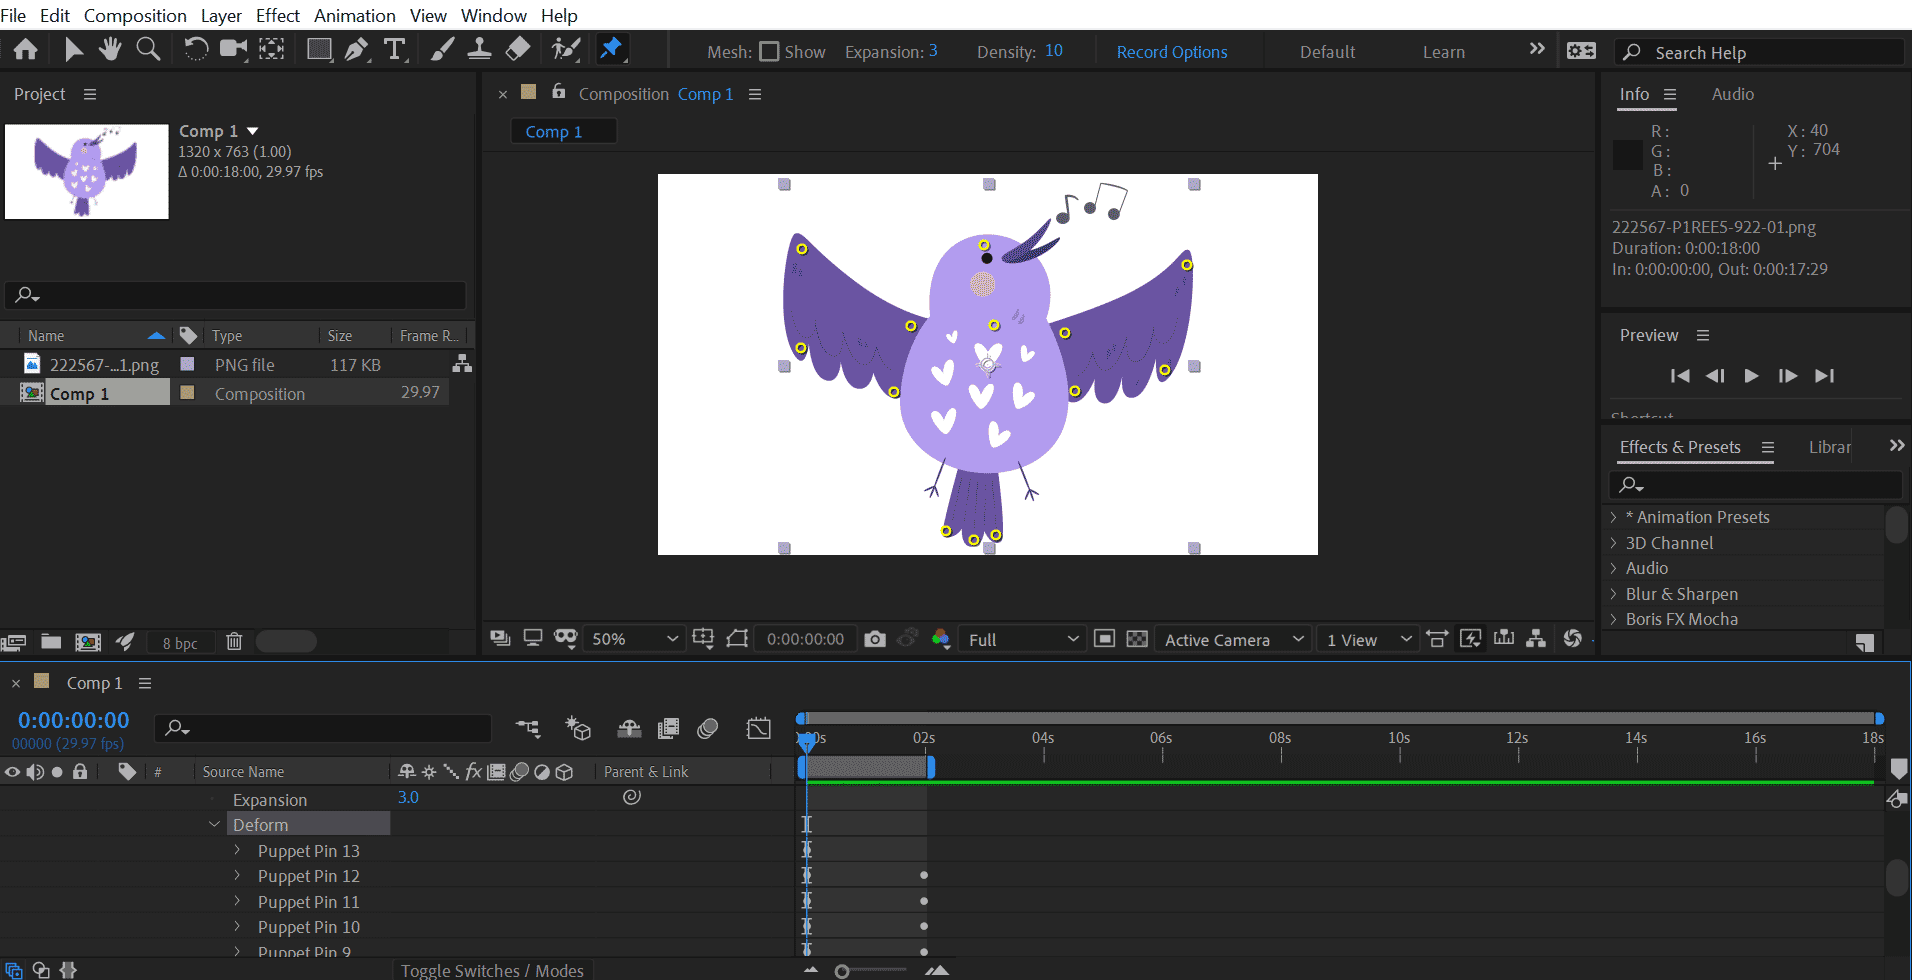
Step 4: Be careful while adding the pins in the key areas, such as the beginning of the image, the middle section, and all the important parts you will need to animate or move. After Effects, automatically add the keyframe on the newly added pins wherever the play head is then.
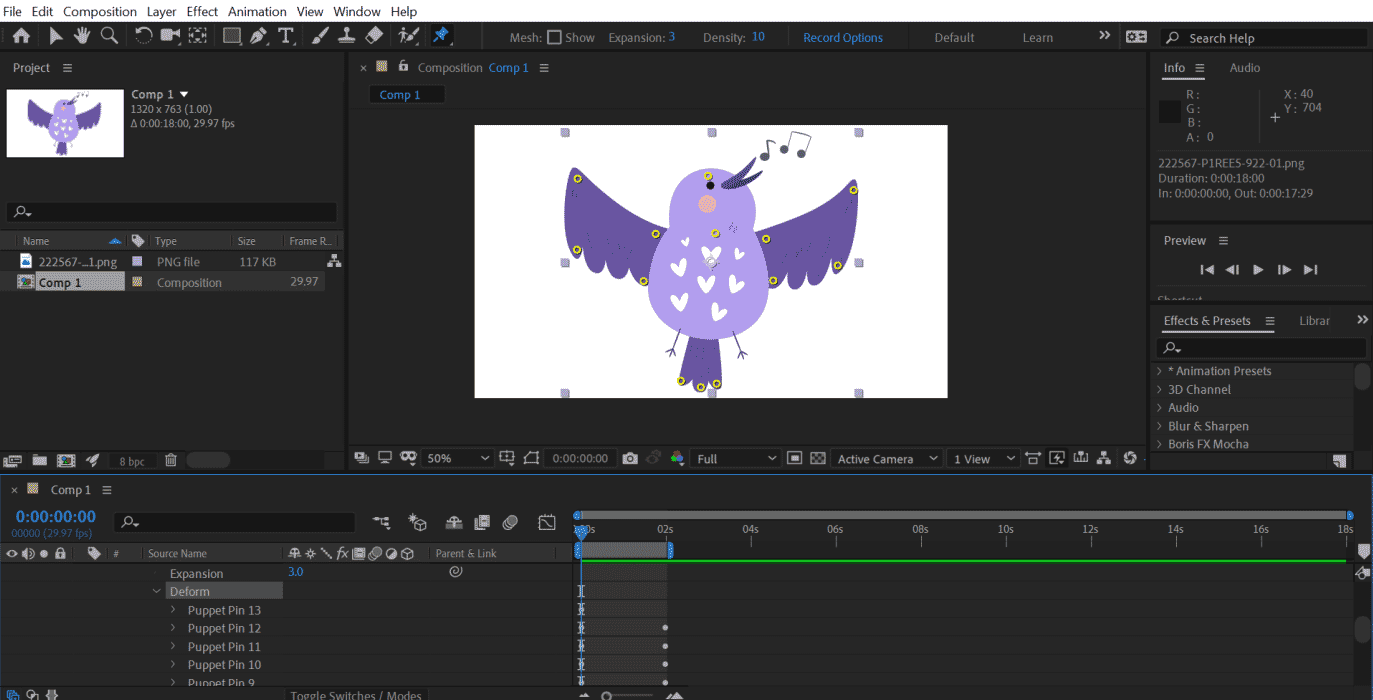
Step 5: I place the pins in the tips, joints in the middle, parts of the feather, the neck and head areas, and finally, the tail area. After that, in the next frame, I will change the keyframe properties to have a slight animation effect with the bird trying to spread its wings. For that, I will change the pins associated with the feather region and pull and stretch to obtain the desired results.
Step 6: After making these changes on previewing, it seems it works fine. However, the problem arises as the animation looks weird. You can fix this issue by easing out the frames. You must select all the deforming keyframes, right-click, and choose Easy Ease.
Step 7: You can use the curve editor to smoothen the motion better. Use the shortcut key Shift + F3 to open the graph editor. Set the influence of the entire frame to about 50%. The output looks much better with a nice and smooth movement. This demonstrates the effect of the Puppet tool in creating slight and subtle animations like women, which completely transformed the image. You can apply this effect anywhere you feel to add a bit of motion and make the graphics more interesting.

Purpose and Functionality of Puppet Tool in After Effects
After Effects Puppet Tool is potent for transforming and modifying pictures or layers to produce organic and dynamic animations. Its main goal is to enable motion graphics designers and animators to give realistic movement to flat, static items, including characters, objects, or backdrops, without using intricate 3D animation.
Functionality:
- Pin-based Deformation: Using the Puppet Tool, you may add pins to a layer to specify particular image areas that can be altered. These pins can be moved to produce a variety of deformations, bends, and warps that give the appearance of movement and flexibility.
- Mesh Creation: Applying the Puppet Tool to a layer causes a mesh to be created around the pins. Thanks to this mesh, you can more easily and precisely manage the deformation throughout the entire layer, allowing for more fluid animation.
- Organic Movement: Smooth, organic movement can be achieved in animations with the puppet tool. This is especially helpful for giving people, monsters, and other components that call for a natural appearance and lifelike motion.
- Keyframe Animation: The puppet tool easily integrates with keyframe animation, enabling you to set and change the pin placements over time. As a result, you may produce intricate animations and change objects or static photos into dynamic, moving components.
- Puppet Starch and Overlap Tools: These two tools are available within the Puppet Tool. You can prevent unintended deformations by controlling the stiffness of particular sections with the Starch tool. An animation is made more fluid using the Overlap tool to control intersections between overlapping layers.
- Versatility: The Puppet Tool has many applications, including character animations, motion graphics, special effects, and abstract art. It provides a unique and adaptable method for animating images and layers.
- Non-Destructive Editing: The Puppet Tool works without causing any harm to the original layer or image. The source layer is unaffected because the deformations and animations are applied as effects.
Applications
You may deform and morph flat 2D objects or characters as if they were formed of flexible materials like rubber or fabric using the Puppet Tool in After Effects, a potent capability. Its uses are numerous and can improve numerous project kinds.
Here are some key applications of the Puppet Tool in After Effects:
- Character Animation: The Puppet Tool is frequently employed when dealing with 2D images or cut-out characters. Puppet Pins may be attached to various body parts, which can then be animated to produce motions like walking, running, waving, and dancing.
- Organic Motion: The Puppet Tool is excellent for making animated scenes that move naturally and fluidly. It can give objects or elements that need more dynamic, lifelike movements, such as flowing water, swaying trees, or a waving flag.
- Facial Animation: The puppet tool can animate facial emotions while working with character animations. You may create a variety of facial expressions, including grins, frowns, and blinks, by strategically placing Puppet Pins on the face.
- Motion Graphics: The Puppet Tool can provide motion graphics pieces with slick, alluring movements. For instance, you can creatively bend, twist, or deform text with animation.
- Logo Animations: The Puppet Tool may animate logos or icons, giving brand identities a lively and interesting touch.
- Interactive Animations: The Puppet Tool can incorporate amusing features that interact with user inputs into interactive presentations or web content.
- Storytelling: The Puppet Tool makes Visual storytelling easier, which lets you animate objects and characters to give stories life.
Tips and Tricks
Here are some tips and tricks for using the Puppet tool in After Effects:
- Use pre-compositions: Think about pre-composing a layer before using the Puppet tool. This can keep your project organized and make managing intricate puppet animations simpler.
- Reduce the Number of Puppet Pins: Too many puppet pins might make it harder to control the animation and cause deformed shapes. Use the fewest possible pins to produce the desired result.
- Create a Control Null: You can create a null object and parent your puppet’s pins to manage your puppet’s overall movement. Instead of manipulating individual pins, you may instead animate the null object.
- Adjust the Mesh Density: Changing the distance between the mesh points will allow you to alter the density of the puppet mesh. More complex deformations are possible with denser meshes, although complexity may also rise.
- Animate with Keyframes: Use keyframe animation to change the positions of the puppet pins over time. Thanks to this, you can precisely control your puppet’s behavior and movement.
- Use the Overlap Tool: When animating many layers with puppet pins, the Puppet Overlap tool helps generate a sense of depth. It promotes correct layering and aids in avoiding crossings.
- Animate on Separate Layers: When working with intricate puppets, consider layering the character and animating each separately. With this strategy, you may have more flexibility and control over the animation process.
Avoiding Common Issues
Here are some common issues to avoid while using the Puppet tool in After Effects:
- Plan Your Mesh Carefully: Examine the image or video you wish to manipulate before using the Puppet Tool. Create a mesh that only includes the components that require manipulation after determining which ones. The animation process will be smoother and more accurate with a well-planned mesh.
- Use the Minimum Number of Pins: Use the fewest possible pins because too many can complicate animation and make it challenging to control. Start with the fewest possible pins to produce the appropriate deformation, and add more only as necessary.
- Strategically Place Pins: Place the pins where you want the animation to come from. Unnatural deformations may result from placing pins too close or too far apart.
- Avoid Crossing Mesh Lines: Crossing mesh lines should be avoided; use care when positioning pins to prevent this from happening. The animation may suffer from unintended distortions and artifacts as a result.
- Use Starch and Expansion Sparingly: The Puppet Tool’s Starch and Expansion attributes allow you to adjust the rigidity and size of particular mesh elements. However, overusing these parameters can result in abnormal deformations or over smoothing. Use them lightly and sparingly.
- Pre-compose Complex Animations: Complex animations should be pre-composed: If your puppet tool animation grows too complicated, you might want to pre-compose the layer with the puppet effect. This can help manage and prevent any performance problems.
Frequently Asked Questions(FAQs)
Q1. Can we use the Puppet Tool in conjunction with other animation techniques?
Answer: Yes, we can use After Effects’ puppet tool with other animation methods.
Q2. How do I avoid unwanted distortions with the Puppet Tool?
Answer: To prevent undesirable distortions, strategically put pins in regions that won’t substantially impact the image’s appearance. Modify the Advanced Puppet Pin settings to customize the deformations’ impact and smoothness further.
Q3. Does the Puppet Tool work with all types of layers in After Effects?
Answer: The Puppet Tool performs best on rasterized layers like pre-composed layers and images. You can also use the Puppet Tool with text and shape layers, but they might require conversion to a compatible format before use.
Conclusion
The Puppet Tool in After Effects is a treasure trove of animation magic waiting to be unlocked! Whether you’re a professional animator or a curious beginner, this feature opens the door to a world of creativity and expression. From organic character movements to enchanting special effects, the Puppet Tool offers a seamless way to bring your imagination to life.
So, don’t be afraid to experiment, push your creative boundaries, and let the Puppet Tool work its magic. Unleash your imagination, and soon you’ll be wowing your audience with spellbinding animations!!
Recommended Articles
We hope that this EDUCBA information on “Puppet Tool in After Effects” was beneficial to you. You can view EDUCBA’s recommended articles for more information.
