Updated May 25, 2023
Introduction to Postgres Connect to Database
While operating any database, the first and the most step after installation of pre-requisites is to connect to the database. While connecting to the database, we can use various GUIs or interfaces. In the case of the PostgreSQL database, the most used method to interact with is through the command line using psql. In addition, you can use an IDE called pgAdmin for the same purpose. While using databases in any application, we need to use APIs to connect to the database. In this article, we will see how to connect to the Postgres database using psql and then to a Java application using JDBC APIs.
Connecting to Postgres using psql –
- The first step is to open the terminal and login to Postgres using a command prompt with a user using the following command –
sudo su – postgresHere, I am logging in as Postgres using sudo. After that, enter the password of the superuser.
- The next step is to connect to a psql prompt that has the following syntax –
psql databaseName nameOfUserwhere databaseName is the name of the database you wish to connect to, and nameOfUser is the user using which you want to connect to the database.
For example, if you want to connect to the database named Postgres and have the username as Postgres, then the connecting statement becomes –
psql postgres postgresthat gives the output as follows –
sudo su – postgres
psql postgres postgres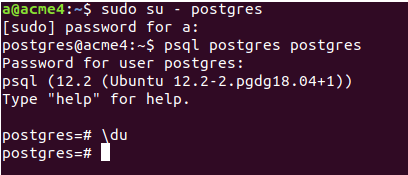
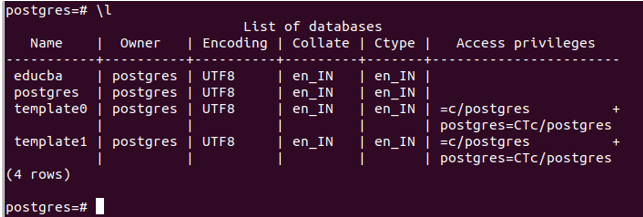
When you finally connect to a particular database, you will see the name of the database on the shell of the terminal. When you see postgres=# in the above case, it indicates that you have successfully connected to the Postgres database. Now, you can fire any psql command you wish to \du is the command to list out the user. You can exit from the output screen using \q, and if you want to check all the available databases, then type \l command, which results in all databases present in our database server as follows –
Now to switch to the educba database and connect to the same, we can type the command
\c educba
or
\connect educba
that gives the output –

Now, the shell switches from postgres=# to educba=#, indicating a direct connection to the educba database.
JDBC Connectivity-
While creating a database-based application and using any of the databases in your Java application, you must follow specific steps to use the JDBC (Java Database Connectivity), an API, i.e., Application Programming Interface, that helps us communicate between our Java application and our database. The database can be any database like MySQL, PostgreSQL, etc. In this article, we will learn how to connect our Java application with our PostgreSQL database with the help of the JDBC driver. Note that JDBC drivers and URLs are different for different relational databases.
Pre-requisites
While creating a database-based Java application, it is required to have a few things installed in your system, which are as follows –
- Java JDK toolkit
You can check the available version of Java in your system by typing the command java -version in your command prompt or terminal. This command will provide you with the output specifying the version of Java installed on your system, similar to the result.
java -version
If not present, you should first install JJava. Mine is Java version “1.8.0_201”.
- PostgreSQL and psql should be installed on your machine can be checked by typing the command psql -V, which should give the output as follows –
psql -V![]()
If not available, install it before proceeding with JDBC driver installation. Mine is psql (PostgreSQL) 12.2 (Ubuntu 12.2-2.pgdg18.04+1).
- The last thing is the JDBC driver for the PostgreSQL jar file, which can be downloaded from the link https://jdbc.postgresql.org/download.html. We will use it further while establishing the JDBC connection.
Steps for JDBC initialization
- We first need to import JDBC using the import statement –
import java.sql.*;You should be careful here; you should not import the org. Postgresql package in your application as doing so will confuse the Javac for compiling the source file.
- The second step is where you will need to load your JDBC driver. You can do this in two ways. One by using the Class.forName() method and the other by passing your driver as a parameter to the JVM while initializing. The second step is preferable because if your application needs to change its database server in the future, it can be done without changing the connection-related code quickly.
In the first method, we will use the Class.forName() method in the following way –
Class.forName("org.postgresql.Driver");where org. Postgresql. The driver determines how to use your PostgreSQL JDBC driver. If you cannot find the driver, this method throws a ClassNotFoundException. JDBC applications commonly use this method.
The second method consists of passing your JDBC driver as a parameter to the initialization string using the -D option as follows –
java -D jdbc.drivers=org.postgresql.Driver example.ImageViewer- Connecting to the database – Now is the time to connect to the database. JDBC applications utilize a URL (Uniform Resource Locator) to represent the database, and when working with the PostgreSQL database, this URL can take one of three forms.
jdbc:postgresql:databaseName
jdbc:postgresql://hostName/databaseName
jdbc:postgresql://hostName:portNumber/databaseName
where
the hostName is localhost by default, and if remote is the Ipv6 address of the machine.
port-number is the socket/port address which is by default 5432 for PostgreSQL.
DatabaseName is the name you want to connect to for your JDBC application.
Finally, you can now connect using the statement.
Connection dbConnectionObject= DriverManager.getConnection(url, username, password);- The last step is closing your JDBC connection once you are done with performing all your database-related manipulations, which can be done by closing your Connection object as follows –
dbConnectionObject.close();Example of Postgres Connect to Database
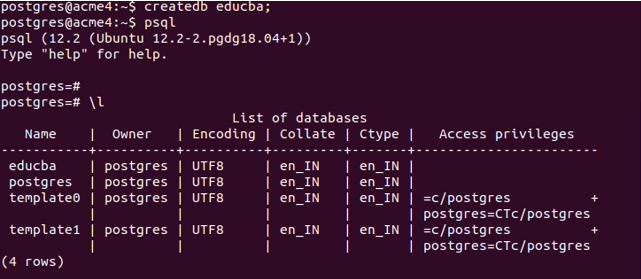
Let us consider one example of a JDBC application with PostgreSQL. We will first need to create a database in our PostgreSQL database server for this. We will create an educba database and connect to it using our JDBC program in Java.
createdb educba;Output:
Create a new file named EducbaJdbcExample .java which will contain a program like this –
import java.sql.Connection;
import java.sql.DriverManager;
import java.sql.SQLException;
public class EducbaJdbcExample {
public static void main(String[] args) {
try (Connection myConnection = DriverManager.getConnection(
"jdbc:postgresql://127.0.0.1:5432/educba", "postgres", "a")) {
if (myConnection != null) {
System.out.println("Successfully connected to educba database!");
} else {
System.out.println("Sorry!Failed to establish JDBC connection");
}
} catch (SQLException e) {
System.err.format("Current SQL status: %s\n%s", e.getSQLState(), e.getMessage());
} catch (Exception e) {
e.printStackTrace();
}
}
}
The first three statements in our program are for importing the packages required for using the JDBC-related methods. The next thing is that we are trying to establish the connection with our PostgreSQL using the following statement –
Connection myConnection = DriverManager.getConnection(
"jdbc:postgresql://127.0.0.1:5432/educba", "postgres", "a")
where 127.0.0.1 stands for localhost, i.e., same machine address, and 5432 is the PostgreSQL port, and I want to connect to the educba database name, and my username and password are ‘a’ and ‘a’, respectively. Here, I have inserted this statement in try because if any exception arises while establishing the connection, it will give an immediate exception and display the message related to the exception. The message “Successfully connected to educba database!” will be displayed if the connection is established. Otherwise, the message “Sorry! Failed to establish JDBC connection” will be shown.
After saving, compiling, and running the application, if it gives the exception like the following –

If you are using Eclipse IDE, creating a Java class file for your program, and right-clicking your file ->Run As -> Java application option, you can run your program. In that case, it will give the following output. This occurs because we have not downloaded any JDBC driver file for PostgreSQL in our current project.
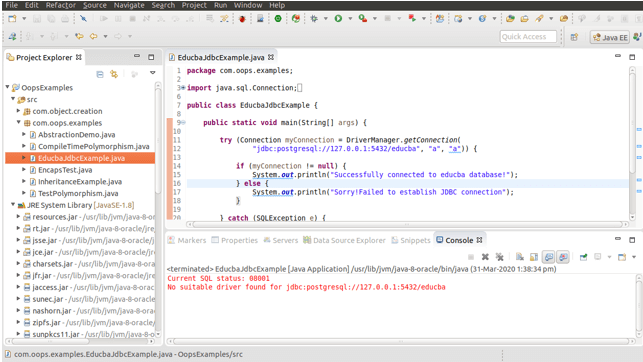
This occurs because the JDBC driver is not loaded. In such applications, we must manually load our JDBC driver using cp. For this, it is required that your program EducbaJdbcExample .java and the downloaded jar file of JDBC driver for PostgreSQL are stored in the same path if you are running through the command line or you have imported jar file in your current project if you are using Eclipse IDE as follows –
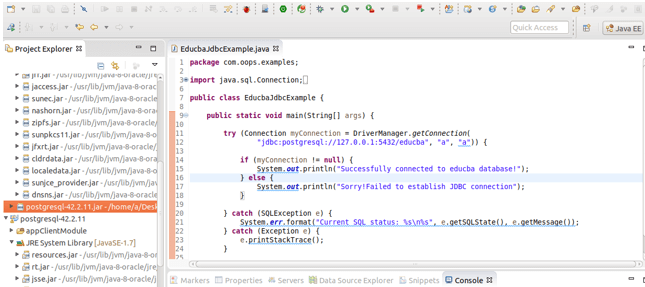
Then you can run your application as a Java application if you are using eclipse –
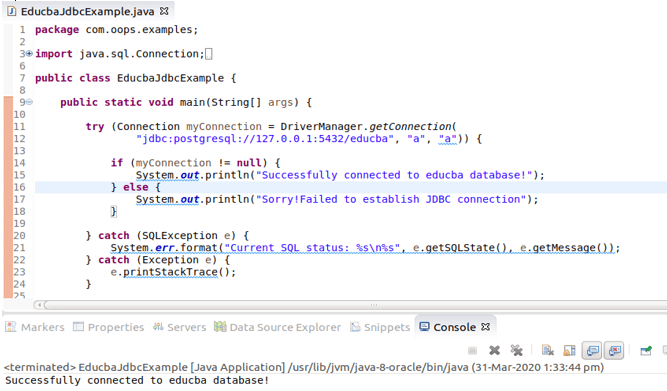
As we can see, the message “Successfully connected to educba database!” is now displayed on the console, indicating that we are directly connected to our database.
We can connect with our PostgreSQL database from our Java application by correctly following all the above steps.
Recommended Articles
We hope that this EDUCBA information on “Postgres Connect to Database” was beneficial to you. You can view EDUCBA’s recommended articles for more information.
