Table of Contents
Why Use Macros to Print Narrow Margins?
Narrow margins are margins we add to a document to fit more content or data on a page or create a particular style. Printing narrow margins with macros means using an automated sequence of commands to change or set the margins, i.e., the space at the four sides of a document.
We can use this for any application, such as MS Word or a spreadsheet. Creating a narrow margin using macros is helpful because it automates the process, saving time and ensuring overall consistent formatting.
In this article, you will learn how to add a narrow margin to your Excel sheet using macros.
How to Add Narrow Margin Using Macros?
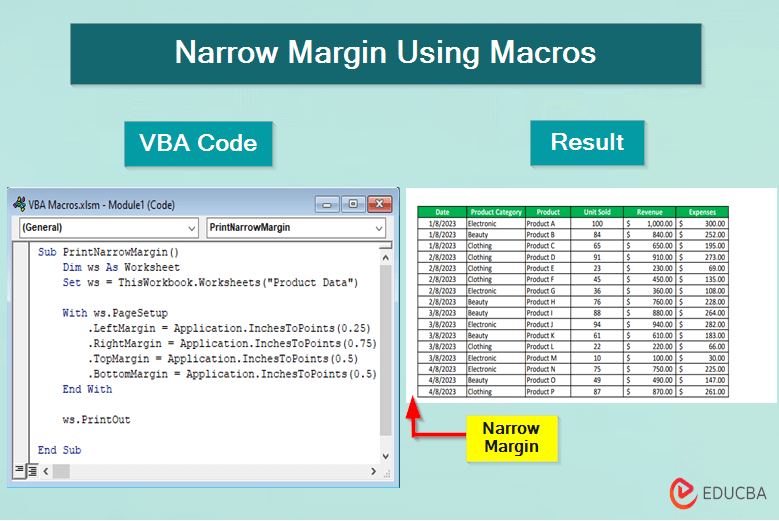
Imagine you work in a corporate environment. You and your team regularly deal with large datasets you need to print neatly with specific margin settings. The margin must be 0.25 inches at the left, 0.75 inches at the right, and 0.50 inches at the top & bottom. Let’s find out how to do that using macros:
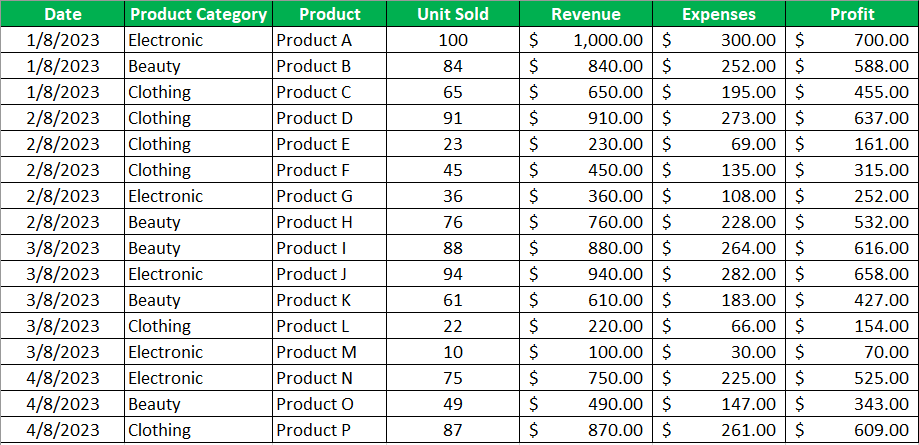
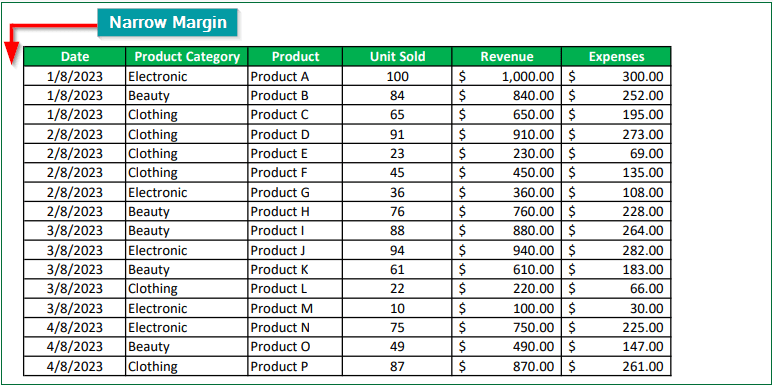
Given Data Table:
Step 1: Open the Microsoft Excel sheet that has the data. For example, let’s say the sheet name is “Product Data”.
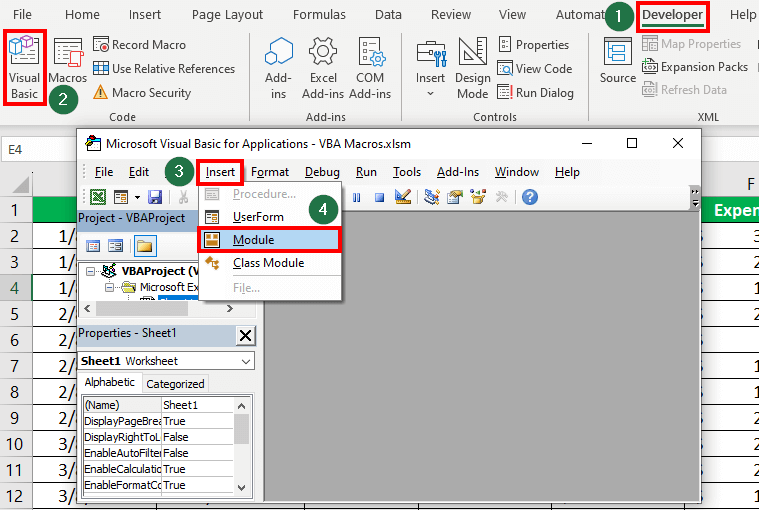
Step 2: Insert a New Module by following these steps,
- Go to the Developer tab on the ribbon.
- Click on the Visual Basic This opens the Visual Basic for Applications (VBA) editor.
- Click on the Insert option
- Select
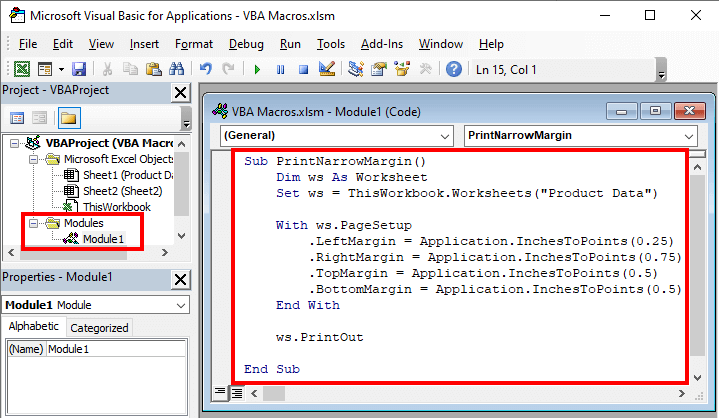
Step 3: Copy and Paste the Macro Code
Code:
Sub PrintNarrowMargin()
    Dim ws As Worksheet
    Set ws = ThisWorkbook.Worksheets("Product Data")
    With ws.PageSetup
        .LeftMargin = Application.InchesToPoints(0.25)
        .RightMargin = Application.InchesToPoints(0.75)
        .TopMargin = Application.InchesToPoints(0.50)
        .BottomMargin = Application.InchesToPoints(0.50)
    End With
    ws.PrintOut
End Sub
Paste the above macro code in the new module as seen below:
Step 4: Close the editor and open your Excel sheet.
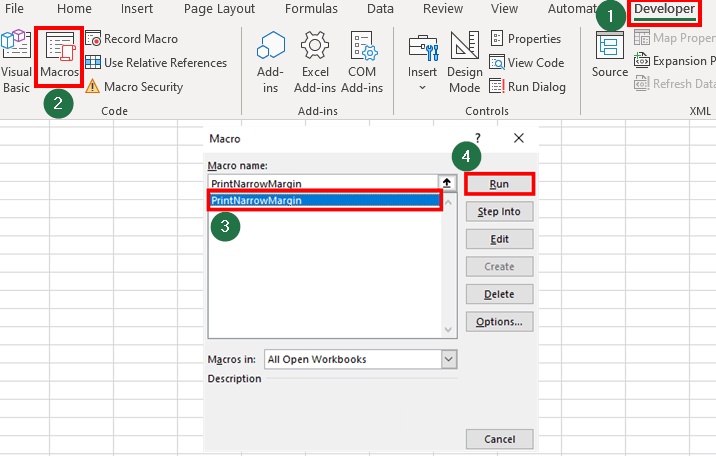
Step 5: Follow these steps to run the macro,
- Open the Developer tab
- Click on Macros in the Code
- Select the PrintNarrowMargin option in the Macro dialog box.
- Click the “Run”
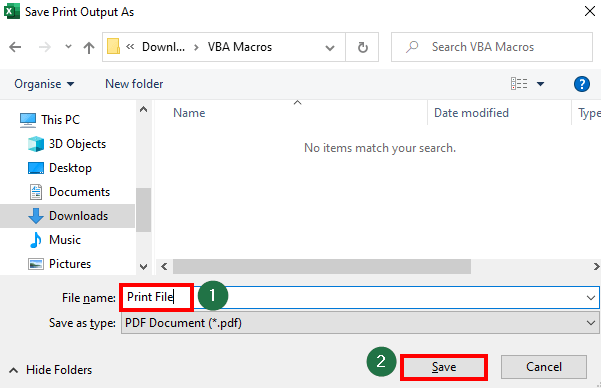
Step 6: Once you click on the run button, a dialog box will appear to save the output.
- Give your file a name
- Click “Save”.
Result:
The macro will execute, and the selected worksheet will print with narrow margins.
Tips
1. Backup Original Settings
Before applying the narrow margins with the macro, back up the original margin settings, so you can easily revert if needed.
2. Adjust Margins as per Document Type
Consider the type of document you are creating. For instance, a slightly wider margin might be appropriate for formal documents like reports or academic papers.
3. Maintain Margin Consistency
Maintain consistency in the use of narrow margins across your documents. Ensure that the macro applies the desired margin settings throughout the document consistently.
4. Add Logical Page Breaks
Pay attention to page breaks when using narrow margins. Adjust your macro to ensure that page breaks occur in logical places and don’t disrupt the flow of content.
5. Ensure Graphics Fit the Margins
If your documents contain tables, charts, or graphics, ensure that they fit well within the narrower margins. Modify their sizes if necessary to avoid overlapping with text.
6. Proofread the Final Document
After applying narrow margins using macro, carefully proofread the document. Sometimes, adjustments might be needed to ensure that the text layout looks clean and professional.
Frequently Asked Questions (FAQs)
Q1. Are there pre-existing macros available for adding narrow margins?
Answer: Some software communities or websites might provide ready-to-use macros for adding narrow margins. However, we recommend creating your own macros tailored to your specific needs and document style.
Q2. Can I customize macros for different margin widths?
Answer: Yes. When creating a macro, you can use any margin width. This makes the macro flexible and reusable for various document types.
Q3. What if I am not familiar with programming or macro languages?
Answer: While some basic programming knowledge can be helpful, you don’t need to be an expert. This article should be enough among several resources available online as it contains detailed information on how to add a macro for margins.
Recommended Articles
This is a comprehensive and stepwise article on how to add a narrow margin using macros in Excel. With supporting screenshots, we have made the process simpler for you. You can learn more by referring to the following articles.
